Introduction: The Truth About Upcycling and Creative Salvage
Upcycling and creative salvage are more than just buzzwords—they’re cornerstones of a movement that blends craftsmanship, environmental stewardship, and resourcefulness. Yet, for newcomers and even seasoned tinkerers, myths abound. Is it really cheaper to restore than to buy new? Can anyone safely tackle restoration projects, or is it a job for professionals only? Does upcycling actually make a difference, or is it just a trendy hobby? These questions—and the persistent misconceptions behind them—can discourage would-be salvagers from picking up their first chisel or scouring the curb for hidden gems.
In this in-depth guide, we’ll dismantle the most common myths about upcycling and creative salvage. Whether you’re eyeing a battered dresser, a pile of old fence boards, or a box of mismatched hardware, understanding the realities of sustainable restoration empowers you to create, save money, and contribute to a greener world. Let’s separate fact from fiction so you can start (or deepen) your upcycling journey with confidence, clarity, and creativity.
Myth 1: Upcycling Is More Expensive Than Buying New
Breaking Down the Cost Equation
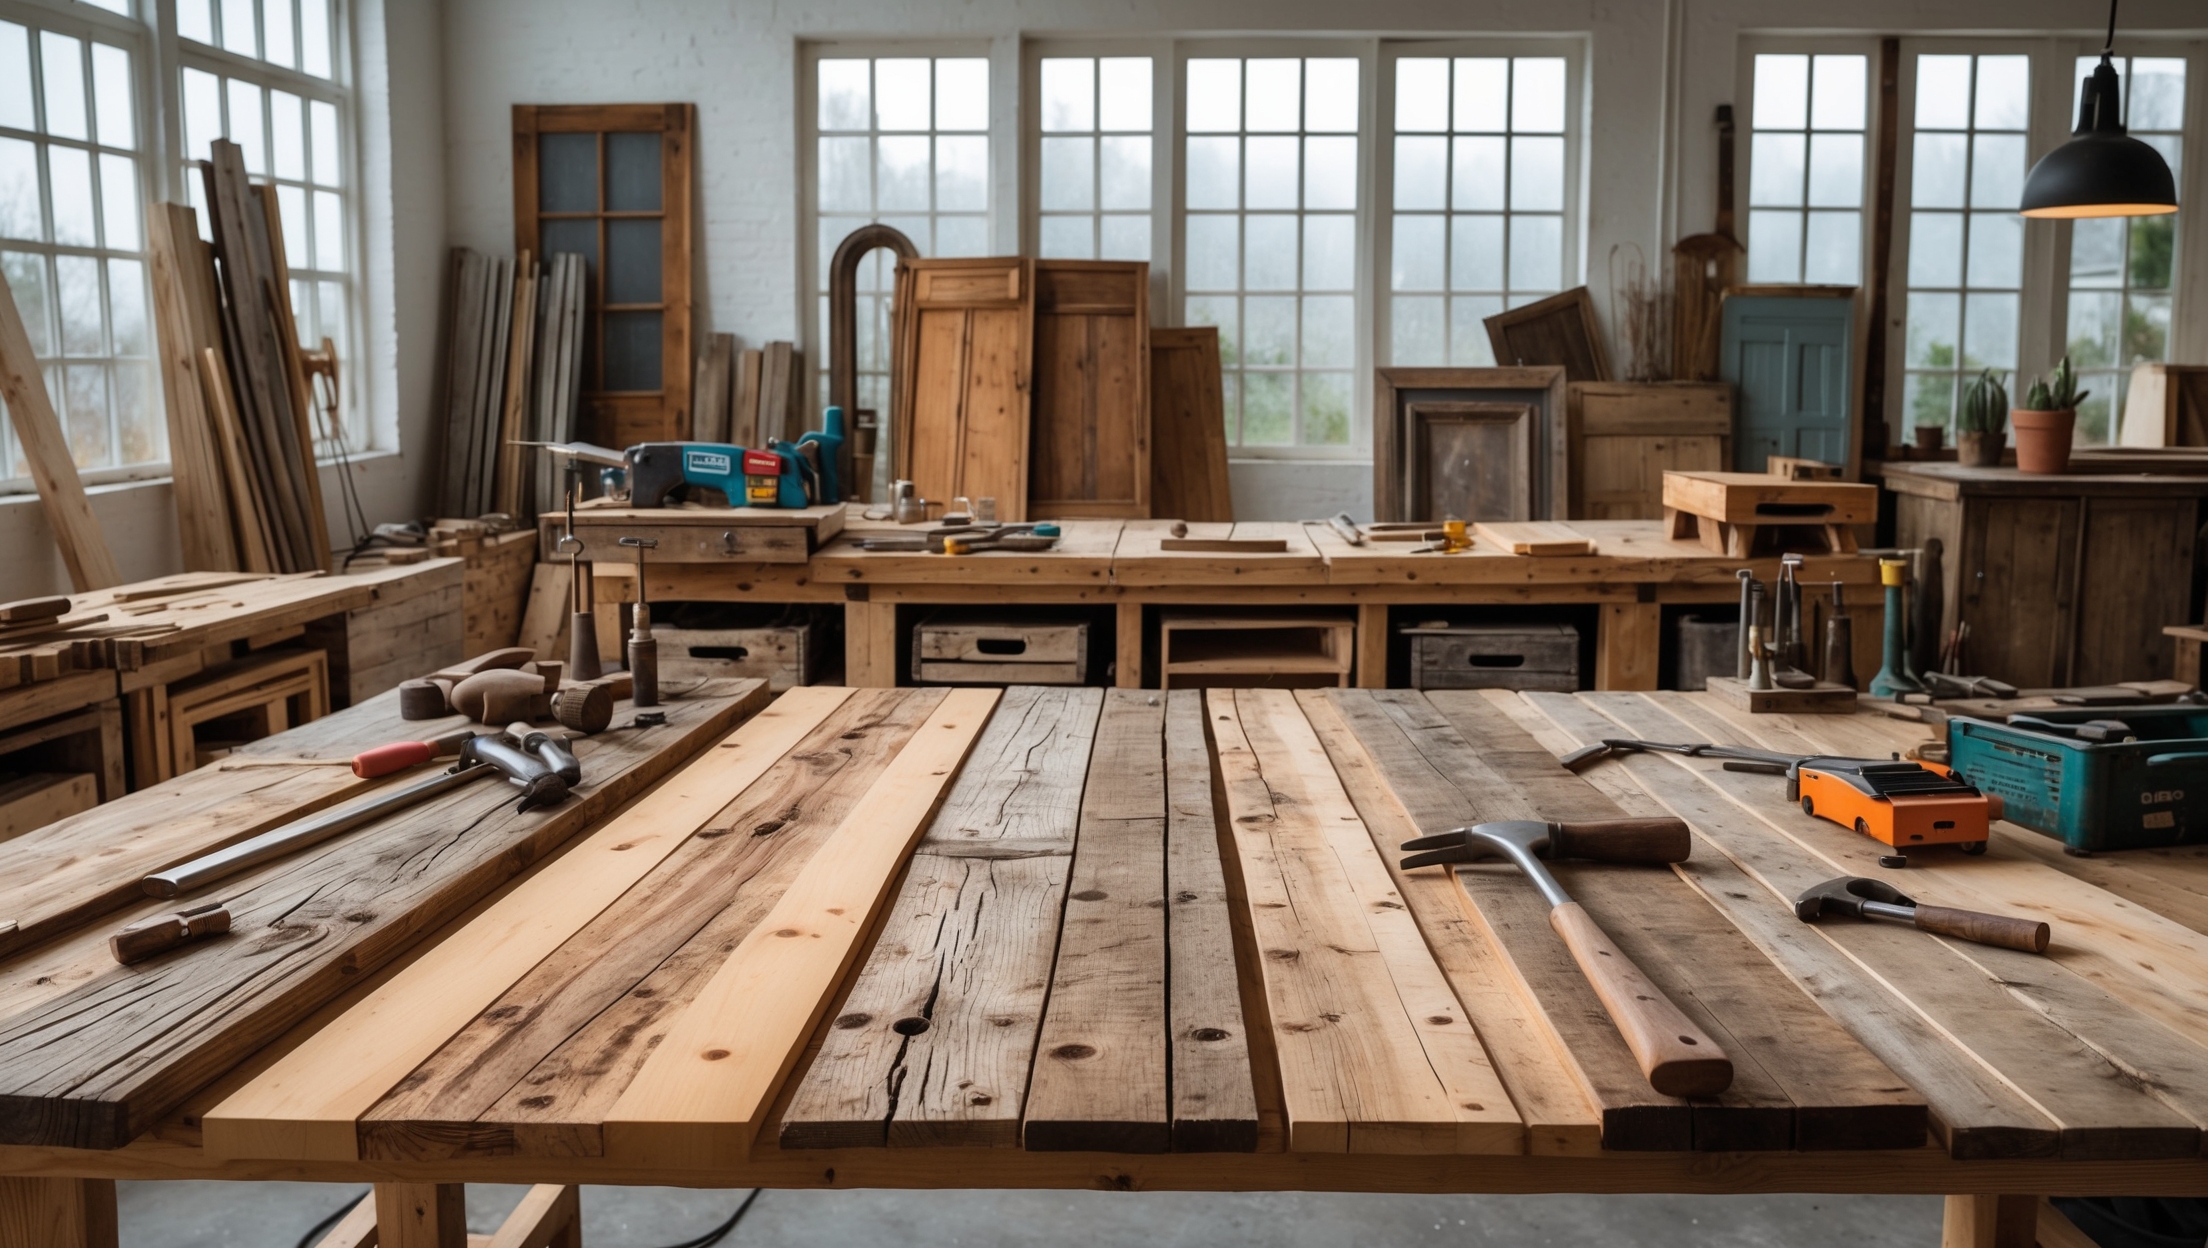
One of the most stubborn myths about upcycling is that it’s more costly than simply purchasing new furniture or décor. The reality is nuanced. While some initial investments—such as basic tools or safety gear—are necessary, ongoing costs are typically far lower than retail prices for comparable new items, especially when you factor in material quality and uniqueness.
- Material Sourcing: Salvaged materials are often free (curbside finds, construction site leftovers, donations) or inexpensive at thrift stores and architectural salvage yards.
- Tool Investment: Basic restoration tools (sanders, brushes, sealants) are a one-time cost and can be reused across projects.
- Long-Term Value: Upcycled pieces are often sturdier and longer-lasting than mass-produced goods, saving money over time.
The key is smart budgeting and knowing when to invest or improvise. Reusing and repurposing can be one of the most budget-friendly ways to furnish or decorate a space.
Myth 2: Upcycling Is Only for Artistic or Handy People
Skill Levels and Learning Curves
It’s easy to feel intimidated by Instagram feeds full of flawless upcycled furniture and intricate restoration projects. But upcycling isn’t just for the artistically gifted or the tool-savvy. In fact, the barrier to entry is much lower than many believe:
- Beginner-Friendly Projects: Simple tasks like repainting, adding new hardware, or reusing jars as storage require minimal skill.
- Online Tutorials: A wealth of step-by-step guides and videos are available for virtually every project type and skill level.
- Community Support: Local workshops, maker spaces, and online forums make it easy to ask questions and get advice.
Upcycling is about learning as you go. Every project adds to your confidence and toolkit, regardless of where you start.
Myth 3: Upcycled Items Are Flimsy or Poor-Quality
Assessing Durability and Material Strength
Some skeptics believe that upcycled goods are inherently less reliable than newly manufactured ones. In reality, many salvaged materials—especially hardwoods, solid metals, and vintage hardware—are superior to their modern equivalents. Here’s why:
- Material Quality: Older furniture and fixtures were often built from solid, high-grade materials no longer common in mass production.
- Restoration Techniques: Proper prep and finishing (cleaning, sanding, sealing) restore strength and longevity to salvaged pieces.
- Customization: You control the process, ensuring repairs are thorough and finishes are durable.
When done correctly, upcycled items can easily outlast cheap, store-bought alternatives—combining character with resilience.
Myth 4: Upcycling Isn’t Actually Sustainable
The Environmental Impact of Creative Salvage
Some critics argue that the environmental benefits of upcycling are overstated. However, numerous studies and real-world examples show otherwise:
- Waste Reduction: Upcycling keeps large, bulky items out of landfills, extending their useful life.
- Resource Conservation: Reusing materials means fewer new resources (wood, metals, plastics) are extracted and processed.
- Carbon Footprint: Upcycled goods require far less energy than manufacturing and shipping new products.
Even small-scale projects add up. Every salvaged chair, shelf, or fixture reduces your household’s environmental footprint.
Myth 5: Upcycling Is Dangerous and Involves Hazardous Materials
Safety, Hazards, and Practical Precautions
The idea that upcycling is inherently risky discourages many who might otherwise enjoy the craft. While safety is crucial, most hazards can be mitigated with straightforward precautions:
- Lead Paint and Asbestos: Older items may contain hazardous substances. Test and, if necessary, consult professionals for removal.
- Tool Safety: Use basic protective gear (gloves, goggles, masks), and follow manufacturer instructions for all equipment.
- Proper Ventilation: Work in well-ventilated areas, especially when sanding or using solvents and finishes.
With a sensible approach and a few safety basics, upcycling is as safe as any DIY hobby.
Myth 6: Upcycling Is Time-Consuming and Impractical for Busy People
Managing Time and Project Scope
Many believe that upcycling demands weeks of effort and endless weekends. In reality, project size is entirely up to you:
- Quick Wins: Projects like refinishing a small table, creating storage from crates, or updating hardware can be completed in a single afternoon.
- Batch Processing: Prepping several items at once (cleaning, sanding, priming) saves time and keeps momentum.
- Flexible Workflow: Upcycling fits into your schedule—work in short bursts or dedicate a weekend for larger undertakings.
By setting realistic goals and breaking projects into bite-sized steps, upcycling becomes a fulfilling, manageable hobby for even the busiest schedules.
Myth 7: There’s No Market for Upcycled Goods
Understanding Demand and Value
Some believe upcycled goods are hard to sell, or that there’s no demand for restored or repurposed items. The facts paint a different picture:
- Growing Consumer Interest: As sustainability awareness rises, so does the demand for upcycled, one-of-a-kind pieces.
- Platforms and Venues: Online marketplaces, local fairs, and pop-up shops make it easier than ever to reach buyers.
- Storytelling Value: The narrative behind each piece—its history, transformation, and eco-impact—adds to its appeal.
Whether as a side hustle or full-time business, upcycling has a robust and growing marketplace.
Myth 8: Only Certain Materials Are Worth Salvaging
Expanding Your Material Horizons
Some upcyclers limit themselves to wood or metal, believing other materials aren’t worth the effort. In reality, many overlooked items can be creatively and sustainably reused:
- Glass: Old bottles, jars, and windows can become vases, storage, or even lighting fixtures.
- Textiles: Vintage linens, curtains, and clothing can be repurposed into upholstery, tote bags, or wall art.
- Ceramics and Tiles: Broken ceramics make unique mosaics, and surplus tiles can be used for coasters or garden paths.
With imagination and a willingness to experiment, almost any material can find new life through upcycling.
Myth 9: Upcycling Requires a Dedicated Workshop
Making the Most of Small or Shared Spaces
Not everyone has a garage or basement to dedicate to creative salvage. The good news is, you don’t need one. Many upcycling projects can be tackled in small apartments, balconies, or even outdoors on a fine day:
- Portable Tools: Hand tools, compact sanders, and folding workbenches fit easily into closets when not in use.
- Protective Solutions: Drop cloths and cardboard protect floors and furniture during in-home projects.
- Outdoor Options: Weather permitting, patios, driveways, and parks are great places to sand, paint, or assemble projects.
Upcycling adapts to your living situation—no warehouse required.
Myth 10: Upcycling Is Just a Trend
The Enduring Value of Creative Salvage
Dismissed by some as a passing fad, upcycling has actually been practiced for centuries under various names—repair, restoration, resourcefulness. The difference today is our heightened awareness of environmental impact and personal consumption.
- Historical Roots: Our grandparents and great-grandparents routinely repurposed and repaired out of necessity.
- Modern Relevance: Today’s upcycling blends old-school thrift with modern aesthetics, creating lasting value.
- Community and Legacy: Upcycled pieces often become heirlooms, carrying stories and meaning through generations.
Upcycling is a philosophy, not a fleeting style. Its principles—waste reduction, creativity, stewardship—are timeless.
Conclusion: Empowered Upcycling Through Informed Choices
Creative salvage and upcycling are gateways to a more sustainable, personalized, and rewarding lifestyle. By dispelling persistent myths, you can approach your next project with realistic expectations, practical know-how, and a sense of adventure. Upcycling isn’t about perfection or professional credentials; it’s about giving materials new purpose, reducing waste, and expressing your unique vision in the process.
Whether you’re transforming a battered chair, reinventing glass jars, or salvaging architectural elements, remember that every small effort counts. The journey is as important as the result—each project teaches new skills, saves resources, and tells a story. Don’t let misconceptions hold you back. With the facts in hand, you’re equipped to create, restore, and inspire in ways that make a real difference for your home, community, and the planet.
Ready to start? Begin with what you have, stay curious, and let creativity guide you. The world of upcycling and creative salvage is wide open—and the only limit is your imagination.

When weighing the initial investment in tools against potential long-term savings, how soon do most people actually start to see a return by upcycling instead of buying new? Is there a realistic break-even point for beginners?
Most beginners who invest in basic upcycling tools tend to see a return within a few projects—usually after three to five completed items. The break-even point depends on how much you spend on tools and the value of what you upcycle, but many people notice savings within the first few months if they regularly upcycle instead of buying new. Starting with simple, low-cost projects helps speed up the return.
I’m just getting started with upcycling and was surprised to read that basic tools are a one-time cost. Can you share what minimum set of tools I’d actually need for my first couple of small furniture projects, and whether there are any budget-friendly alternatives?
To start small furniture upcycling projects, you’ll want a tape measure, screwdriver set, hammer, sandpaper or sanding block, paintbrushes, and a basic drill. These tools cover most beginner tasks. For budget-friendly options, consider borrowing tools from friends, checking local tool libraries, or buying secondhand at thrift stores. You don’t need everything at once—just pick up what each project requires.
You mention that salvaged materials are often free or cheap, but I’ve found that sourcing quality pieces in my area can be competitive. Do you have tips for finding reliable sources of salvage materials for small businesses, especially in places where they’re in high demand?
It can definitely be challenging to source good salvage materials when demand is high. Try reaching out directly to local demolition companies or contractors, as they sometimes have leftover materials they’re willing to sell or give away. Networking with other small businesses or joining local online groups focused on reuse can also help you learn about new opportunities quickly. Visiting salvage yards regularly and letting staff know what you’re looking for can give you a heads-up when new stock arrives.
I see that salvage yards and thrift stores can be good sources for inexpensive materials, but how do you make sure the salvaged wood or hardware is safe and in good enough shape for a restoration project?
When choosing salvaged wood or hardware, check for signs of rot, mold, or insect damage, and avoid pieces with deep cracks or warping. Clean everything thoroughly and consider sanding or treating wood to remove old finishes or contaminants. For hardware, look for rust or structural damage, and test moving parts. If unsure, consult a professional or use materials from reputable salvage suppliers with clear histories.
You mentioned that salvaged materials can often be found for free or really cheap. Are there any tips for beginners on how to find good quality materials without accidentally picking up stuff that’s unsafe or not worth restoring?
Start by looking at local classifieds, community boards, and construction sites where offcuts are often free—always ask permission first. Inspect materials for signs of mold, rot, or pests, and avoid anything with peeling paint if you can’t verify it’s lead-free. Sturdy, solid wood or metal is usually a safe bet. If you’re unsure, do a quick online search about the material before taking it home.
I’m new to upcycling and noticed you mentioned basic restoration tools as a one-time investment. Could you give some examples of the essential starter tools I’d need for typical projects like furniture or home decor, and an idea of what I might expect to spend to get started?
For beginner upcycling projects like furniture or home decor, some essential starter tools include a hammer, screwdrivers, pliers, a measuring tape, a hand saw or jigsaw, a power drill, sandpaper, paintbrushes, and a staple gun. You might also want a basic set of clamps. For most decent-quality entry-level tools, you can expect to spend about $100 to $200. Many of these tools will last for years and cover a broad range of projects.
For someone just starting out with minimal tools, is it possible to upcycle larger furniture items without needing to invest much up front, or are certain projects better suited for beginners on a budget?
It’s definitely possible to upcycle larger furniture items without a big upfront investment, especially if you start with simple projects. Look for pieces that need minimal repairs, like a wooden chair or side table. Basic tools such as sandpaper, a screwdriver, and paintbrushes are usually enough for beginner projects. As you gain confidence, you can try more complex pieces and gradually add to your toolkit.
I was surprised to read that upcycled pieces can actually end up sturdier than mass-produced goods. For resale, how can I determine if a salvaged item is worth restoring in terms of both durability and potential profit, especially if I don’t have much experience yet?
When assessing a salvaged item for resale, start by checking its basic structure—look for solid joints, good materials like hardwood, and any signs of rot or damage. Research what similar restored items sell for to gauge possible profit. If you’re new, start small and track the time and costs involved in each project to better understand your potential return as you gain experience.
Can you share some tips on how to find quality salvaged materials without spending a lot of time or money? Are there certain places or types of items that usually offer the best value for new upcyclers trying to minimize their budget?
To find quality salvaged materials affordably, start with local thrift stores, yard sales, and community swap events, as these often have hidden gems at low prices. Check online marketplaces for items people are giving away. Construction sites and remodeling projects sometimes offer scrap wood or fixtures if you ask politely. Look for solid wood furniture, glass jars, and sturdy fabrics, as these tend to be versatile and easy to upcycle. Building relationships with local businesses can also lead to ongoing sources of materials.
I’m interested in starting with upcycling, but I’m not sure how to tell if an old piece, like a dresser from the curb, is worth the effort to restore. Are there signs or criteria you recommend for deciding what’s salvageable and what’s not?
When assessing an old piece like a curbside dresser, check for solid wood construction, sturdy joints, and minimal water damage or rot. Avoid items with extensive mold, deep cracks, or warped frames, since these are harder to fix. Drawers should slide well and hardware should be mostly intact. If the structure feels stable and the flaws look cosmetic (like scratches or faded paint), it’s usually a good candidate for upcycling.
You discuss the upfront investment in basic restoration tools. For someone just starting out, what would a realistic budget look like to cover both tools and initial safety gear, and are there affordable alternatives for people on a tight budget?
For beginners, you can start with a basic toolkit and essential safety gear for around $50 to $100 if you shop smart. Look for sales, secondhand stores, or borrow tools if possible. Essential items include a hammer, screwdrivers, sandpaper, dust mask, gloves, and safety glasses. Many community workshops also offer tool lending programs, making it easier and more affordable to get started with upcycling.
I get that basic restoration tools are a one-time investment, but for someone just starting out, is it possible to put together a reliable toolkit on a tight budget? Are there any specific tools you’d recommend buying used or borrowing at first?
You can definitely assemble a reliable upcycling toolkit on a tight budget. Essential items like sandpaper, screwdrivers, and paintbrushes are often affordable new. For bigger tools such as power drills or saws, buying used or borrowing from friends or tool libraries is a smart move. Start with the basics and add specialized tools as your projects become more advanced.
I’m still a bit unsure about the initial investment you mentioned for upcycling tools and safety gear. Do you have any tips on assembling a beginner’s toolkit without overspending, or maybe a list of must-have tools for someone just starting out?
For beginners, it’s smart to start with a few basic tools: a hammer, screwdrivers, pliers, a handsaw, a tape measure, and sandpaper. For safety, pick up protective goggles and work gloves. Many hardware stores sell affordable starter kits, or you can find quality used tools at thrift shops. Start small, add as you go, and only buy what your first projects need.
I’m interested in the claim that upcycled pieces are often longer-lasting and sturdier than mass-produced furniture. Are there particular materials or types of salvaged items that are more durable, and how can beginners identify them during the sourcing process?
Upcycled pieces can be sturdier, especially when made from solid woods like oak, maple, or walnut, as these older materials often have better craftsmanship and denser construction compared to today’s particleboard furniture. When sourcing, look for furniture with dovetail joints, sturdy frames, and minimal warping. Avoid pieces with visible damage or rot. Starting at thrift stores or estate sales can help you find high-quality items to upcycle.
I get that tool investment is mostly a one-time thing, but are there certain tools you’d recommend absolutely buying versus ones you could maybe borrow if you’re new to upcycling? What’s the best way to keep upfront costs low for beginners?
For beginners, it’s wise to buy essential hand tools like a hammer, screwdriver set, measuring tape, and a basic saw, since you’ll use them often. Specialty tools like power sanders or staple guns can usually be borrowed or rented at first. To keep upfront costs low, check local tool libraries, ask friends or family to borrow items, and look for secondhand tools at thrift stores or garage sales.
You talk about upfront investments in basic tools for upcycling, but I’m curious how quickly those costs are typically offset. For someone just starting out, do you have any advice on which tools are truly essential to buy first and which ones can wait until you take on more advanced projects?
Upfront tool costs for upcycling are often offset pretty quickly if you regularly take on small projects—sometimes within just a few projects, especially if you’re repurposing free or low-cost items. For beginners, focus on essentials like a good screwdriver set, measuring tape, basic saw, hammer, and safety gear. Specialty tools like power sanders or staple guns can usually wait until you tackle bigger or more complex projects.
If upcycled furniture is usually sturdier and longer-lasting than new mass-produced options, how can someone tell if a salvaged item is actually worth restoring, or if it’s better to pass on it due to hidden damage or required repairs?
When considering salvaged furniture, check for signs of solid construction like sturdy joints, real wood rather than particle board, and minimal wobbling. Look for obvious damage such as deep cracks, warped wood, or evidence of woodworm. If repairs would require specialized tools or skills you don’t have, it might be best to pass. However, minor surface scratches or cosmetic flaws are usually easy to fix and shouldn’t be dealbreakers.
I run a small furniture shop and am interested in upcycling curbside finds, but I’m worried about the initial tool investment mentioned in the article. Are there any recommended starter kits for basic restoration, or is it better to buy tools individually as needed?
If you’re just starting out, a basic restoration starter kit can be a good value, as it usually includes essentials like sandpaper, a putty knife, brushes, and sometimes a staple gun. However, many shop owners find it more practical to buy tools individually as projects demand—this way, you only invest in what you actually use and can upgrade quality over time. Consider starting with the basics and expanding as your needs grow.
I’m intrigued by the idea that upcycled furniture can be sturdier than new mass-produced items. Could you share some tips on how to evaluate salvaged materials for quality before committing to a restoration project?
When evaluating salvaged materials, check for solid wood rather than particleboard, as it’s generally stronger and more durable. Inspect for signs of rot, insect damage, or deep cracks, especially around joints and stress points. Look for well-made joinery, like dovetails or mortise and tenon connections, which indicate higher craftsmanship. Give pieces a gentle shake to test for stability, and avoid anything with a musty odor that could signal mold. Taking time to assess these factors will help ensure your upcycled project starts with quality materials.
I noticed the article talks about initial investments in basic tools for upcycling. For someone just starting out, could you elaborate on which tools are truly essential versus those that can wait until later projects?
For beginners in upcycling, the essential tools usually include a good pair of scissors, a utility knife, a measuring tape, screwdrivers, a paintbrush, and maybe a basic hammer. Things like power drills, specialty saws, or advanced painting equipment can be added later as your projects become more complex. Start simple and expand your toolkit as you gain experience and confidence.
I’m interested in upcycling but I’m concerned about the time commitment compared to just buying something new. Based on your experience, how much extra time does a typical restoration project take for a beginner, and are there ways to keep a project manageable?
For beginners, an upcycling project can take anywhere from a few hours to several weekends, depending on the item’s size and your chosen design. To keep things manageable, start with small projects like picture frames or stools. Plan your steps before you begin, gather all materials in advance, and keep your workspace organized. This way, you can enjoy the process without it feeling overwhelming.
I get that basic restoration tools are a one-time investment, but for someone just starting out, how much should I realistically budget for the essential tools and safety gear before upcycling actually becomes cheaper than buying new furniture?
For beginners, budgeting around $100 to $200 is usually enough to cover essential upcycling tools like screwdrivers, a sander, basic saws, paintbrushes, and safety items such as gloves and goggles. Quality secondhand tools can help lower costs. After this initial outlay, your expenses mostly go toward materials, making upcycling increasingly cost-effective with each project.
When you talk about salvaged materials being cheap or even free, do you have tips on where parents with limited time can reliably find quality items for upcycling? I love the idea, but I worry about the time commitment to hunting down good materials.
For busy parents, local resources like neighborhood Facebook groups, Buy Nothing groups, and community recycling events can be great ways to find upcycling materials quickly. Many schools or libraries also host occasional swap events. Thrift stores often organize items for easy browsing, and some even have discounted crafting supplies. Setting a specific list of materials and asking friends or family to keep an eye out can also save you time.
I’m curious about the safety aspect mentioned in the introduction. Are there certain upcycling or restoration projects that are actually too risky for beginners to try on their own, and if so, what kind of projects would those be?
Yes, some upcycling or restoration projects can be risky for beginners. Projects involving old paint that may contain lead, electrical repairs, or working with items like pallets that could have been treated with chemicals should be approached with caution or left to professionals. It’s also best to avoid using power tools with limited experience. Always research materials and techniques before starting a project to ensure safety.
You mention that salvaged materials are often free or really cheap, but I’ve noticed some places like architectural salvage yards can be expensive for specific pieces. Any tips on how to consistently source good quality materials without breaking the bank?
You’re right—some salvage yards can be pricey, especially for in-demand or unique items. To keep costs down, try checking local classifieds, community swap groups, or even curb alerts for freebies. Habitat for Humanity ReStores, demolition sites (with permission), and auctions are also worth exploring. Building relationships with contractors or renovation crews can sometimes lead to early access to discarded materials before they hit the market.
I’m curious about the durability of upcycled pieces compared to new, mass-produced furniture. Can you share examples or tips on how to ensure salvaged items actually last longer, especially when using free or reclaimed materials?
Upcycled furniture can be just as durable, if not more so, than mass-produced pieces, especially if you choose strong reclaimed materials like solid wood or metal. Pay attention to joints and reinforcements—use wood glue, screws, or brackets instead of just nails. Sanding and sealing surfaces with quality finishes will protect against wear. Vintage hardware can be replaced with new, sturdy options for extra longevity. Always check for hidden damage in salvaged materials before starting your project.
When it comes to salvaging materials from places like construction sites or curbside, are there any safety or legal issues I should watch out for, especially if I might involve my kids in a small project?
Yes, there are both safety and legal issues to consider when salvaging materials. Always get permission before taking anything from construction sites or curbs, as items may still belong to someone or be protected by local laws. For safety, watch out for sharp edges, nails, or hazardous materials, and make sure kids wear gloves and sturdy shoes. Supervise children closely during any salvaging activity to prevent accidents.
I’m curious about tool investments for beginners—are there certain restoration tools you’d recommend starting with to get the most versatility, especially if you’re trying to keep costs down? Or should newbies consider borrowing or renting before buying?
For beginners in upcycling, it’s wise to start with a few versatile, budget-friendly tools like a good screwdriver set, pliers, a basic hand saw, and a sander. These cover most simple restoration tasks. Borrowing or renting specialty tools, such as power tools or clamps, is a smart way to experiment before investing in pricier equipment. This approach lets you test what you actually use and need as your projects evolve.
The article addresses the notion that upcycling can be more expensive up front due to tool purchases. Could you share some advice on how to prioritize which tools are essential for someone just starting out, so they don’t overspend right away?
When starting with upcycling, it’s smart to begin with just a few basic tools that match the types of projects you want to try. For most beginners, essentials include a good screwdriver set, a hammer, pliers, a measuring tape, and sandpaper. If you need to cut wood or other materials, consider a handsaw. Focus on quality with these basics, and only add specialty tools as you discover what techniques you enjoy most.
You mention that salvaged materials are often free or cheap from places like curbside finds or salvage yards, but how do you make sure the materials you pick up are actually safe or in good enough condition for reuse? Are there certain things to watch out for when sourcing materials this way?
When sourcing salvaged materials, check for signs of mold, rot, pests, and structural damage. Avoid wood with soft spots or a musty smell, and steer clear of anything with peeling paint if you suspect it’s old enough to contain lead. For metal, look for excessive rust or corrosion. It’s also smart to clean and disinfect all salvaged items before bringing them indoors or using them for projects.
You mention that basic restoration tools are a one-time investment, but what would you suggest as the absolute essentials for someone just starting with upcycling, and is there a way to keep those costs down for beginners?
For beginners, the absolute essentials include a hammer, screwdrivers, sandpaper, a measuring tape, paintbrushes, and safety gloves. Start with quality basics rather than specialty tools. To keep costs down, check out secondhand shops, borrow from friends or family, or look for local tool libraries. Many projects can be done with just these few tools, so you can gradually expand your collection as you gain experience.
I’m interested in trying my first upcycling project but worried about the upfront cost of tools. Are there any recommendations for starter kits or essential tools that offer good value without compromising on safety or effectiveness?
Starting out with upcycling doesn’t have to be expensive. For most basic projects, a small toolkit with essentials like a hammer, screwdriver set, pliers, measuring tape, and a utility knife should be enough. Many beginner toolkits are available at hardware stores and offer good value. It’s also smart to include safety gear like gloves and safety glasses. Look for kits labeled for beginners or home use, as they balance quality and cost well.
I’m interested in saving money, but I’m concerned about the time commitment. Roughly how long does a typical upcycling project take compared to shopping for something new, especially if you’re balancing work and kids?
Upcycling projects vary in time depending on complexity, but many simple ones like repainting furniture or adding new hardware can be done in a few hours spread over a weekend. While shopping for something new might be quicker upfront, upcycling can be fit around your schedule and often saves money. If you balance work and kids, try breaking the project into small, manageable steps so it doesn’t feel overwhelming.
You mention that salvaged materials can often be obtained for free or at a low cost from places like construction sites and curbside finds. Are there any legal or safety considerations to keep in mind when collecting materials from these sources, especially for beginners?
Absolutely, there are important legal and safety considerations. Always ask permission before taking materials from construction sites or private property, as taking items without consent can be considered theft. For curbside finds, ensure items are clearly discarded. Safety-wise, wear gloves and sturdy shoes, and inspect materials for hazards like nails, sharp edges, or toxic substances like lead paint. Beginners should research local regulations and prioritize personal safety when salvaging.
You mention that salvaged materials can often be found for free or really cheap at places like thrift stores or construction sites. Are there any tips for finding good quality items if I’m a beginner and don’t really know what to look for?
When starting out, focus on items made from sturdy materials like solid wood, metal, or thick glass, as they’re more durable and easier to work with. At thrift stores, check furniture for wobbling or cracks and test drawers or doors. At construction sites, ask permission before taking anything and look for wood without rot or heavy warping. It helps to bring a tape measure and a flashlight to inspect pieces closely before deciding.
I’m interested in starting some upcycling projects at home, but I’m not sure where to find quality salvaged materials without spending too much time searching. Do you have tips for sourcing good materials locally, especially for someone who’s new to this and on a tight schedule?
Try starting with local thrift stores, community recycling centers, or charity shops, as they often have a steady rotation of items perfect for upcycling. Check neighborhood online marketplaces and apps for free or cheap items nearby—many people give away things like furniture or scrap wood. Also, keep an eye out for curbside discards on bulk trash days. This way, you can gather materials without spending too much time searching.
I’m curious about the initial tool investment. For a small shop just getting started with upcycling, what are the absolute essentials to buy upfront, and can you recommend any ways to keep those startup costs manageable?
For a small upcycling shop, start with essentials like a basic screwdriver set, hammer, measuring tape, utility knife, pliers, a power drill, and some sandpaper. Look for secondhand tools at thrift stores, garage sales, or local online marketplaces to save money. Many communities also have tool libraries where you can borrow items as needed, which really helps keep startup costs low.
I’m curious about the upfront investment for beginners—if I don’t already own basic restoration tools like sanders or brushes, how much should I realistically expect to spend to get started on my first upcycling project?
Getting started with upcycling doesn’t have to be expensive. For basic tools like a sander, brushes, and some paint or varnish, you can expect to spend around $50 to $150, depending on quality and whether you buy new or secondhand. Many beginners start with manual sanding blocks and entry-level brushes to keep costs low, then upgrade as they gain experience.
As someone trying to keep costs down for my business, I’m curious—how do you suggest balancing the upfront investment in tools and safety gear with the ongoing savings on materials? Are there certain tools you recommend prioritizing at first for smaller upcycling projects?
To keep costs manageable, begin with versatile, essential tools like a basic drill-driver, a hammer, and a good set of screwdrivers. For safety, prioritize gloves and safety glasses. These basics support a wide range of small upcycling projects. As your business grows, reinvest some savings from reusing materials into additional tools and upgraded safety gear when needed. This way, you gradually build your toolkit without overspending upfront.
I’m curious about how upcycled items really compare in terms of durability to store-bought furniture. Have you found that projects made from salvaged wood or old hardware actually last longer, or does it depend on the techniques and materials used?
Upcycled furniture can be just as durable, or sometimes even more so, than store-bought pieces, especially when solid salvaged wood or quality old hardware is used. However, the longevity really depends on the skills and methods applied during the upcycling process. Proper preparation, sturdy joinery, and good finishing are key—when done right, upcycled items often outlast mass-produced furniture made with cheaper materials.
You mention that salvaged materials can often be found for free or at low cost from places like thrift stores and construction sites. Do you have recommendations for how beginners can reliably find safe, high-quality materials, especially in regions where salvage options seem limited?
For beginners in areas with limited salvage options, try reaching out to local community groups, online classifieds, or neighborhood apps, where people sometimes give away materials. Always inspect items for signs of mold, pests, or damage. If you’re unsure about safety, especially with construction leftovers, stick to wood, glass, and metal, and avoid anything with unknown paint or finishes. Building relationships with small businesses or contractors can also help you hear about leftover materials before they’re discarded.
You mention that basic restoration tools are a one-time investment, but for someone just starting out, what would you consider the absolute essentials, and is there a way to minimize upfront costs without sacrificing safety?
For beginners, the essentials are typically a screwdriver set, hammer, pliers, measuring tape, and safety gear like gloves and goggles. To keep costs low, consider buying gently used tools or borrowing from friends or community tool libraries. Prioritize safety equipment—never skip on protective gear, even if you’re saving elsewhere.
The article says that basic restoration tools are a one-time investment, but do you have recommendations for which specific tools are essential to start with? Also, how much should someone budget for getting set up if they’ve never upcycled before?
For beginners in upcycling, start with essentials like a hammer, screwdrivers, pliers, a measuring tape, safety goggles, a utility knife, sanding blocks, and a paintbrush set. Optional helpful tools include a cordless drill and a staple gun. For a basic starter kit, budgeting around $50 to $100 is usually enough; higher-quality or specialized tools might increase costs, but you can start small and expand as you gain experience.
I get that salvaged materials can be free or cheap if you know where to look, but sometimes thrift store prices seem high around here. Do you have tips for finding good, affordable sources for wood or hardware that aren’t picked over, especially in urban areas?
Try checking out local construction sites for leftover wood—they often have scrap they’re happy to give away if you ask politely. Community centers, online neighborhood groups, or freecycling forums can be good sources too. For hardware, small independent hardware stores sometimes have clearance bins, and architectural salvage yards can offer unique finds at lower prices than trendy thrift stores. Timing your visits early in the week or after restocks can also help you get the best selection.
I’m curious about the long-term durability of upcycled pieces compared to new ones. Do you have any advice for someone who wants to ensure their restored furniture lasts just as long as something bought from a store? Are there certain materials or finishes that make a big difference?
Upcycled furniture can be just as durable as new pieces if you pay attention to a few key factors. Start with solid, high-quality base materials—solid wood tends to last longer than particleboard or MDF. When restoring, use durable finishes like polyurethane, varnish, or high-quality paint to protect the surface. Reinforce any loose joints and replace worn hardware as needed. Proper care and regular maintenance will also help ensure longevity.
I’m new to DIY projects and wondering about the initial tool investment mentioned. Which basic restoration tools would you recommend starting with if I’m just planning to upcycle small furniture like chairs or nightstands?
For starting out with small furniture upcycling, you’ll find a few basics very handy: a good quality screwdriver set, a hammer, sandpaper or a sanding block, a tape measure, wood glue, clamps, and a paintbrush or small roller. If you want to expand a little, a cordless drill and a putty knife are also useful. These essentials should cover most simple restoration and painting tasks for chairs and nightstands.
Could you elaborate a bit on the kinds of safety gear you consider essential for beginners interested in upcycling? I’m curious if there are specific tools or materials that should be avoided by someone just starting out.
For beginners in upcycling, basic safety gear includes gloves to protect your hands, safety goggles for eye protection, and a dust mask if you’ll be sanding or working with old paint. Closed-toe shoes are also important. As for tools and materials to avoid, steer clear of power tools until you’re comfortable with hand tools, and avoid items with lead paint, mold, or strong chemical odors. Stick to clean, solid wood, glass, or metal at first.
I run a small resale shop and am curious about the actual costs involved in upcycling, especially when it comes to buying tools and materials like paint or hardware. Do you have any tips for keeping those expenses low when just starting out?
To keep upcycling costs low, consider sourcing tools and materials secondhand—thrift stores or local buy-nothing groups can be great for inexpensive finds. Buying paint, brushes, or hardware in bulk often saves money. Also, start small with a basic toolkit and expand as your projects grow. Repurposing leftover materials from previous projects or asking friends for unused supplies can also help reduce expenses.
I’m curious about the costs you mentioned for basic restoration tools. For someone just starting out, what should I expect to spend on quality tools, and are there any essentials that can be safely bought secondhand?
For beginners, you can expect to spend around $60 to $150 on a set of basic, good-quality restoration tools like sandpaper, brushes, a hammer, screwdrivers, and a putty knife. Essentials such as hammers, hand saws, clamps, and even some power tools can often be safely bought secondhand—just check they’re in good working order. Items like sandpaper, wood glue, and paint brushes are best purchased new for best results.
I’m new to upcycling and was curious about the basic tools mentioned. Are there specific starter tools or safety gear you recommend for someone who’s just beginning, and how much should I expect to budget for these upfront costs?
For beginners, basic upcycling tools usually include a sturdy pair of scissors, a hammer, screwdrivers, a measuring tape, sandpaper, and a paintbrush. For safety, consider gloves, protective glasses, and a dust mask if sanding or painting. You can get started with these essentials for around $40–$80, depending on brands and where you shop. Over time, you can expand your toolkit as your projects get more complex.
I’m interested in starting my first upcycling project but am a bit worried about the cost of tools mentioned in the article, like sanders and sealants. Do you have recommendations for which tools are truly essential for a beginner, or where to find them affordably?
For your first upcycling project, you really only need a few basics: a screwdriver, basic sandpaper (instead of a power sander), and a paintbrush. Many hardware stores sell small quantities of sealant and paint, or you can check local buy-nothing groups and thrift stores for affordable supplies. Start simple, and you can always invest in more specialized tools as you gain experience.
You talk about the initial investment in tools for upcycling—do you have advice on which basic tools are worth buying first if someone is on a college budget? Is it possible to get started with just a few essentials and add more over time?
You can definitely start upcycling with just a few essentials, especially on a college budget. A basic toolkit might include a hammer, screwdriver set, measuring tape, pliers, and a utility knife. If you plan to work with wood, a hand saw and some sandpaper are useful. Many projects only need these basics, and you can add specialized tools later as your skills grow and your projects get more ambitious.
You mention that salvaged materials can come from places like construction sites and thrift stores. How do you make sure the materials you find are safe and in good enough condition to use for upcycling projects, especially if you’re just starting out?
When looking for salvaged materials, check for signs of damage, mold, or pests, and avoid items with strong odors or stains. For wood, make sure it’s not warped or rotting. With furniture or textiles, look for sturdy frames and intact fabric. If you’re unsure, start with simple items like glass jars or metal containers and clean everything thoroughly before use. Don’t be afraid to ask staff at thrift stores or salvage yards about the history or condition of items.
You mention that the initial investment in tools can add up, but is there a way to start with just the essentials without overspending? For someone on a tight budget, which tools would you consider absolutely necessary for basic upcycling projects?
Absolutely, you can start upcycling without a big investment. For most basic projects, you’ll only need a few essentials: a hammer, screwdrivers (both flathead and Phillips), a measuring tape, a handsaw, sandpaper, and a paintbrush. These tools cover most beginner projects and are usually affordable. You can also look for secondhand tools at thrift stores or online marketplaces to save even more.
You mentioned that upcycled items are often sturdier than mass-produced goods. Are there specific types of furniture or materials that tend to work better for beginners, especially when it comes to durability and ease of restoration?
Solid wood furniture is usually a great starting point for beginners because it’s durable, forgiving during repairs, and easy to refinish. Old dressers, tables, or chairs made from hardwood often respond well to sanding and painting. Materials like metal or particleboard can be trickier—metal may need special tools and coatings, while particleboard is less sturdy. Stick to sturdy wood pieces for your first upcycling projects.
You mention that salvaged materials can often be found for free or cheap, like from curbside finds or construction leftovers. Are there any tips on how to spot good quality pieces versus stuff that’s unsafe or not worth the effort to upcycle?
When looking for salvaged materials, check for signs of rot, mold, or insect damage, especially in wood. Avoid materials with strong odors or visible contamination. For furniture, make sure it’s sturdy and not warped. With metal pieces, steer clear of excessive rust or sharp edges. Construction leftovers are best if they’re clean and not treated with hazardous chemicals like lead paint or asbestos. Trust your instincts—if something looks unsalvageable or unsafe, it’s better to pass and keep searching.
I see that you talk about initial investments in basic tools for upcycling. If someone wants to try their first project on a tight budget, which tools would you absolutely prioritize, and are there any affordable alternatives to expensive power tools for beginners?
For a first upcycling project on a tight budget, prioritize a good pair of scissors, a utility knife, a tape measure, a screwdriver set, sandpaper, and strong glue. These hand tools are affordable and versatile for many beginner projects. Instead of power tools, consider borrowing or renting if needed, but many small projects can be done well with just these basics.
I’m curious about your mention of basic restoration tools like sanders and brushes being a one-time investment. Do you have recommendations for beginner-level tools that balance affordability and quality for someone just starting out with upcycling a few small furniture pieces?
For beginners, a basic orbital sander is a great choice—they’re easy to use and can handle most small furniture projects. Look for brands like Black+Decker or Ryobi, which offer reliable sanders at a reasonable price. For brushes, synthetic bristle brushes or small foam brushes work well for both paint and varnish. Start with a medium grit sandpaper set and a couple of brush sizes to cover detail and broad surfaces.
I’m curious about the upfront costs for someone just starting with upcycling. If I want to try restoring a small dresser, what basic tools or safety gear would I actually need, and about how much should I budget for them?
For a small dresser upcycling project, basic tools like sandpaper, a screwdriver, a paintbrush or roller, and some wood glue are usually enough. Safety gear should include gloves and a dust mask, especially when sanding. You can get started for around $40–$70 if you shop at budget hardware stores. Many items, like sandpaper and brushes, are inexpensive or sold in starter kits.
You mention that basic tools and safety gear are a one-time investment, but for someone just starting out, what specific tools would you recommend as must-haves for common upcycling projects? Are there budget-friendly alternatives that still get the job done?
For beginners in upcycling, start with a tape measure, hammer, basic screwdrivers, pliers, a hand saw, and a cordless drill. Safety-wise, get work gloves, safety glasses, and a dust mask. Budget-friendly options can be found at discount stores or even secondhand shops. Many projects can be tackled without high-end tools—just be sure whatever you choose is sturdy and safe to use.
As someone who is interested in starting upcycling projects for my store, I’m wondering how you balance the upfront investment in tools and safety gear against the long-term savings. Are there specific tools you find essential, or ways to keep these initial costs down?
Balancing upfront investment with long-term savings in upcycling is all about prioritizing essentials. Start with versatile tools like a good set of screwdrivers, a hammer, pliers, and a reliable drill. For safety, focus on gloves, goggles, and a mask. You can keep costs down by buying second-hand tools, borrowing from local tool libraries, or sharing with other makers. As your projects grow, you’ll get a better sense of which specialty tools are truly worth purchasing.
I’m just getting started with upcycling and the article mentions that tool investment is mostly a one-time cost. Could you give some examples of which basic tools are absolutely essential for a beginner, and what kind of projects you can do with just those?
For beginners, a few essential tools go a long way in upcycling. Consider starting with a hammer, screwdrivers (flathead and Phillips), a tape measure, pliers, a handsaw, sandpaper, and a basic cordless drill. With just these, you can tackle projects like turning old drawers into shelves, refinishing small furniture, or making simple wall hooks. As you explore more complex projects, you can add specialized tools over time.
I’m curious about the cost breakdown you mentioned for tool investments in upcycling. For someone just starting out, what would you say are the absolute essentials in terms of tools and safety gear, and how much should a beginner realistically budget for them?
For beginners in upcycling, start with basic essentials: a hammer, screwdrivers, pliers, a utility knife, measuring tape, sanding block, and a cordless drill. For safety, you’ll need gloves, safety glasses, and a dust mask. You can expect to spend around $75–$150 for decent starter-quality tools and gear if you shop at big-box stores or look for sales. As your projects become more advanced, you can gradually add specialized tools as needed.
I’m new to upcycling and I’m curious about the tools mentioned in the article. For someone just getting started, which basic restoration tools would be worth buying first to keep costs down, and which ones could maybe wait until later projects?
To get started with upcycling, it’s smart to begin with a few essentials: a good screwdriver set, sandpaper, a basic hammer, and a tape measure. These will cover most simple projects without a big investment. Power tools like electric sanders or drills are helpful but can wait until you feel ready for bigger or more frequent projects.
I noticed the article mentions that the ongoing costs of upcycling are usually lower than buying new, but what about the upfront investment in tools and safety gear for someone starting from scratch? Can you recommend which tools are actually essential for beginners versus nice-to-have?
Starting out with upcycling does involve some initial costs, but you don’t need a full workshop from day one. Essential tools for beginners include a basic toolkit (hammer, screwdrivers, pliers), a tape measure, safety goggles, gloves, a dust mask, and a sanding block. Power tools like a drill or jigsaw are nice-to-have and can be added later as you take on more complex projects. Start simple, and build your kit as you go.
I’m curious about the upfront cost of buying basic restoration tools for someone just starting out. How much should a beginner expect to spend to get the necessary gear, and are there ways to cut those initial costs even further?
For beginners, a basic set of restoration tools like sandpaper, screwdrivers, paintbrushes, pliers, and a hammer typically costs between $50 and $100 if you buy new. To cut costs, consider checking thrift stores, local classifieds, or borrowing from friends and family. Sometimes you can also find starter tool kits on sale at big-box stores, which can help you save even more.
I’m curious about sourcing materials—are there particular salvage yards or donation sites you’ve found to be especially reliable for getting free or low-cost items, or is it mostly about trial and error and local connections?
Finding good sources for upcycling materials is often a combination of local research and building relationships. Some larger cities have dedicated creative reuse centers or nonprofit donation sites that can be very reliable. Local salvage yards may vary, so visiting them in person helps. Community groups, online classifieds, and even neighborhood curb alerts can also be great sources once you know where to look. Over time, you’ll develop a network of go-to spots.
You mention that upcycled pieces are often sturdier and longer lasting. For someone new to restoration, how much skill is really needed to achieve that kind of quality? Are there common mistakes beginners should watch out for when starting a first project?
You don’t need advanced skills to start upcycling, but patience and attention to detail help a lot. Beginners often rush the prep work, like cleaning or sanding, which can affect the final result. Using the right tools and materials for your project is key. Start with simple projects, follow tutorials, and don’t be discouraged by early mistakes—each attempt builds your confidence and skill.
I’m wondering how to tell if salvaged materials like old fence boards or hardware are actually safe and sturdy enough to use for furniture. Is there a way for beginners to check quality before investing time and effort into an upcycling project?
Absolutely, beginners can check salvaged materials by looking for obvious signs of rot, warping, deep cracks, or insect damage. Try pressing a screwdriver into the wood—if it sinks in easily, the material may be too soft or decayed. For hardware, check for rust, bends, or missing parts. If everything feels solid and holds together under gentle pressure, you’re likely safe to proceed. When in doubt, start with smaller projects to build confidence.
You mention that upcycled pieces can end up sturdier than mass-produced ones. How can beginners tell if a salvaged item is actually worth the effort to restore, especially if they’re working with limited tools or experience?
When assessing salvaged items, look for solid construction and minimal damage—real wood, metal, or sturdy frames are good signs. Avoid pieces with lots of rot, deep cracks, or missing structural parts, as these can be hard to fix without advanced tools. Simple repairs like sanding or repainting are ideal for beginners. Trust your instincts: if the item feels stable and just needs cosmetic work, it’s likely worth your time.
If someone is just starting out and only has a small budget for tools, which basic restoration tools would you recommend getting first to maximize both safety and versatility in upcycling projects?
For beginners with a small budget, focus on versatile hand tools like a claw hammer, screwdrivers (flat and Phillips), a tape measure, utility knife, safety goggles, and a dust mask. These cover most simple upcycling tasks and keep you safe. If you can, add a sanding block, pliers, and a set of clamps for more options. Always wear gloves for extra protection.
You mention that upcycled pieces can be sturdier and longer-lasting than new, mass-produced items. For a business like mine, how can I communicate this long-term value to customers who might be hesitant about buying upcycled furniture?
Emphasizing the craftsmanship, unique materials, and durability of your upcycled pieces can help customers see their value. Share stories or examples of how upcycled furniture has lasted over time, perhaps even including customer testimonials. Highlight the quality of construction compared to mass-produced items, and consider offering warranties or care tips to build trust in the longevity of your products.
I’m curious about sourcing salvaged materials—do you have tips for finding good quality pieces at thrift stores or curbside, and how do you make sure they’re actually worth restoring compared to just starting with something new?
When looking for salvaged materials at thrift stores or curbside, focus on sturdy items made from solid wood, metal, or glass—they’re usually easier to restore. Check for excessive damage, rot, or missing parts, as repairs can sometimes be more costly than starting fresh. Bring a tape measure, look for reputable brands, and trust your instincts; if the item feels solid and the restoration work is manageable, it’s likely a good find.
I’m curious about the upfront investment in basic tools for someone new to upcycling. Is there a particular set of tools you’d recommend starting with for typical furniture projects, and how much should a beginner expect to budget for them if shopping from US hardware stores?
For basic furniture upcycling, you’ll want to start with a few essentials: a screwdriver set, hammer, measuring tape, sanding block or electric sander, paintbrushes, and possibly a cordless drill. These can usually be found at US hardware stores for $60–$150 total, depending on brand and quality. As you gain experience, you can gradually add more specialized tools based on your project needs.
You mention that upcycled pieces can be sturdier than mass-produced items. As a business owner concerned about durability and liability, how can I assess whether salvaged materials are strong enough to handle regular use, or should I stick to certain types of furniture for upcycling projects?
To ensure salvaged materials are up to the task, start by carefully inspecting them for cracks, warping, or signs of rot, especially with wood. Opt for solid hardwoods or sturdy metals, as these hold up well over time. For higher-stress items like chairs or tables, prioritize materials with a proven track record of durability. Testing load-bearing capacity and reinforcing joints can also help boost strength and safety.
You mentioned that upcycling usually has a lower ongoing cost than buying new, but are there types of projects where the expense actually does end up being higher, like certain furniture restorations or using specialty tools?
Yes, some upcycling projects—especially those involving large furniture or requiring specialty tools and materials—can end up costing more than buying new items. For example, restoring antique furniture may need expensive finishes or expert help. Projects that require power tools or rare parts can also drive up costs. Planning ahead and budgeting for tools, materials, and any professional assistance can help you avoid unexpected expenses.
I’m interested in the point about tool investment for upcycling projects. As a small business owner just getting started, how do I determine which basic tools are essential versus those that would be nice to have later on?
To start, focus on versatile, high-use tools like a quality drill, measuring tape, hand saw, basic screwdrivers, pliers, and a sander. These cover most small upcycling projects. Specialty items like power sanders, nail guns, or jigsaws are helpful but not essential right away. As your business grows and your project range expands, you can invest in more specialized tools based on your evolving needs.
I understand basic tool investments can be a one-time cost, but do you have advice on which tools are essential for someone starting small-scale projects at home with a limited budget? I’d love some guidance on how to get the most value without overspending up front.
For small-scale upcycling projects on a budget, start with a quality multi-bit screwdriver, a hammer, measuring tape, utility knife, and a basic hand saw. A cordless drill is also very useful if you can stretch your budget. Look for secondhand options or tool sets, which often cost less than buying items individually. As you grow more confident, you can add specialized tools based on your project needs.
You mention that basic restoration tools are a one-time investment for upcycling, but as a parent with limited time and a tight budget, I’m wondering what the absolute essentials are to get started without overspending. Is there a minimum tool set you’d recommend for beginners to maximize value?
To get started with upcycling on a budget, you really only need a few basics. A reliable screwdriver set, a hammer, some sandpaper, and a tape measure cover most beginner projects. If you can, a pair of pliers and a basic paintbrush are also very useful. These items are affordable, easy to find, and should be enough for simple restoration or creative projects with your family.
You mention that upcycled pieces can often outlast mass-produced ones, but are there certain materials or types of furniture where this tends not to be the case?
Yes, some materials or furniture types may pose durability challenges when upcycled. For example, particleboard or low-quality veneers often don’t hold up as well after reworking, especially if they’ve already suffered water damage or structural issues. Flat-pack furniture is also trickier, since its joints and fastenings are weaker. Solid wood and sturdy metals, on the other hand, usually respond best to upcycling and can last much longer.
When you talk about needing basic restoration tools like sanders or sealants, how much should I budget upfront if I’m just starting with small projects? Also, is there a way to spread out these tool purchases over time rather than buying everything at once?
For small upcycling projects, you can start with a basic sander and some sealant for around $50–$100, depending on brands and quality. There’s no need to buy everything at once—begin with just the essentials for your first project, then add tools as you tackle new materials or more complex restorations. This way, you spread out costs and only invest in what you truly need.
You mention that salvaged materials can be found for free or at low cost in places like construction sites and thrift stores. Do you have any tips on ensuring the safety and quality of these materials before starting a project, especially for beginners?
Absolutely, safety and quality are important when working with salvaged materials. For beginners, inspect items for signs of mold, rust, or structural weakness. Avoid materials coated in lead paint or containing asbestos, especially with older items. Clean everything thoroughly before use, and if possible, ask about the history of the material. When in doubt, consult guides or experienced upcyclers to help assess suitability for your project.
You talk about basic tool investments for upcycling, like sanders and sealants. For someone just starting out who wants to keep costs low, which tools are truly essential for the first few projects, and where might it be worth splurging a bit?
For beginners looking to keep costs low, start with a good set of screwdrivers, a basic hammer, a tape measure, and some sandpaper (manual sanding works fine at first). A hand saw is also useful if you plan to cut wood. If you’re ready to invest a bit, consider a quality multi-bit screwdriver or a small electric sander, as they’ll save time and effort. You can always expand your toolkit as your projects become more ambitious.
When considering the initial investment in basic tools and safety gear for upcycling, what would you recommend as the essential must-haves for someone just starting out? It would be helpful to know which purchases are most cost-effective for beginners.
For beginners in upcycling, start with a few versatile hand tools: a hammer, screwdrivers (both flathead and Phillips), a measuring tape, pliers, and a utility knife. For safety, invest in gloves, safety glasses, and a dust mask—these are often inexpensive and essential. Look for basic tool sets that offer multiple items at a lower price, which can be more cost-effective than buying tools individually.
The article mentions that upcycled pieces can be sturdier and last longer than mass-produced goods. Are there specific types of materials or items you’d recommend beginners look for that are especially durable or easy to work with when starting out?
For beginners, look for solid wood furniture, metal frames, or sturdy glass pieces, as these materials are typically durable and easy to upcycle. Items like old dressers, wooden chairs, or metal shelves are great starting points. Avoid particle board and flimsy plastics, as they tend to wear out quickly and are harder to work with. Starting with quality materials makes upcycling projects more rewarding and long-lasting.
I’m curious about tool investments for beginners—what are the absolute essentials for someone just starting with upcycling, and can you recommend ways to keep those initial costs down while still being able to tackle a variety of projects?
For beginners in upcycling, start with core tools like a hammer, screwdrivers (both flathead and Phillips), pliers, a measuring tape, a handsaw, and a basic power drill. To save money, consider buying secondhand tools, borrowing from friends, or looking for tool libraries in your area. Start with these essentials, then expand your toolkit as you gain experience and take on more complex projects.
You mentioned that salvaged materials can often be sourced for free or at a low cost from places like construction sites and thrift stores. Are there any tips or best practices you recommend for safely and ethically collecting materials from these sources, especially for someone new to upcycling?
When collecting salvaged materials, always ask for permission before taking anything from construction sites or public areas, as materials might still be in use or reserved. Wear protective gear like gloves, and check items for hazards such as sharp edges or mold. At thrift stores, inspect materials for damage or pests before purchasing. Start small—gather only what you need—so you don’t end up with excess, and be mindful to respect both property and people working in these spaces.
I’m curious about sourcing materials like curbside finds or leftovers from construction sites. Is there a good way to figure out if these materials are safe and suitable for beginner projects, or are there certain types I should avoid as a first-timer?
When sourcing materials, it’s important to check for obvious damage, mold, or chemical residue—these can make items unsafe. Beginners should avoid materials like treated wood, old paint (which may contain lead), and anything with strong odors or stains. Clean, unfinished wood, basic metal, and glass are usually safer bets. When in doubt, wear gloves and a mask during inspection, and start with smaller projects to build confidence.
I’m interested in upcycling some old furniture, but I’m worried about the safety aspect since I’m not exactly handy. Are there certain types of projects that are safer or easier for beginners to try at home, especially if you have limited tools?
Absolutely, there are plenty of beginner-friendly upcycling projects that are both safe and satisfying. Start with simple updates like painting or staining, which usually just require sandpaper, brushes, and basic protective gear. Adding new hardware, such as knobs or handles, is another easy way to refresh furniture without power tools. Avoid projects that involve cutting or structural changes until you gain more confidence. Always work in a well-ventilated area and read product instructions carefully for safety.
I’m new to upcycling, and I noticed you mentioned basic tools like sanders and sealants are a one-time investment. For someone just starting out, what are the absolute essentials I should get on a tight budget, and is it possible to borrow or rent these instead?
For beginners on a tight budget, the essentials are usually a good multi-purpose screwdriver, a small hammer, sandpaper (instead of a power sander), measuring tape, and basic protective gear like gloves and a mask. Many local tool libraries, community centers, or hardware stores offer rental or borrow options, so you can definitely try those before buying anything. Start small, and add tools as you find what you use most.
You mention that salvaged materials can often be free or inexpensive, but are there any hidden costs beginners should be aware of when sourcing items from places like curbside piles or construction sites? For example, are there risks of pests, toxins, or extra work needed to make those materials usable?
You’re right to consider hidden costs. Salvaged materials can sometimes bring surprises like pests, mold, or chemical residues, especially from construction sites or curbside finds. Cleaning, repairing, or treating these materials may require extra time and sometimes specialized products or safety gear. It’s wise to inspect items closely and factor in the effort or expense to make them safe and usable for your projects.
I’m interested in the comparison between the upfront investment in basic restoration tools and the savings over time. Do you have advice for someone just starting out with a very limited budget on which tools are truly essential for upcycling, versus those that can be borrowed or skipped in the beginning?
If you’re just starting out with upcycling and have a limited budget, focus on essentials like a good screwdriver set, a basic hammer, sandpaper, and a measuring tape. These will cover most beginner projects. Tools such as power drills, clamps, or specialty saws can often be borrowed from friends, tool libraries, or rented as needed. Starting small lets you spread out costs, and you’ll still see big savings compared to buying new items.
The article says that basic restoration tools are a one-time investment, but is there a minimum set of tools you suggest for someone just starting out with upcycling? I want to keep costs low but still be able to tackle small furniture projects effectively.
For beginners aiming to keep costs low, a minimum set of tools would include a hammer, screwdrivers (both flathead and Phillips), a tape measure, sandpaper or a sanding block, a paintbrush, and a good set of pliers. These basics should allow you to handle most small furniture upcycling tasks, from tightening joints to sanding and painting surfaces.
I’ve always wanted to incorporate more salvaged materials in my shop, but I’m unsure about what basic tools are essential for safe and effective upcycling at a small business scale. Can you offer guidance on a starter toolkit for beginners?
To get started with upcycling salvaged materials, focus on a few key tools. A good set of screwdrivers, a claw hammer, pliers, utility knife, and measuring tape are essential. For cutting and shaping, invest in a handsaw, sandpaper, and perhaps a jigsaw for more versatility. Safety gear is crucial—always have gloves, safety glasses, and a dust mask. As your shop grows, you can add power drills, clamps, and a sander. Start simple and expand as needed.
You mentioned that upcycled pieces are often sturdier and longer-lasting than store-bought items. If I’m just starting out and only have basic tools, how realistic is it to achieve results that will actually hold up for daily family use?
It’s definitely realistic to create sturdy upcycled pieces with basic tools, especially for simpler projects like shelves, small tables, or storage crates. The key is choosing solid materials—like real wood or metal—and taking your time with assembly. Even with basic skills, paying attention to joints and fastenings makes a big difference. As you gain experience, your pieces will become even more durable and suitable for everyday family use.
I’m new to upcycling and a little worried about the initial tool investment you mentioned. Are there certain tools you recommend starting with that cover most basic projects, or should I wait and buy them as specific needs come up?
For most basic upcycling projects, starting with a few versatile tools is a good idea. A hammer, screwdriver set, measuring tape, utility knife, and a pair of pliers will cover many tasks. You don’t need to buy everything at once—add specialized tools as you start new projects that require them. This way, you can manage costs and avoid cluttering your workspace with unused items.
You mention that ongoing costs for upcycling are usually much lower than buying new, but what about the hidden expenses, like specialty tools or fixing mistakes during a project? Are there certain projects where the costs really do start to add up for beginners?
You’re absolutely right—while upcycling often saves money, some hidden costs can crop up, especially for beginners. Specialty tools, unique supplies, or correcting errors can add up, particularly with complex furniture or large-scale projects. For those new to upcycling, starting with simple items like jars, picture frames, or small decor pieces is a good idea to keep costs manageable as you build your skills and tool collection gradually.
You mention the initial investment in tools and safety gear for upcycling. Are there any starter kits or essential tools you recommend for someone with a limited budget who wants to experiment with creative salvage projects?
If you’re starting out on a budget, a basic toolkit is usually enough for most upcycling projects. I recommend starting with a claw hammer, tape measure, screwdriver set, utility knife, pliers, and a hand saw. For safety, have work gloves, a dust mask, and safety glasses. Many hardware stores sell beginner tool kits that combine these essentials at a reasonable price, and you can often find gently used tools in thrift shops or community tool libraries.
You mentioned that salvaged materials can often be found for free or at low cost, but I’m wondering how reliable it is to source quality items this way. Are there any tips for finding salvage materials that are actually sturdy enough for long-lasting upcycling projects?
Sourcing quality salvage materials takes a bit of patience, but it’s definitely possible. Look for items made from solid wood, metal, or glass, as these tend to be more durable. Always inspect for signs of rot, rust, or structural damage. Visiting reputable salvage yards, architectural reuse centers, or even construction sites can boost your chances of finding sturdy materials. Don’t hesitate to ask about the history or age of materials—it can give clues about their longevity.
I’m curious about the tool investment part. For someone just starting out with minimal equipment, what would you say are the true essentials versus nice-to-haves, and is it possible to get by on a tight budget without compromising on project quality?
You can definitely start upcycling on a tight budget without sacrificing quality. The true essentials are usually a good pair of scissors, a tape measure, a basic screwdriver, sandpaper, and a strong adhesive or glue. Nice-to-haves might include power tools, clamps, or a staple gun, but you don’t need these right away. Many creative projects can be tackled with just the basics and a bit of patience.
If I’m just starting out and only have basic hand tools, how much should I expect to spend on essential restoration tools for beginner upcycling projects? Are there any specific brands or tools you’d recommend for someone on a tight budget?
For beginner upcycling projects, starting with basic hand tools is totally doable. You can expect to spend around $50–$100 to get essentials like a hammer, screwdrivers, pliers, a handsaw, a measuring tape, and sandpaper. For budget-friendly options, look at brands like Stanley or Irwin for durability without breaking the bank. Consider buying starter toolkits, as they often offer better value than purchasing individual tools.
I’m curious about the cost breakdown mentioned in the article. How do you suggest beginners prioritize tool purchases if they’re on a tight budget, and are there any tools that can be skipped or borrowed for initial projects?
For beginners on a budget, focus on acquiring basic, versatile tools like a good measuring tape, utility knife, and screwdrivers. More specialized or expensive tools—like power sanders or circular saws—can often be borrowed from friends or local tool libraries, or even rented. This way, you only invest in essentials upfront and can gradually expand your toolkit as needed for more advanced upcycling projects.
I’m interested in upcycling furniture for my shop, but I’m curious about the durability of upcycled pieces compared to buying new. Have you found that restored items actually hold up better over time, especially with regular customer use?
Upcycled furniture can be very durable, often rivaling or even surpassing new items—especially if quality materials and solid construction are used in the original piece. Restoration usually involves tightening joints, reinforcing weak spots, and applying modern finishes, all of which boost longevity. Many shop owners find that upcycled pieces stand up well to frequent use, provided the restoration work is thorough and professional.
You mention that tool investment is a one-time cost, but as someone with little to no tools at home, how much should I realistically budget to get started with basic upcycling projects, and are there any must-have tools for beginners?
For basic upcycling projects, you can start with a budget of around $50 to $100, depending on quality and where you shop. Essential tools for beginners include a hammer, screwdriver set, measuring tape, utility knife, and a pair of pliers. If you’re planning to paint or sand, consider adding a paintbrush and some sandpaper. You don’t need to buy everything at once—start with the basics and expand your toolkit as your projects grow.
I’m curious about sourcing salvaged materials for upcycling projects. Are there particular types of items or materials that tend to be better quality or longer-lasting than what you typically find in new mass-produced furniture?
Salvaged materials from older furniture or buildings are often made from solid wood, metal, or thick glass, which can be more durable than many newer, mass-produced items that use particleboard or plastic. Hardwoods like oak, walnut, and maple, as well as vintage metal fittings, are especially valued for their longevity. Always check the condition to ensure the materials are sturdy and free from pests or rot.
You mentioned that basic restoration tools are a one-time investment and can be reused, but for someone just starting out, which specific tools would you consider truly essential for most upcycling projects, and which ones can wait until later?
For most upcycling projects, I’d say the essentials are a good set of screwdrivers, a hammer, a measuring tape, sandpaper, a utility knife, and some basic paintbrushes. These will cover a lot of beginner projects. Power tools like electric sanders, drills, or staple guns are really helpful but can wait until you’ve done a few projects and want to invest more.
As a small business owner, I’m interested in upcycling but worried about the upfront investment in tools and safety gear you mentioned. Do you have recommendations for a starter toolkit that balances quality and cost for those just beginning with creative salvage?
A basic upcycling toolkit can be both affordable and effective. Start with essential hand tools like a hammer, screwdrivers, pliers, tape measure, and utility knife—look for mid-range brands for durability without high prices. For safety, prioritize protective gloves, safety glasses, and a dust mask. You can gradually add power tools or specialized gear as your projects expand. Local hardware stores and secondhand shops are good sources for budget-friendly, quality tools.
When starting out with upcycling, do you have suggestions for where a beginner can safely find quality salvaged materials around the US? I want to avoid wasting time on items that are too damaged or unsafe, but I’m also hoping to keep initial costs low.
For beginner upcyclers, thrift stores, architectural salvage yards, and ReStores run by Habitat for Humanity are great places to find quality materials at low prices. Estate sales and local garage sales can also yield sturdy items. Always check for signs of rot, mold, severe rust, or structural damage. Avoid materials with chipped paint if you suspect it’s old, as it could contain lead. Starting with smaller furniture or wooden items can help you assess quality more easily and keep projects manageable.
I’m curious about how you balance the time spent searching for salvage materials with the possible money saved. Does it ever end up being more trouble than it’s worth compared to just buying something on sale, especially if your schedule is really packed?
Balancing time and savings in upcycling really depends on your personal situation. If your schedule is tight, searching for salvage materials can sometimes feel more demanding than simply buying items on sale. Many upcyclers suggest setting clear limits on how much time you spend sourcing materials or planning projects around what you already have. This way, you can enjoy the creative aspect without it becoming overwhelming or less cost-effective.
You talk about upcycled pieces often being longer-lasting than something new from the store. Are there certain types of materials or items you’ve found just aren’t worth the effort to restore, either because they’re so damaged or because the cost really does add up?
Absolutely, some materials can be more trouble than they’re worth. Items with extensive water damage, particle board furniture, or pieces made with cheap veneers are usually not ideal for upcycling—they often fall apart or require expensive repairs. Similarly, heavily rusted metal can take significant effort to restore. It’s usually best to focus on quality hardwoods, solid metals, and sturdy fabric items for the most rewarding results.
I’m interested in upcycling for the long-term value and sustainability, but I’m concerned about the upfront tool investment mentioned. Are there specific tools you’d recommend prioritizing for someone on a tight budget who wants to get started with small projects?
For small upcycling projects on a tight budget, start with basic, versatile tools like a hammer, screwdrivers (both flathead and Phillips), a measuring tape, utility knife, and pliers. A hand saw and sandpaper are also helpful for simple woodwork. These essentials will cover most beginner projects, and you can add other tools as your skills and needs grow.
You mention that upcycled pieces can be sturdier and longer-lasting than mass-produced goods. Do you have any tips on how to assess the quality of salvaged materials when sourcing them, so I don’t end up with something that’s more trouble than it’s worth?
When sourcing salvaged materials, check for signs of rot, warping, or deep cracks in wood, and make sure metal parts aren’t badly rusted or corroded. Test for sturdiness by gently applying pressure or tapping the material. Also, look for materials from older furniture or buildings, as they’re often made from denser, higher-quality resources. Cleaning and light refinishing can reveal hidden potential, but avoid pieces that seem structurally unsound.
I noticed you mentioned that salvaged materials can often be found for free or really cheap, like from construction sites or curb finds. Are there any tips for safely approaching places to ask for leftover materials, especially here in the US where regulations might be strict?
When approaching places like construction sites or businesses for leftover materials, always ask for permission before taking anything. Politely introduce yourself and explain your upcycling project. It helps to go during business hours and seek out a supervisor or manager. Wear appropriate safety gear if you’re entering an active site. Many areas have regulations, so check local rules about salvaging. Never take materials from private property or dumpsters without explicit approval.
You mentioned that basic restoration tools are a one-time cost, but what would you say is the minimum set of tools someone should start with if they’re on a really tight college budget? Are there any tools that are non-negotiable for safety or project success?
If you’re starting out with upcycling on a tight college budget, focus on a few essentials. A basic set could include a screwdriver (multi-bit if possible), a hammer, pliers, sandpaper, and a measuring tape. For safety, definitely get protective gloves and safety glasses—these are non-negotiable. As you take on more projects, you can gradually add items like a utility knife or a small hand saw.
I get that upcycled pieces can last longer than mass-produced items, but how do you know which salvaged materials are actually good enough quality to be worth reusing? Are there any warning signs to look for before starting a project?
When choosing salvaged materials for upcycling, inspect for signs of damage like rot, mold, significant rust, deep cracks, or unstable joints. Solid wood, metal, and glass are generally reliable if they’re structurally sound. Avoid pieces with lingering odors, water damage, or signs of pests. If something feels weak or unsafe, it’s best not to use it—trust your senses and, when in doubt, start with smaller projects to get a feel for material quality.
You talked about the upfront cost of basic tools for upcycling. If I’m just starting out and don’t own any tools yet, what are the absolute essentials I should buy first to keep the initial investment as low as possible without sacrificing safety or quality?
If you’re new to upcycling, start with a few versatile and affordable tools: a tape measure, a basic hammer, a cordless drill with drill bits, a screwdriver set, pliers, and a handsaw. Also, invest in safety basics like protective gloves and safety goggles. These essentials will cover most beginner projects while keeping your costs low and your work safe and effective.