Introduction: Reviving Salvaged Windows for Sustainable Living
Salvaged windows are more than just architectural relics—they are tangible links to craftsmanship, material quality, and the environmental benefits of reuse. Whether you’ve rescued a set of wavy-glass sashes from a demolition site, or you’re inheriting a home with original windows in need of care, restoration offers a unique blend of sustainability and historic charm. Yet, tackling window restoration can seem daunting. From dealing with old paint and fragile glass to energy efficiency concerns, many homeowners and DIY upcyclers hesitate to take on these beautiful but battered components.
This in-depth guide will demystify the process of restoring salvaged windows, offering step-by-step techniques, glazing tips, and practical advice to help you bring vintage windows back to life. You’ll discover how to evaluate condition, repair wood rot, handle lead paint safely, reglaze panes, upgrade for insulation, and preserve the unique character that makes old windows such a treasure in sustainable living. Whether you’re aiming for period-accurate detail or a creative, upcycled twist, these restoration methods will empower you to save money, reduce waste, and add lasting value to your home or creative salvage project.
Evaluating Salvaged Windows: What’s Worth Restoring?
Assessing Window Condition
Begin by inspecting your salvaged windows for:
- Structural Integrity: Check frames and sashes for warping, cracks, or rot, especially at corners and joints.
- Glass Condition: Look for cracks, chips, or missing panes. Original wavy glass adds value, but replacements are possible.
- Paint and Finish: Flaking, peeling, or multiple layers may indicate lead paint or moisture problems.
- Hardware: Note missing or rusted latches, pulleys, and sash cords; restoration or replacement may be needed.
If the wood is mostly sound, the glass is salvageable, and the sashes are intact (even if loose or painted shut), restoration is almost always worthwhile.
When to Salvage, When to Scrap
- Beyond Repair: Sashes with extensive rot, severe warping, or missing large sections of wood may cost more to restore than to rebuild or replace.
- Custom Needs: Unusually sized or shaped windows may justify extra effort for historic accuracy or unique upcycling projects.
Safety First: Lead Paint and Glass Handling
Lead Paint Hazards
Windows painted before 1978 likely contain lead. Protect yourself by:
- Wearing a certified respirator (NIOSH-approved) and gloves.
- Using wet methods (damp rags, scrapers) to minimize dust.
- Setting up plastic sheeting to contain debris.
- Disposing of chips and dust according to local hazardous waste protocols.
For large jobs or heavy lead contamination, consult a professional abatement service.
Safe Glass Removal
- Wear safety glasses and cut-resistant gloves.
- Score glazing putty with a utility knife before prying it out.
- Work slowly to avoid breaking old, brittle glass.
- Have a cardboard box or padded surface ready for removed glass panes.
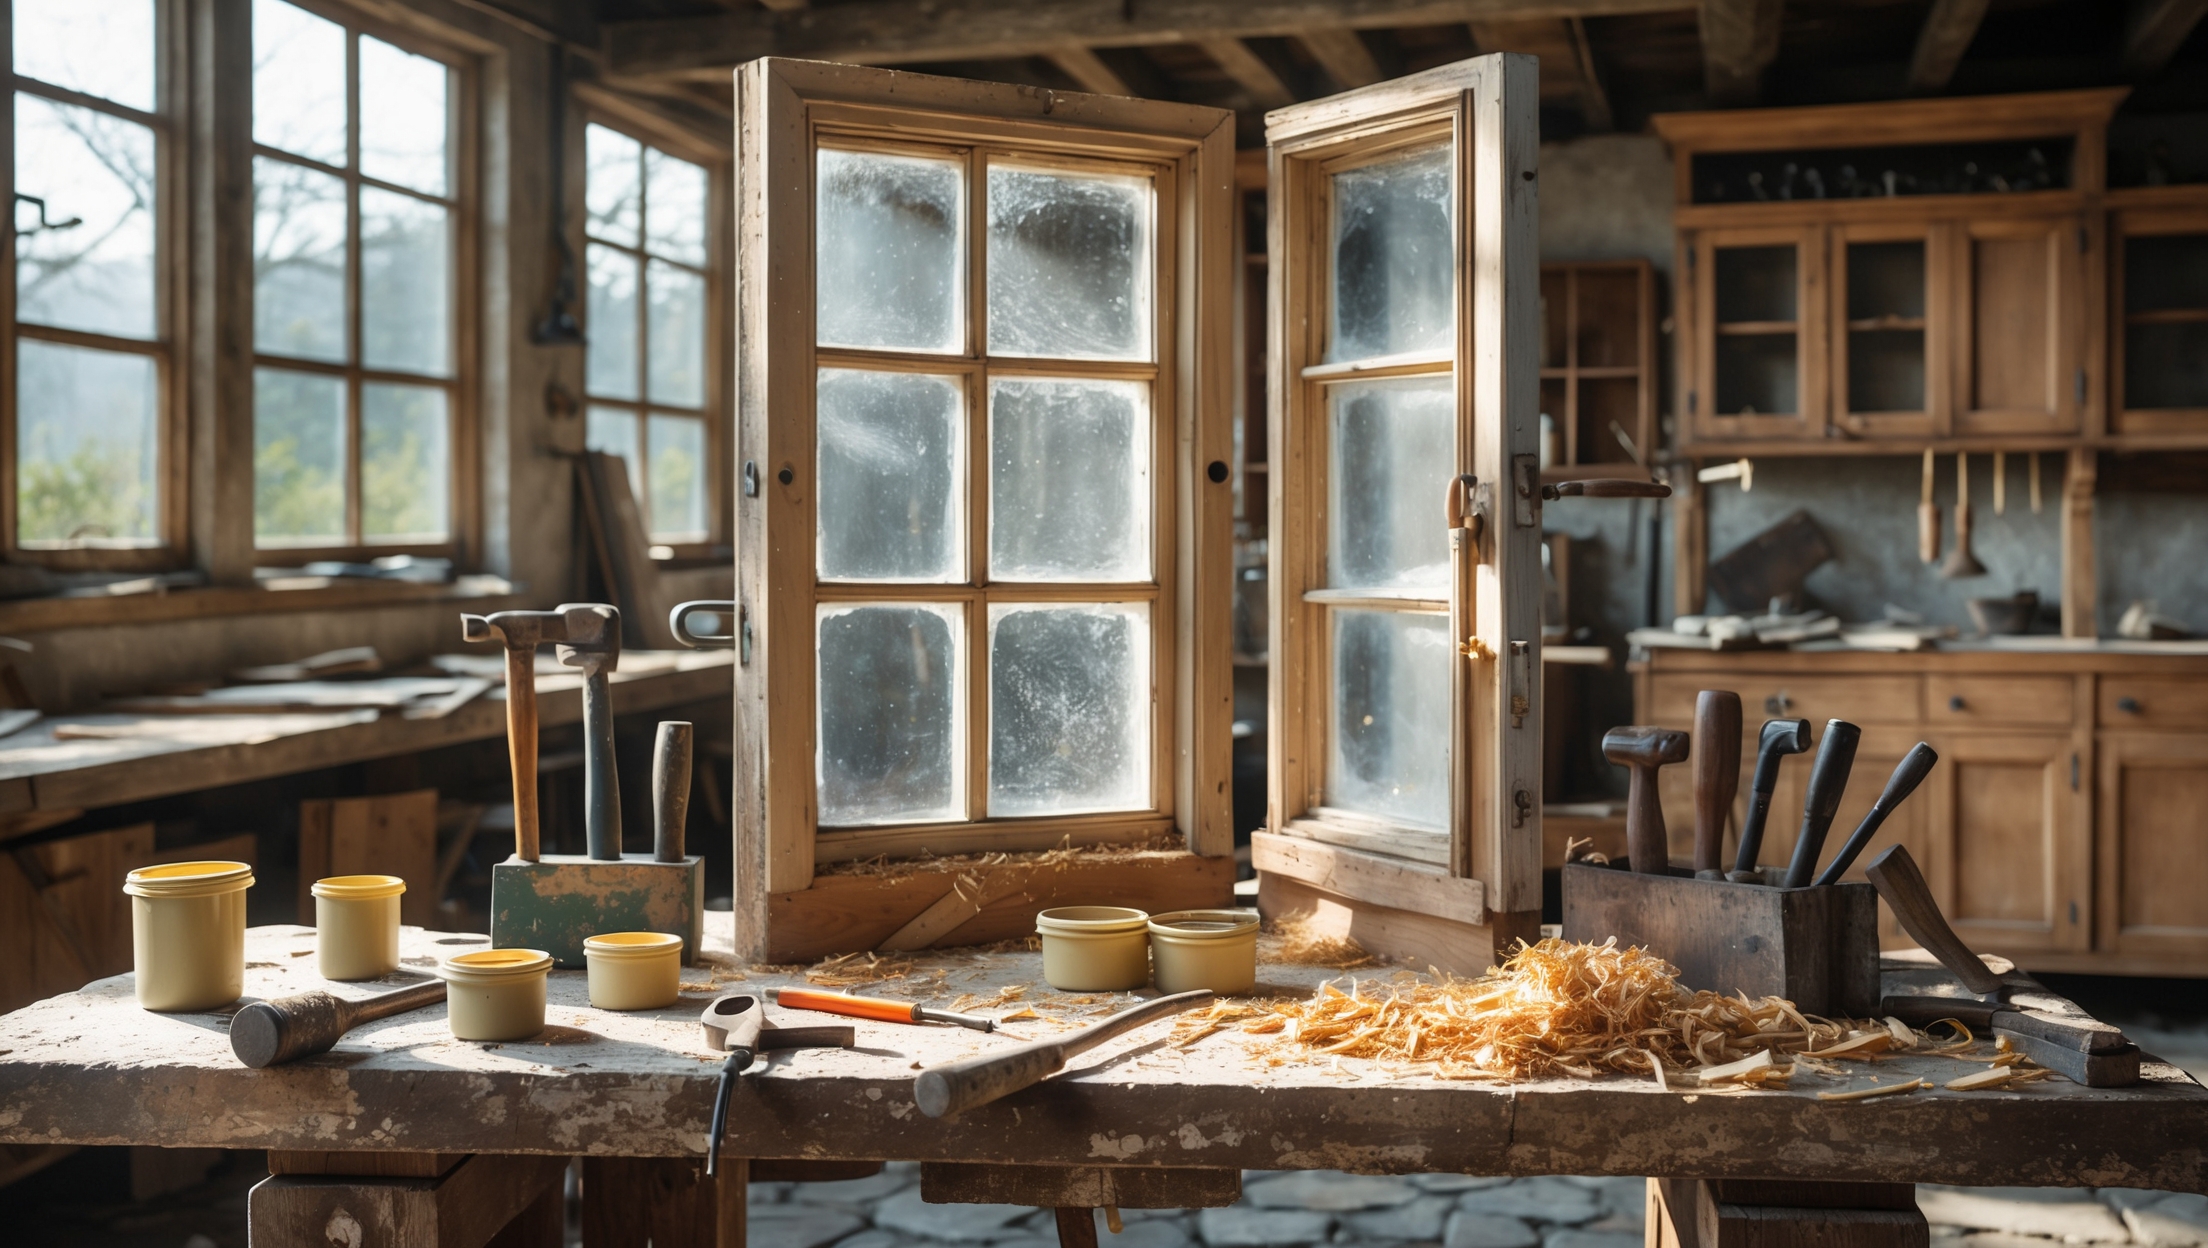
Dismantling and Cleaning Salvaged Windows
Removing Sashes from Frames
- Carefully cut through layers of paint along seams with a putty knife.
- Use a flat pry bar to gently loosen sashes from the frame.
- Label each sash and frame for easy reassembly, especially for multi-light or multi-sash windows.
Cleaning and Stripping
- Remove all hardware and set aside for cleaning or replacement.
- Use a gentle paint stripper for stubborn coatings, following all safety guidelines.
- Scrub wood with a mild soap and water solution; avoid soaking, which can swell joints.
- Let all pieces dry thoroughly before proceeding.
Repairing Sashes and Frames: Woodwork Techniques
Fixing Cracks and Splits
For minor cracks or splits:
- Inject wood glue into the crack using a syringe or fine nozzle.
- Clamp the sash or frame until the glue sets (typically overnight).
- Lightly sand the repaired area before refinishing.
Dealing with Wood Rot
- Excavate all soft, damaged wood with a chisel or screwdriver.
- Treat the affected area with a liquid wood hardener to stabilize remaining fibers.
- Fill voids with an epoxy wood filler, sculpting to match the original profile.
- Allow to cure, then sand smooth for painting or staining.
Replacing Missing or Broken Parts
- Mill replacement muntins, rails, or stiles from rot-resistant wood (fir, pine, or cedar).
- Use wood joinery (dowels, mortise and tenon) for stronger, longer-lasting repairs.
- Secure pieces with waterproof glue and finish nails where appropriate.
Glass and Glazing: The Heart of Window Restoration
Reglazing Techniques
Reglazing rejuvenates both appearance and weather resistance. Steps include:
- Remove old glazing putty with a putty knife or specialized scraper.
- Gently lift out the glass pane. Clean and set aside.
- Scrape out debris and apply a thin bead of linseed oil putty or modern glazing compound to the rebate (groove).
- Press glass into place, ensuring even contact.
- Insert new glazing points (small metal tabs) every 6-8 inches to secure the pane.
- Apply a smooth, angled bead of glazing putty to seal the edges. Use a putty knife for a crisp finish.
- Allow the putty to skin over (typically 7–14 days) before painting.
Dealing with Broken or Missing Panes
- Measure carefully for replacements; vintage windows often vary by a fraction of an inch.
- Order glass to size—restoration glass (wavy) is available from specialty suppliers if you want period authenticity.
- In a pinch, clear acrylic can substitute, but will lack the historic look and scratch more easily.
Creative Upcycling Ideas for Salvaged Panes
- Turn multi-light sashes into decorative interior dividers or picture frames.
- Use single-pane sashes as custom chalkboards (apply chalkboard paint on one side of the glass).
- Install salvaged windows in garden sheds or greenhouses for a whimsical, sunlit effect.
Improving Energy Efficiency Without Compromising Character
Weatherstripping and Draft-Proofing
- Install adhesive-backed foam or V-seal weatherstripping along meeting rails and sashes.
- Consider bronze spring weatherstripping for a more durable, period-appropriate option.
- Seal gaps between sash and sill with removable caulk during colder months.
Adding Storm Windows
- Interior or exterior storm windows offer a significant boost to insulation while preserving the original windows.
- Choose wood-framed storms for historic homes or low-profile aluminum for less visible installations.
- DIY options: Build custom storms from salvaged glass and screen framing.
Low-Impact Glazing Upgrades
- Apply heat-shrink window film on the interior during winter for a temporary insulation boost.
- Consider low-E (low emissivity) coatings applied by professionals to existing glass for improved performance.
Refinishing: Paints, Stains, and Period-Appropriate Touches
Priming and Painting
- After repairs and glazing, prime all bare wood with an oil-based or high-quality latex primer.
- Use exterior-grade paint for long-lasting protection; light colors reflect more heat and resist fading.
- Paint slightly onto the glass (about 1/16″) to seal the glazing putty edge against moisture.
Staining and Clear Finishes
- For a natural look, apply a penetrating stain followed by spar varnish or marine-grade polyurethane.
- Multiple thin coats provide the best protection, sanding lightly between layers.
Historic Hardware: Restoration and Reuse
- Soak paint-caked hardware in a crockpot with water and mild detergent overnight; scrub clean with a brush.
- Polish brass, bronze, or steel components, or leave patina for an antique look.
- Replace missing sash locks, lifts, or pulleys with salvaged or reproduction parts for authenticity.
Reinstallation: Ensuring Smooth Operation and Longevity
Rehanging Sashes
- Replace or repair sash cords and counterweights as needed.
- Lubricate pulleys and moving parts with a silicone-based spray or beeswax.
- Check for smooth, balanced operation before final sealing and trim work.
Final Sealing and Trimming
- Caulk around the exterior of the frame to block water intrusion.
- Install interior and exterior trim as desired; reuse original moldings whenever possible for historic continuity.
Creative Upcycling Inspiration: Beyond Traditional Restoration
Room Dividers and Art Installations
- Repurpose large salvaged windows as room dividers to let light pass between spaces while adding vintage character.
- Use multi-pane sashes as frameworks for pressed flowers, wallpaper samples, or stained glass inserts.
Greenhouse and Garden Uses
- Assemble mismatched sashes into a DIY greenhouse, cold frame, or potting shed for a truly upcycled garden feature.
- Create decorative garden mirrors by replacing glass with mirrored panes and mounting outdoors.
Maintenance Best Practices for Restored Windows
Annual Inspection Checklist
- Check for peeling paint, cracked glazing, or loose putty—touch up as needed to prevent moisture infiltration.
- Ensure all hardware operates smoothly; lubricate and tighten as needed.
- Inspect weatherstripping for wear and replace if necessary.
Seasonal Upkeep
- Clean glass with a mild, non-abrasive cleaner; avoid harsh chemicals that damage putty or finish.
- During winter, check for drafts and add temporary caulking or window film if needed.
Conclusion: The Sustainable Rewards of Window Restoration
Restoring salvaged windows is a hands-on way to preserve history, save resources, and infuse your home with authentic character. While the process may appear intricate, each step—from careful dismantling and wood repair to glazing and refinishing—builds both your skillset and a deeper appreciation for quality craftsmanship. You’ll not only keep valuable materials out of the landfill but also enjoy functional, beautiful windows that can last for generations with proper care.
Don’t be intimidated by old paint or fragile panes; with the right techniques and safety precautions, even beginners can achieve professional results. Invest in quality materials, take your time, and remember that minor imperfections add to the unique story of each window. For those who crave creativity, salvaged windows offer endless upcycling potential—transforming into artful dividers, garden structures, or decorative features that brighten any space.
Ultimately, window restoration embodies the heart of sustainable living: honoring the past, reducing waste, and creating something enduringly beautiful. Whether you restore a single sash or tackle a whole house, you contribute to a legacy of mindful reuse and inspired design. Embrace the journey, and let your salvaged windows open new perspectives—literally and figuratively—on what your home can be.


I inherited several old windows with wavy glass but the sashes have some wood rot at the corners. How can I tell if the rot is too far gone for repair, and are there recommended products or techniques for fixing minor rot versus major damage?
To assess wood rot, probe the affected areas with a screwdriver. If the wood feels spongy or crumbles deeply, it may be too far gone and require replacement of that part of the sash. For minor rot, you can remove the decayed wood, treat the area with a wood hardener, and then fill with an epoxy wood filler. For major damage, splicing in new wood sections or replacing the sash corners is often necessary.
When checking salvaged windows for lead paint, what are some safe and practical ways to test at home before starting restoration? I’m worried about lead exposure as a parent and wondering if there are clear signs or simple kits you recommend.
Home lead test kits, available at most hardware stores, are a practical way to check for lead paint. These kits usually involve rubbing a test swab on the paint and watching for a color change. While chipping, cracking, or alligatoring paint can be a warning sign, only testing confirms lead. Always wear gloves and a mask when handling old paint, and keep children away from the area until testing is complete.
If I want to reglaze salvaged windows for better insulation, do you recommend any specific types of glazing putty or methods that balance energy efficiency with maintaining the original historic appearance? I’m interested in practical, cost-effective options.
For reglazing historic windows, linseed oil-based putty is a classic choice that preserves an authentic look while offering good durability. If energy efficiency is a priority, you can pair traditional putty with interior weatherstripping and use a high-quality, single-pane glass or consider discreetly adding a secondary glazing panel inside. Avoid synthetic putties, as they may not blend as well visually with historic woodwork. Clean, prime, and oil the sash grooves before applying putty for best results and longevity.
If a salvaged window has some minor wood rot in the corners but the rest of the frame seems solid, is repair usually possible, or is it more cost-effective to replace those parts? What materials or products do you recommend for patching rot?
Minor wood rot in window corners can usually be repaired without replacing the entire section. Remove all the soft, rotted wood first, then treat the area with a wood hardener to stabilize it. After that, fill the gaps with a high-quality epoxy wood filler or wood restoration putty, shaping it to match the original profile. Once cured, sand, prime, and paint for a long-lasting repair.
I have some old window sashes with cracked original glass and a fair bit of paint buildup. You mention handling lead paint and reglazing panes, but is it better to strip all the paint before attempting repairs, or can some areas be left covered if they’re not flaking?
You don’t always need to strip all the paint before making repairs. If the paint is stable, not flaking, and in good condition, you can safely leave those areas covered, especially if you’re concerned about disturbing potential lead paint. Focus on removing loose or cracked paint in the areas you’ll reglaze or repair. Just be sure to use safe lead paint practices, like wet-sanding or using a HEPA vacuum, when working around old finishes.
Your guide covers both repairing wood rot and replacing missing hardware—do you typically find it more cost effective to restore original components, or are there situations where sourcing modern replacements makes more sense in terms of durability and budget?
Restoring original components is often more cost effective, especially for maintaining historic value and authenticity. However, if the wood rot is extensive or the hardware is missing or too damaged, modern replacements can sometimes offer better durability and may actually be less expensive than repair or sourcing rare vintage parts. It really depends on the extent of damage and your priorities for authenticity versus practicality.
When checking for lead paint on old windows, what is the safest way to remove it without risking damage to the original wood or glass? The article mentions safe handling but I’m wondering about specific tools or methods that are both effective and gentle on historic materials.
To safely remove lead paint from old windows while preserving the wood and glass, use a chemical paint stripper formulated for lead (citrus-based ones are gentle), and apply it carefully with a soft brush. Avoid heat guns and sanding, as these can damage historic materials and release lead dust. After softening, gently scrape with a plastic or wooden scraper to protect surfaces, and always work in a well-ventilated area wearing protective equipment.
If the wooden frames have some minor rot in a few spots, is it better to patch those areas or replace entire sections of the sash? I’d like to keep as much of the original window as possible but I’m not sure what’s practical for a beginner.
For minor rot in wooden sash frames, patching is usually a good option, especially if you want to preserve the original window. You can use wood epoxy or filler to repair small damaged areas. Just make sure to remove all soft, rotted wood first. Replacement of entire sections is only necessary if the rot is extensive or compromises the window’s structure. For beginners, careful patching is both practical and effective.