Introduction: Unlocking the Potential of Salvaged Wood
Salvaged wood holds a unique place in the world of creative salvage and upcycling. Each piece tells a story—weathered barn boards, old floor joists, discarded pallets, or forgotten fence posts. With environmental concerns at an all-time high, upcycling timber isn’t just a trend; it’s a practical, sustainable approach to making the most of existing resources and minimizing waste. However, working with salvaged wood comes with its own set of challenges and nuances. From hidden nails and structural weaknesses to pests and moisture damage, every timber requires thoughtful assessment and skilled handling. This guide offers a detailed, step-by-step approach to repairing, treating, and transforming salvaged wood for a variety of upcycling projects, whether you’re crafting rustic shelves, building furniture, or designing architectural features. Alongside repair tips, you’ll find advice on safe treatment, creative finishing, and sustainable design strategies to ensure that your upcycled creations are both beautiful and built to last.
Assessing Salvaged Wood: Quality, Safety, and Suitability
Where to Source Salvaged Timber
- Demolition sites (with permission)
- Old barns and sheds
- Construction skips (check legality)
- Reclamation yards
- Pallets from local businesses
Identifying Quality Wood
Begin by inspecting each piece for splits, rot, warping, or insect damage. Look for:
- Solid, dense grain—hardwoods like oak, ash, and maple are especially prized
- Minimal deep cracks or soft spots indicating rot
- Signs of active infestation (powdery frass, fresh holes, beetles)
- Embedded hardware (nails, screws, staples)
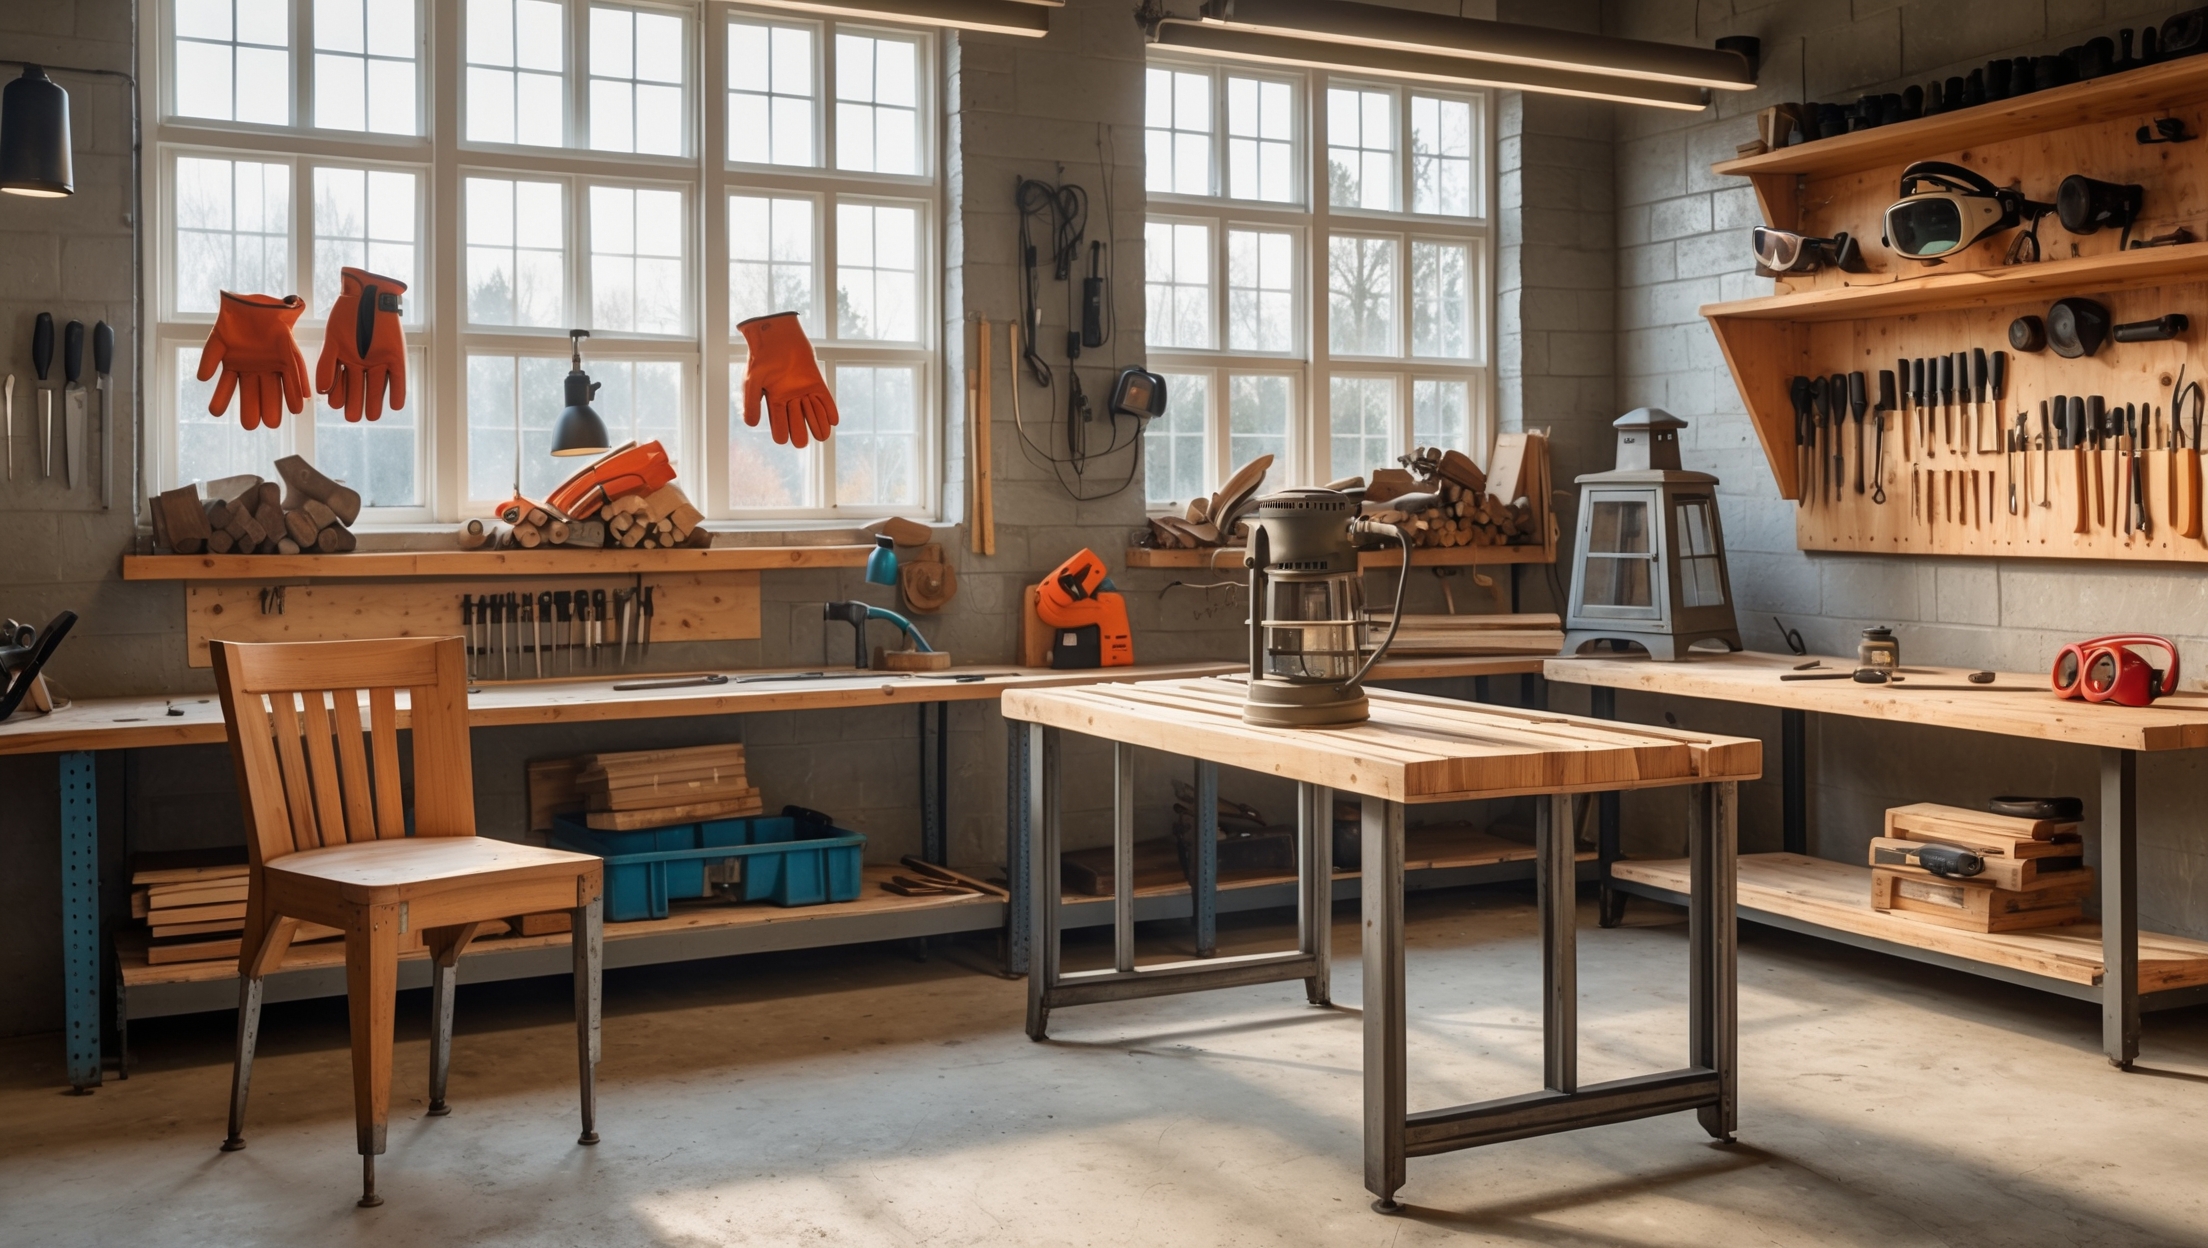
Safety First: Hazards to Watch For
- Lead paint: Common on wood painted before 1980; test before sanding.
- Chemical treatments: Pressure-treated wood may contain toxins—avoid for food surfaces or indoor use.
- Mold and mildew: Black, white, or green patches indicate fungal growth; treat or avoid as needed.
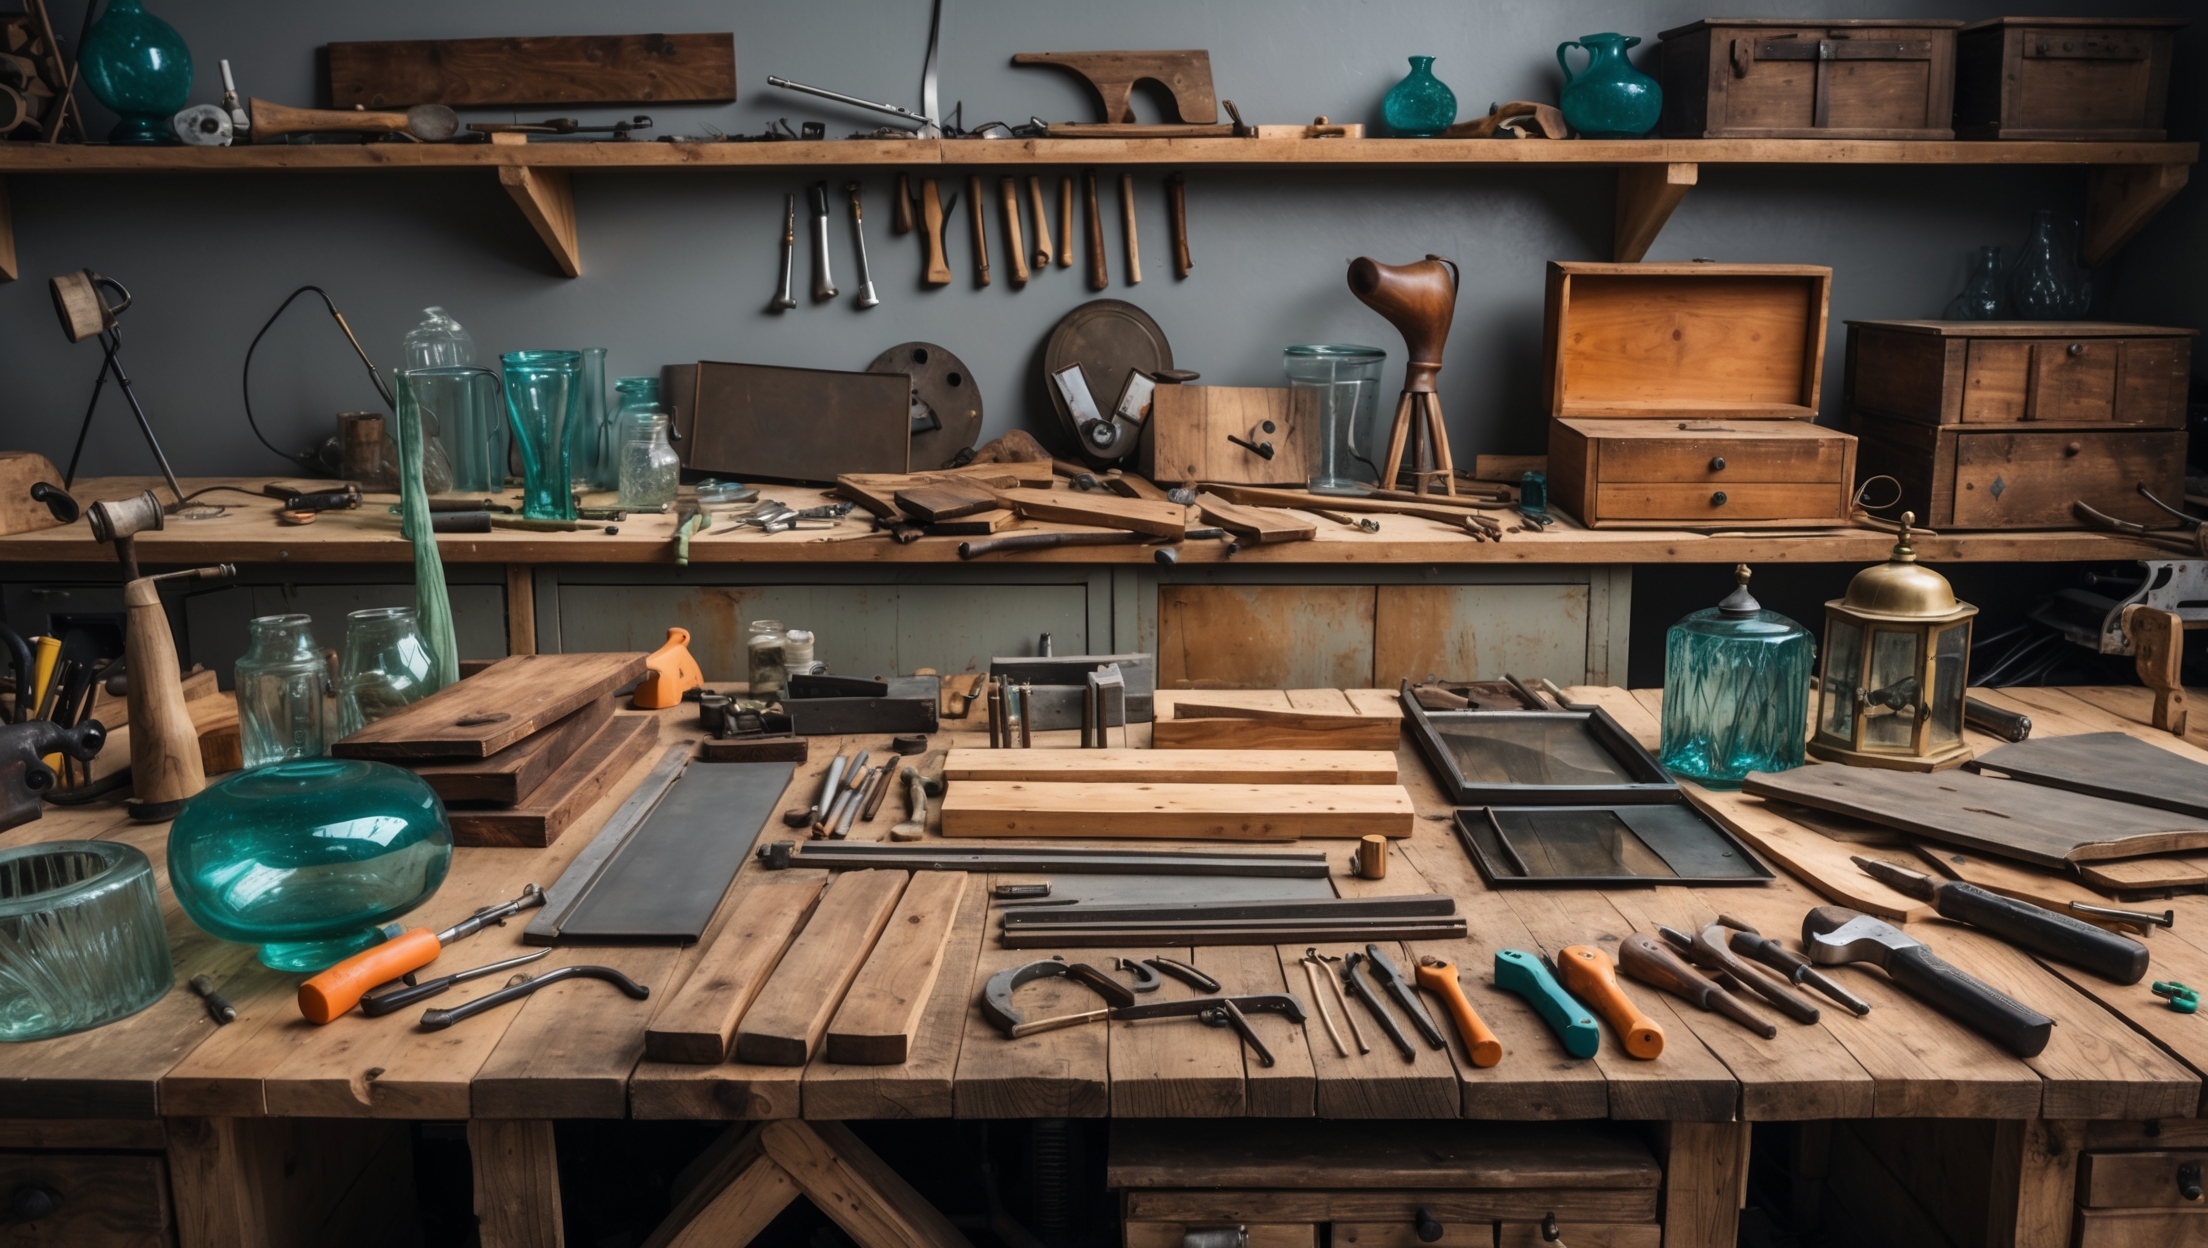
Cleaning and Preparing Salvaged Wood
Removing Hardware and Debris
Start by removing all visible nails, screws, brackets, and staples using a pry bar, pliers, or nail puller. For stubborn hardware, apply penetrating oil and gently work it loose. Use a metal detector to scan for hidden metal, especially in thick beams or floorboards, as missed nails can damage tools.
Deep Cleaning Methods
- Dry brushing: Use a stiff-bristled brush to remove loose dirt and surface dust.
- Mild detergent wash: Mix a gentle soap with water, scrub with a sponge, then rinse and dry thoroughly.
- Mold and mildew treatment: Apply a 1:10 bleach solution with water if needed (wear gloves, work outdoors, and allow to dry fully).
Drying Salvaged Wood Properly
After cleaning, allow wood to dry completely before further work. Stack with stickers (spacers) between layers to promote airflow and prevent new mold growth. Depending on thickness and moisture content, drying may take days to weeks. Use a moisture meter to ensure levels are below 14% for indoor projects.
Repairing Salvaged Timber: Techniques for Restoration
Stabilizing Cracks and Splits
- Wood glue and clamps: For small splits, inject glue into the crack and clamp until set.
- Epoxy filler: For larger voids or missing sections, use a two-part epoxy wood filler. Sculpt while wet, sand when cured.
- Butterfly (bowtie) keys: Inlay wooden keys across cracks to add strength and visual interest.
Replacing Lost Material
- Patching with matching wood: Cut and fit patches from similar salvaged stock. Use tight joints and wood glue for best results.
- Plugging holes: Use dowels or plug cutters to fill old nail or screw holes, then sand flush.
Flattening and Straightening Boards
Warped boards can be flattened using a planer or jointer, though hand planes and sanders can suffice for small projects. Always remove all metal before sending wood through any power tool to avoid blade damage and injury.
Safe Treatment: Ensuring Longevity and Health
Pest Control
- Heat treatment: Bake small pieces at 120°C (250°F) for 1 hour to kill insects.
- Borate treatments: Apply borate wood preservatives to deter future infestations, especially for outdoor projects.
Dealing with Old Paint and Finishes
- Lead paint safety: Test with lead swabs. If positive, use chemical strippers or hire a professional—never dry sand or burn.
- Removing varnish/stain: Use citrus-based strippers for less toxic removal, then sand lightly with a dust mask.
Sealing and Protecting Wood
- Eco-friendly oils: Tung oil or linseed oil nourish wood and provide a natural finish.
- Water-based sealers: Low-VOC polyurethane offers durability without heavy fumes.
- Wax finishes: Great for indoor pieces that won’t see heavy wear.
Creative Upcycling Ideas for Salvaged Wood
Furniture Projects
- Dining tables: Use wide, thick planks for farmhouse-style surfaces. Reinforce joints with dowels or biscuits.
- Benches and stools: Shorter, sturdy beams make excellent supports. Add modern legs or keep rustic for charm.
- Wall-mounted shelves: Clean, sand, and finish smaller boards for unique, character-rich shelving.
Architectural Features
- Accent walls: Mix and match boards in different widths and tones for a mosaic effect.
- Ceiling beams: Hollow out lightweight boards for easier installation as faux beams.
- Door and window frames: Salvaged trim adds instant history to new builds.
Decorative and Small Projects
- Picture/photo frames: Use narrow strips or molding offcuts.
- Planter boxes: Combine offcuts and end pieces for rustic outdoor planters.
- Wall art: Arrange blocks or planks into geometric patterns, then stain or paint for effect.
Finishing Salvaged Wood: Bringing Out Natural Beauty
Sanding and Smoothing
Start with coarse-grit sandpaper (60–80 grit) to remove roughness, progressing to finer grits (120–220) for a smooth finish. Sand with the grain to avoid scratches. For heavily textured woods, consider leaving some tool marks for character.
Staining and Coloring
- Natural stains: Coffee, tea, or vinegar-steel wool solutions can add subtle tones sustainably.
- Water-based stains: Low-odor and available in many shades, these are ideal for indoor use.
- Layered finishes: Try dry-brushing with diluted paint for a weathered, layered look.
Protective Coatings
- Clear coats: Use water-based polyurethane or hard wax oil for a durable, non-yellowing finish.
- Outdoor protection: Apply marine varnish or exterior-grade oils to resist moisture and UV damage.
Design Tips for Sustainable Upcycled Wood Projects
Maximizing Material Use
- Plan cuts in advance to minimize waste.
- Keep offcuts for future repairs or small projects.
- Design projects to work with, not against, warps and imperfections.
Blending Old and New
- Combine salvaged timber with new fasteners or hardware for improved strength.
- Highlight original marks or nail holes as design features.
- Mix wood tones and grains for eclectic, visually rich results.
Documenting Provenance
- Label projects with the origin of the wood (e.g., “from 1920s barn”).
- Share the story of your salvaged materials in your home or marketing.
Common Pitfalls and How to Avoid Them
- Skipping metal detection: Always scan before cutting or planing to avoid tool damage.
- Underestimating prep time: Salvaged wood often requires more work than new lumber—budget accordingly.
- Using untreated wood outdoors: Moisture and UV can quickly damage unprotected timber.
- Ignoring safety: Always wear gloves, dust masks, and eye protection when working with reclaimed wood.
Conclusion: Salvaged Wood as a Cornerstone of Sustainable Living
Upcycling salvaged wood is more than a creative endeavor; it’s a meaningful commitment to sustainability, resourcefulness, and craftsmanship. Each board, beam, or block you rescue and restore helps divert waste from landfills, reduces demand for virgin timber, and preserves a tangible piece of history. The process—from sourcing and careful assessment, through thorough cleaning, repair, and finishing—demands patience and a keen eye for detail. Yet, the rewards are substantial: unique materials, rich textures, and the satisfaction of creating something truly one-of-a-kind. By prioritizing safety, understanding the quirks of aged lumber, and applying thoughtful restoration techniques, you can ensure that your upcycled wood projects not only look stunning but also stand the test of time. Whether you’re a hobbyist or a seasoned craftsman, salvaged timber offers endless potential for beautiful, resilient, and environmentally responsible design. Let each project be a testament to sustainable living and the power of creative salvage.
As you embark on your next upcycling adventure, remember that every scar and imperfection in salvaged wood is an opportunity for innovation and character. With proper repair, treatment, and finishing, your reclaimed creations will enrich your space and inspire admiration for generations to come. Embrace the journey of restoration, and let the story of salvaged wood become part of your own sustainable legacy.

I’m really interested in trying some upcycling projects with salvaged wood, but I’m not sure how to tell if old pallets are safe to use for furniture, especially regarding chemical treatments and infestations. Are there any quick tests or signs I should look for before bringing them home?
When checking pallets for safety, look for a stamp on the wood—avoid any marked ‘MB’, as this means they were treated with methyl bromide, a harmful chemical. Prefer pallets stamped ‘HT’ (heat-treated). Inspect for signs of infestation like small holes, sawdust, or active insects. If the wood smells unusual or feels damp and moldy, it’s best to leave it. Always clean and sand the wood thoroughly before using it for furniture.
When checking salvaged wood for things like lead paint or chemical treatments, do you have any preferred testing kits or methods that work well for people doing small DIY projects at home? I’m especially interested in tips for making sure old pallets are safe to use inside.
For DIY projects, lead test kits like 3M LeadCheck are easy to use and widely available. For chemical treatments on pallets, look for stamps like HT (heat treated) or MB (methyl bromide). Avoid pallets marked MB, as they contain chemicals. If stamps are missing or unclear, it’s safest not to use the wood indoors. Scrubbing pallets with soap and water, then sanding, helps remove surface residues, but doesn’t eliminate deep chemical treatments. When in doubt, prioritize safety and choose wood with clear, safe markings.
When assessing salvaged wood, you mention checking for active insect infestation and signs of rot. For someone who’s just starting out, what are some practical ways to repair minor cracks or soft spots rather than discarding the wood altogether?
For minor cracks, you can fill them with wood filler or epoxy, then sand the surface smooth once it’s dry. For small soft spots, dig out any loose or crumbly wood and fill the area with wood hardener followed by filler. Always let everything cure fully before sanding and finishing. These simple fixes help you save and use more of your salvaged wood rather than discarding it.
In the section about assessing salvaged wood, you highlight pests and signs of active infestation as concerns. Once you identify insect damage, what are the most effective steps to treat the wood so it can still be safely used for interior furniture projects?
If you find insect damage in salvaged wood, first remove any visibly infested sections. Then, thoroughly clean and sand the wood. To treat remaining pests, consider using a borate-based wood preservative or heat-treating the wood (kiln-drying at 120°F for several hours can kill most insects). Afterward, seal the wood with an appropriate finish to prevent future infestation and ensure it’s safe for interior furniture use.
I love the idea of using pallets from local businesses, but I’m worried about hidden nails or old stains. What’s the safest way to check for embedded hardware and clean the wood, especially if I want my kids to help with the project?
When working with pallet wood, start by inspecting each piece carefully in good lighting. Use a strong magnet to detect hidden nails, and a metal detector if available. Always remove hardware with pliers or a crowbar, and sand the surface smooth. For stains, scrub with soapy water and let the wood dry fully. Make sure kids wear gloves and use hand tools under supervision for safety.
You mention avoiding pressure-treated wood for indoor projects due to possible toxins. If I find a great-looking board but I’m unsure about its treatment history, is there a reliable method to identify pressure-treated lumber, or should I just avoid anything with an uncertain background altogether?
If you’re unsure about a board’s treatment history, it’s safest to avoid using it indoors. Pressure-treated lumber often has a greenish or brownish tint, visible surface perforations from treatment, or chemical odors, but these signs aren’t always reliable. Without confirmation, it’s better to use wood with a known, untreated background to avoid potential exposure to harmful chemicals.
When working with salvaged wood that might have hidden nails or embedded hardware, do you have any specific tools or methods you recommend for safely detecting and removing them without damaging the timber? I’m mostly dealing with old floor joists and barn boards.
When working with old floor joists and barn boards, a handheld metal detector is very useful for spotting hidden nails or hardware. After marking the detected spots, use tools like a pry bar, nail puller, or pliers to carefully extract the fasteners. For stubborn or embedded metal, a small punch and hammer can help push nails through. Always inspect slowly to minimize damage to the wood.
When you’re inspecting old floor joists or barn boards for hidden nails or other embedded hardware, do you have a favorite tool or technique for spotting them before cutting? I’ve run into a few surprise nails with my circular saw and it gets expensive fast.
Inspecting salvaged wood for hidden nails is crucial to avoid damaging your tools. One effective technique is to use a strong magnet, running it slowly along the wood’s surface to detect any embedded metal. For a more thorough check, a handheld metal detector is very helpful—it can spot nails buried beneath the surface where magnets might miss them. Always check both sides and along edges before making any cuts.
I noticed you mentioned avoiding pressure-treated wood for indoor or food surfaces because of possible toxins. How can I tell for sure if a salvaged piece is pressure-treated, especially if any original stamps or markings are faded or missing?
Identifying pressure-treated wood without labels can be tricky, but there are a few clues. Pressure-treated wood often has a greenish or brown tint and sometimes small, evenly spaced surface incisions from the treatment process. It may also feel heavier than untreated wood. If you’re unsure, avoid using it for indoor or food-related projects to be safe.
If I want to upcycle pallets from local businesses but worry about hidden pests or mold, what specific treatments or products have worked best for you to make sure the wood is safe for indoor use? Any tips on dealing with mildew without compromising the wood’s character?
To ensure pallet wood is safe for indoor use, start by scrubbing it thoroughly with a mixture of water and mild detergent to remove surface mold and dirt. For deeper mildew, a diluted vinegar solution works well and helps preserve the wood’s look. Let the wood dry completely in a sunny, ventilated area. To eliminate pests, heat-treat the wood by baking it in a low oven (around 150°F) for a few hours, if possible. Finish by sealing the dry wood with a clear, non-toxic sealant to lock out future moisture without hiding its character.
When checking salvaged wood for lead paint, are there particular test kits or methods you recommend for ensuring accuracy before beginning any sanding? I’ve come across older boards with multiple paint layers and want to be sure I’m identifying potential hazards properly.
For checking salvaged wood for lead paint, look for EPA-recognized lead test kits such as 3M LeadCheck or D-Lead. These kits are designed for painted surfaces and are generally reliable when used according to their instructions, even on multiple paint layers. Make sure to test all exposed and unpainted areas, and if in doubt, consider sending a sample to a certified lab for confirmation before sanding.
When sourcing salvaged timber from demolition sites or construction skips, are there any best practices or legal considerations to keep in mind to avoid running into issues with property owners or hazardous materials, especially regarding older structures with potential lead paint or mold?
When collecting salvaged timber from demolition sites or skips, always get permission from the property owner or site manager—taking materials without consent may be considered theft. For older structures, be cautious of hazards like lead paint, asbestos, or mold. Wear protective gear, and if you suspect hazardous materials, consult a professional for safe handling or disposal. Checking local regulations on salvage is also a good idea.
I run a small workshop and am considering using pallets from local businesses. Since some may have chemical treatments, are there specific markings or signs I should look for to make sure the wood’s safe for indoor furniture?
Yes, pallet wood can be safe if you know what to look for. Check for stamps on the pallets: ‘HT’ means heat-treated and is generally safe, while ‘MB’ stands for methyl bromide, a chemical treatment you should avoid for indoor use. Also avoid pallets with unknown stains or strong odors, as these could indicate chemical exposure.
You mention checking for lead paint and active infestations—are there any quick at-home tests for these issues, or do I really need to invest in specialized kits before I start working with salvaged boards?
For lead paint, there are affordable at-home test swabs available at most hardware stores, which can give you quick results—no need for expensive equipment. For active infestations like termites, look for visible signs such as small holes, sawdust, or tapping sounds. If you’re unsure, consider having a professional check, but simple inspections are often enough for DIYers.
Could you elaborate on how to safely identify and remove lead paint from old painted timber? Is there a preferred technique or product for DIYers that minimizes exposure, especially if you’re working with intricate woodwork or indoors?
To safely identify lead paint, use a lead test kit from a hardware store. If lead is present, avoid dry sanding or scraping, as this creates hazardous dust. For DIYers, wet sanding or using a liquid paint remover is safer and helps contain particles. Always wear a certified respirator, gloves, and goggles, and seal off the work area. For intricate woodwork, a gentle liquid remover with a soft brush is effective, but if the piece is large or heavily coated, consider consulting a professional.
I like the idea of using old pallets from local businesses, but I’ve heard they can sometimes have pest issues or be treated with harsh chemicals. What steps do you recommend for making sure pallet wood is both safe and sturdy enough for making furniture, particularly for indoor projects?
To ensure pallet wood is safe for indoor furniture, first check for markings like ‘HT’ (heat treated), which is safer than ‘MB’ (methyl bromide, a chemical treatment). Avoid pallets with stains, odors, or visible pest damage. Clean thoroughly, sand to remove splinters, and let the wood dry out completely. Consider sealing the wood with a non-toxic finish for added safety and durability indoors.
You mention treating mold and mildew when assessing salvaged timber. Do you have preferred non-toxic methods for removing fungal growth, especially on pieces you plan to use inside the home? I’m concerned about lingering odors or health issues if not fully treated.
For non-toxic mold and mildew removal on salvaged timber, I recommend scrubbing with a solution of white vinegar and water, or hydrogen peroxide (3%). Both effectively kill fungal growth and won’t leave harmful residues. Make sure to dry the wood thoroughly afterward, as moisture encourages regrowth. If odors persist, setting the wood in sunlight can help dissipate them. Always wear gloves and a mask during cleaning to protect yourself from spores.
When salvaging wood from old barns or demolition sites, how can I be sure I’m not accidentally picking up timber that’s been treated with hazardous chemicals, especially if there’s no visible labeling? Are there reliable tests or signs to look for before bringing it home?
It’s wise to be cautious, as older timbers may have been treated with chemicals like creosote, lead paint, or chromated copper arsenate. Signs include unusual colors (greenish or oily surfaces), a strong chemical smell, or paint remnants. If in doubt, you can use chemical test kits—lead and arsenic test kits are widely available at hardware stores. When unsure, avoid using questionable wood for indoor projects, especially where it might contact food or skin.
I noticed you mentioned lead paint as a hazard with older salvaged wood. If I suspect some boards might have lead-based paint, what are the safest ways to test and remove it so I can still use the wood for indoor furniture?
If you suspect lead-based paint on salvaged wood, use a lead test kit available at most hardware stores to check for lead. If lead is present, removal should be done with extreme caution: avoid sanding or scraping, as this creates hazardous dust. Instead, use a chemical paint remover designed for lead paint, working outdoors with gloves and a mask. If the boards are extensively coated, consider consulting a professional for safe removal.
You mention being cautious with pressure-treated wood because of possible toxins. If I’m not sure how wood was treated, are there any reliable ways for a non-expert like me to tell if it’s safe for indoor furniture or kids’ rooms?
If you’re unsure about how wood was treated, look for signs like a greenish or yellow tint, oily feel, or small puncture marks, which can indicate pressure treatment. However, it’s hard to be completely certain without lab testing. For safety, avoid using questionable wood indoors or where children will have contact, and opt for wood with a clear, known history when possible.
When working with salvaged wood from pallets or demolition sites, how do you reliably test for lead paint or chemical treatments before starting repairs? I want to make sure I’m not exposing my team or customers to anything unsafe, especially since some projects are for indoor use.
To check salvaged wood for lead paint, you can use EPA-recognized lead test kits, which are available at most hardware stores. For chemical treatments like pesticides or preservatives, look for unusual staining, strong odors, or colored markings, especially on pallets. If you suspect chemical treatments, avoid using the wood indoors or send a sample to a lab for analysis. When in doubt, err on the side of caution to ensure safety.
I noticed the article warns about chemical treatments in salvaged wood, especially for indoor or food-related projects. What are the safest ways to test if old timber has been pressure-treated, and are there any non-toxic sealers you recommend if I’m unsure?
To check if timber has been pressure-treated, look for greenish or dark stains, tiny surface incisions, or chemical odors. You can also ask where the wood came from; old decking, railroad ties, or utility poles are usually treated. If unsure, play it safe and use a non-toxic sealer like tung oil, raw linseed oil, or shellac for indoor use. These create a protective barrier without harmful chemicals.
When sourcing salvaged timber from places like demolition sites or old barns, what are some practical ways to test for lead paint on-site before I start sanding or cutting? I work in a small space and want to make sure I avoid contamination from the start.
You can use instant lead test swabs, which are available at most hardware stores. Simply rub the swab on the painted surface—if it turns a specific color (usually red or pink), lead is present. Wear gloves when testing, and if you get a positive result, avoid sanding or cutting until the paint is safely removed. This quick check helps protect your workspace from lead dust.
When sourcing pallets from local businesses, how can I be sure the wood is safe for indoor furniture, especially for homes with kids? Are there certain markings or certifications to look out for to avoid chemical-treated wood and possible pests?
When choosing pallets for indoor furniture, especially for homes with kids, look for pallets marked with ‘HT’, which means heat-treated and not chemically treated—these are safer for indoor use. Avoid pallets marked with ‘MB’ (methyl bromide), as they have been chemically treated. Also, inspect pallets for signs of pests or mold, and always clean and sand them thoroughly before use.
The article mentions finding wood at demolition sites and construction skips, but how do you usually get permission to take wood from those places without running into legal problems? Are there standard procedures most people follow to get access?
To avoid legal issues when collecting wood from demolition sites or skips, it’s important to always ask for permission from the property owner, site manager, or contractor. Explain your interest in salvaging the wood, and get their approval—preferably in writing. Many people also check with local authorities for any specific rules. Never take materials without clear permission, as they may still have an owner or be reserved for recycling.
Could you share some tips on how to effectively remove old paint or chemical treatments from salvaged wood, especially if I’m concerned about lead or toxins? I want to make sure any upcycled furniture is safe for everyday use.
When removing old paint or treatments from salvaged wood, especially if lead is suspected, use a HEPA-filter vacuum and wear a certified mask. Avoid sanding, as it spreads dust. Instead, use a chemical stripper labeled as safe for lead paint or try gentle scraping after wetting the surface to keep dust down. Always work outdoors or in a well-ventilated area and dispose of debris following local hazardous waste guidelines. Once clean, seal the wood with a non-toxic finish for extra safety.
For someone new to upcycling timber, can you explain how to determine if an old pallet or barn board is too damaged by rot or insects to be worth the effort? Are there quick signs to spot, or should beginners expect to lose a lot of material during prep?
When checking old pallets or barn boards, look for soft, crumbly areas or wood that breaks apart easily—these are signs of rot. Small holes, sawdust, or tunneling can indicate insect damage. If large sections are affected, the wood is probably not worth the effort. Beginners might lose some material during prep, but with practice you’ll spot usable boards more quickly.
When sourcing pallets from local businesses, are there specific markings or features I should look for to ensure the wood hasn’t been chemically treated and is safe for indoor projects? Sometimes it’s hard to tell what’s been used on them.
When choosing pallets for indoor projects, look for the HT stamp, which stands for heat treated—these are generally safe. Avoid pallets labeled MB (methyl bromide), as this is a chemical treatment unsuitable for indoor use. Also, steer clear of pallets with stains, strong odors, or unidentified paint markings, since these may indicate exposure to chemicals or spills.
I’m curious about identifying pressure-treated wood among salvaged lumber, especially since you mention it may contain toxins. Are there any clear visual cues or simple tests to recognize pressure-treated boards before I decide to use them for my indoor projects?
Identifying pressure-treated wood among salvaged boards can be tricky. Look for a greenish or brownish tint, and sometimes, small incisions or perforations along the surface from chemical injection. Older boards might have a chemical smell or visible stamp with treatment codes. If you’re unsure, it’s safest to avoid using questionable boards indoors, especially where kids or food are involved.
When salvaging wood from old barns or demolition sites, what is the best way to test for lead paint before sanding, especially if you don’t have access to professional equipment? Are store-bought lead test kits reliable enough for this purpose?
When salvaging old wood, store-bought lead test kits are a practical option for checking for lead paint if you don’t have access to professional tools. Most kits use swabs that change color when they detect lead. While these kits are generally reliable for screening, they aren’t as sensitive as laboratory tests. Always follow the instructions carefully, test in several spots, and if you get a positive or unclear result, it’s safest to avoid sanding or disturbing the paint.
I’m new to working with salvaged wood and noticed you mentioned checking for lead paint, especially on pieces painted before 1980. What is the safest way for a beginner to test for lead paint, and if I find some, can I still use the wood after treating it?
For beginners, using a lead paint test kit from a hardware store is the safest and easiest way to check salvaged wood. These kits usually involve swabbing the surface and watching for a color change. If you find lead paint, it’s best not to sand or dry scrape the wood, as this releases harmful dust. The safest option is to either professionally remove the paint or avoid using that wood for indoor projects, especially where children could be exposed.
If I find a piece of salvaged timber with some mild warping or minor cracks, is it still worth trying to upcycle it? Are there recommended repair techniques for making slightly damaged boards sturdy enough for furniture projects?
Yes, salvaged timber with mild warping or minor cracks can still be upcycled, especially for furniture projects where a bit of character is welcome. For warping, you can try flattening the board by dampening it and clamping it flat as it dries. Small cracks can be filled with wood filler or epoxy, then sanded smooth. Reinforcing weak spots with dowels or splines also adds strength. Always check for structural integrity before using the wood for load-bearing parts.
You mention that salvaged wood can sometimes have hidden nails or old hardware embedded. What’s the safest way to detect and remove these, especially if I’m working with pallets or wood from demolition sites? I want to avoid damaging my tools or injuring myself.
To safely detect hidden nails or hardware in salvaged wood, use a handheld metal detector to scan each piece thoroughly. Mark any detected spots for closer inspection. Wear heavy-duty gloves and safety glasses, then use tools like pliers, a nail punch, or a claw hammer to carefully extract any fasteners. Take your time and double-check each board before cutting or sanding to avoid tool damage or injury.
I see you mention the risks of lead paint and chemical treatments on salvaged wood. As someone looking to upcycle old pallets for indoor furniture, are there reliable ways to test for these hazards at home, or is it always best to get professional help before starting a project?
For home testing, there are lead paint test kits available at hardware stores that can give a quick indication of lead presence, but their reliability can vary. Chemical treatments on pallets are harder to identify—look for pallet stamps like ‘MB’ (methyl bromide) or ‘HT’ (heat treated). ‘MB’ means it’s chemically treated and should be avoided for indoor use. When in doubt or if you suspect heavy contamination, it’s safest to consult a professional, especially for furniture projects.
When looking for salvaged wood at demolition sites or skips, how can I quickly determine if a piece is worth bringing home or if it’s likely to have too much rot or pest damage to be usable? Any quick assessments or tools you recommend for busy parents?
When you’re short on time, check salvaged wood for visible signs of rot like softness, crumbling, or dark patches, and look for small holes or tunnels that indicate pests. A simple tool like a screwdriver works well—press it into the wood; if it sinks in easily, the wood may not be sound. Also, sniff for a musty odor, which can signal hidden rot. This quick check helps you avoid bringing home problematic pieces.
I noticed you suggest checking for signs of active insect infestation and rot when assessing salvaged wood. Could you share some tips on how to repair minor insect damage or soft spots, or is it generally safer to discard wood with these issues altogether?
Minor insect damage or small soft spots can often be repaired. For insect holes, remove any loose material, treat the area with a wood hardener or borate solution to kill any remaining pests, then fill holes with wood filler or epoxy. For soft spots, dig out all decayed wood, apply wood hardener, and patch as needed. If the damage is extensive or the wood feels spongy, it’s safer to discard it.
When checking salvaged wood for pests, you mentioned looking for signs like frass and fresh holes. Is there a specific method or tool you recommend for making sure you don’t miss hidden infestations, especially in larger beams?
To check for hidden infestations in larger beams, a moisture meter can be useful as unusually moist areas might suggest pest activity. For a more thorough check, gently tap the wood with a mallet and listen for hollow sounds, which may indicate internal tunnels. If you want to be extra cautious, a small drill or awl can help test suspicious areas for soft spots that could signal hidden damage.
You mentioned avoiding pressure-treated wood for food surfaces or indoor projects. If I’m not sure whether a piece of salvaged wood has been chemically treated, are there any specific signs to look for, or do you recommend a certain test before using it in a project?
If you’re unsure whether salvaged wood has been pressure treated, check for a greenish or brown tint, surface residue, or small puncture marks where chemicals were injected. Newer treated lumber may have end tags with treatment info. If you can’t tell, it’s safest to avoid using it for food surfaces or indoor projects, since chemical treatments can sometimes be hard to identify. There’s no simple home test, so when in doubt, choose wood you can verify as untreated.
When checking salvaged wood for issues like embedded nails or lead paint, do you have any preferred tools or methods that make the process safer or more efficient? I’d love to hear how these steps fit into your workflow, especially when tackling bigger projects.
For checking salvaged wood, I rely on a handheld metal detector to quickly find hidden nails or screws, which saves a lot of time and prevents tool damage. For lead paint, I use lead test swabs on suspect paint layers before any sanding or cutting. I make these checks my first step after collecting the timber, especially on larger batches, so I can sort, prep, and handle each piece safely from the start.
You mention using barn boards and reclaimed pallets for upcycling projects. In your experience, what methods work best for dealing with nails and old embedded hardware without damaging the timber, especially if you want to keep the wood’s character?
To safely remove nails and embedded hardware while preserving the wood’s character, I recommend starting with a metal detector to locate hidden metal. Use pry bars or cat’s paws gently, working from the underside if possible. For stubborn nails, cut off protruding points with an angle grinder and tap the rest through instead of pulling. Removing only what’s necessary lets you keep nail holes and marks that add authentic character to the reclaimed wood.
When checking salvaged wood for things like insect damage and rot as you mentioned, are there any simple home tests or tools I can use before I start working with it? I want to make sure I catch any hidden issues before I invest a lot of time.
You can use a screwdriver or awl to gently test for rot—press it into the wood in several spots; soft or crumbly areas may indicate decay. For insect damage, look for small holes, sawdust, or tunnels. Tapping the wood with a hammer and listening for hollow sounds can also help spot hidden issues. A flashlight can help you inspect cracks or crevices more closely.
If I find a piece of salvaged wood that has some signs of mold or mildew but otherwise seems solid, what specific treatments or products would you suggest to make it safe for use in indoor furniture projects?
If the wood is structurally sound but shows signs of mold or mildew, first scrub it with a solution of water and mild detergent or white vinegar. Let it dry completely, ideally in the sun, to inhibit further growth. For extra protection, lightly sand the affected areas and consider treating the wood with a borate-based wood preservative, which is effective against mold and safe for indoor use. Always wear a mask and gloves during cleaning and sanding.
You mention avoiding pressure-treated wood for indoor or food-related projects due to possible toxins. If I’m unsure whether a piece of reclaimed timber was chemically treated, are there easy ways to identify it, or should I just avoid any wood with an unknown history?
If you’re unsure about whether reclaimed wood was pressure-treated, it’s safest to avoid using it for indoor or food-related projects. Pressure-treated wood often has a greenish or brown tint, visible perforations from treatment, or smells chemical, but these signs aren’t always obvious. When in doubt, choose wood with a clear history or stick to untreated woods for safety.
I’m curious how you decide whether to keep weathered finishes on timber for a rustic look or sand them down completely for a cleaner result. Are there situations where leaving the original surface is better for structural integrity or durability, especially with hardwoods like oak or ash?
Choosing whether to keep a weathered finish or sand timber down depends on your project’s style and the wood’s condition. If the weathered surface is only cosmetic and the wood underneath is solid—especially with durable hardwoods like oak or ash—it’s fine to keep it for a rustic look. However, if the weathering has compromised the wood (like deep cracks or rot), sanding or removing damaged layers is safer. Sometimes, keeping the original surface can even protect the wood by retaining its natural patina, but always check that it’s structurally sound first.
When checking salvaged wood for possible chemical treatments, are there any specific signs I should look for besides just assuming all pallet wood might be treated? Also, what’s the safest way to test for lead paint if I don’t have professional equipment?
When inspecting salvaged wood, look for stamps or markings—like ‘MB’ for methyl bromide—indicating chemical treatments, especially on pallets. Unusual colors, oily residues, or strong chemical smells can also be warning signs. For testing lead paint without professional gear, you can use store-bought lead test swabs, which are simple to use and give quick results. Always wear gloves and a mask when handling or sanding questionable wood.
When assessing salvaged wood for upcycling, you mention looking out for chemical treatments and lead paint. If I come across reclaimed timber that seems to have been previously treated or painted, what are the safest steps for testing and removing these hazards without compromising the wood’s quality?
If you find reclaimed timber with old paint or signs of chemical treatment, start by testing for lead using a lead test kit from a hardware store. For chemical treatments, look for stamps or odors that suggest prior use of preservatives. If hazards are found, use a respirator mask, gloves, and work in a well-ventilated area. Remove paint with a chemical stripper or scraper rather than sanding, to avoid spreading dust. For treated wood, it’s safest to avoid indoor use, as complete removal is difficult without damaging the timber.
When assessing salvaged timber from barns or sheds, how do you determine if minor insect damage is still safe to work with? Are there specific signs where you’d pass on a piece entirely versus trying to treat and use it in a project?
When inspecting salvaged timber, minor insect holes that are small, not widespread, and don’t affect the wood’s strength can often be treated and used. However, you should avoid wood that crumbles easily, has deep tunnels, or feels soft or spongy—these are signs of structural compromise. If the damage is old and inactive, you can treat it with a suitable wood preservative before use.
When checking salvaged wood for lead paint, do you have any recommendations on affordable home test kits that actually work well? I worry about accidentally sanding something hazardous when working with old barn boards or reclaimed trim.
For checking salvaged wood for lead paint, look for lead test kits like 3M LeadCheck or D-Lead. These are widely available, relatively affordable, and have a good reputation for reliability when used as directed. Be sure to follow the instructions closely for accurate results, especially with older finishes. Always take proper precautions if the test detects lead, including avoiding sanding and using protective gear.
When assessing salvaged wood for use in a project, how do you distinguish between minor surface mold that can be treated and more serious fungal growth that would make the timber unsafe or structurally unsound?
Minor surface mold on salvaged wood usually appears as a thin layer or spotty discoloration on the outer surface, often gray, white, or green, and can often be scrubbed off with mild detergent. Serious fungal growth, like deep rot or spongy texture, indicates structural damage—you might notice the wood is soft, crumbly, or has a musty odor. In those cases, the timber is likely unsafe and shouldn’t be used for structural projects. Always check beneath the surface, and if unsure, consult a professional.
You mention that hardwoods like oak and maple are especially prized when upcycling salvaged timber. How do you recommend identifying specific wood species if the boards are heavily weathered or painted over and the grain isn’t obvious?
When the wood grain isn’t visible due to weathering or paint, try sanding a small, inconspicuous area to expose the underlying grain and color. If that’s not possible, pay attention to the weight and hardness; hardwoods like oak and maple are generally heavier and denser. Also, check for characteristic smells when freshly cut or sanded, as some species have distinctive scents. If you’re still unsure, consider consulting a local woodworker or using online identification forums for help.
When sourcing salvaged wood from old barns or demolition sites, what is the best way to safely test for lead paint before starting any sanding or restoration? Are there specific kits or methods you recommend for small business owners working with limited resources?
Before working with salvaged wood, using a lead test kit is a simple and effective way to check for lead paint. Look for EPA-recognized kits like 3M LeadCheck or D-Lead, which are affordable and provide quick results. Just follow the instructions—usually, you’ll rub a reagent on the wood, and it changes color if lead is present. Always wear gloves and a mask during testing, and if you detect lead, avoid sanding and consider professional removal options.
I run a small furniture shop and often find salvaged wood with signs of old insect damage but no live pests. Is there a reliable way to be sure it’s safe to use, or should I always avoid wood with any history of infestation?
You don’t need to automatically discard wood with old insect damage, especially if there are no live pests or fresh frass (sawdust). To be sure it’s safe, inspect the wood thoroughly and consider heat-treating it by baking it at 55–60°C (130–140°F) for at least an hour, which kills any remaining eggs or larvae. Sealing or finishing the wood also helps prevent future infestations.
You listed a few places to source salvaged timber like demolition sites and pallets from businesses. For someone new to this, is there a certain type of salvage source that’s usually easier or safer to work with for a first project, especially when it comes to avoiding hidden damage or contaminants?
For beginners, pallets from local businesses or shipping centers are usually the easiest and safest to work with. They’re often accessible, manageable in size, and you can visibly inspect them for damage or signs of chemical treatment. Just be sure to look for pallets marked with HT (heat-treated), not MB (methyl bromide), to avoid chemical contaminants.
I’m planning to use salvaged pallets for a small bookshelf, but the article mentions concerns about chemical treatments. How can I tell if a pallet is safe for indoor projects or if it’s been pressure-treated with something toxic?
To check if a pallet is safe for indoor use, look for stamps on the wood. Pallets marked ‘HT’ (heat treated) are generally safe, while those marked ‘MB’ (methyl bromide) or with greenish stains may have been chemically treated and should be avoided. If there’s no stamp or you’re unsure, it’s best not to use that pallet indoors.
You mention that some salvaged wood might be pressure-treated and could contain toxins. Are there any specific tests or visual indicators I can use to confirm whether a piece is safe for indoor or food-related projects before I start working with it?
To check if salvaged wood is pressure-treated, look for a greenish or brown tint, oily surface, or faint chemical smell—these are common indicators. Sometimes, there may also be small incised lines on the surface. For greater certainty, hardware stores offer chemical test kits that detect preservatives. If the wood is stamped with codes like ‘CCA’, ‘ACQ’, or ‘PT’, it’s best avoided for indoor or food-related projects. When in doubt, err on the side of caution and use only wood with a clear history or confirmed as untreated.
Could you clarify what to do if we find pressure-treated wood in a pallet—how can we tell if it’s safe to use for indoor furniture, especially since you mentioned avoiding certain toxins? I’m trying to keep costs down but don’t want to risk bringing something harmful into our home.
If you find pressure-treated wood in a pallet, check for stamps or markings—like ‘CCA’, ‘ACQ’, or a greenish tint—which indicate chemical treatment. Pressure-treated wood often contains toxic preservatives and isn’t recommended for indoor furniture, especially where food or skin contact is common. When in doubt, choose pallets marked ‘HT’ (heat-treated), as these are safer and free from chemical treatments. Prioritize your family’s health by avoiding any wood that can’t be clearly identified as untreated or heat-treated.
When sourcing salvaged wood from old barns or demolition sites, what is the best method for testing if old paint contains lead, and are there recommended brands of test kits you trust that are both reliable and easy for a beginner to use?
To test old paint for lead, the most common method is to use a lead test swab kit that reacts with lead and changes color. Brands like 3M LeadCheck and D-Lead are popular, user-friendly, and widely considered reliable for beginners. Just follow the instructions carefully—usually, you rub the swab on the painted surface and check for a color change indicating lead presence.
I’m interested in using old pallets for a project with my kids, but I saw you mentioned concerns about chemical treatments on some salvaged wood. How can I tell if pallets are safe to use indoors or for things like bookshelves in a child’s room?
To check if pallets are safe for indoor use, look for markings on the wood. Pallets stamped ‘HT’ have been heat-treated and are generally safe. Avoid pallets marked ‘MB,’ which means they’ve been treated with methyl bromide, a harmful chemical. Also, steer clear of pallets with stains, strong odors, or unknown origins. Sand and clean the wood thoroughly before using it for kids’ projects.
I’ve found a batch of old pallets I want to reuse for building shelves, but I’m concerned about possible chemical treatments. Are there any clear signs or quick tests to help me figure out if this pallet wood was pressure-treated or chemically treated, besides just avoiding anything marked with ‘MB’ for methyl bromide?
Besides avoiding pallets marked ‘MB’, you can check for other stamps like ‘HT’ (heat-treated, which is safer) or ‘CT’ (chemically treated). If there’s no stamp, look for a strong chemical smell, unusually green or orange-tinted wood, or an oily surface—these may suggest chemical treatment. If you’re unsure, it’s safest to avoid using the wood for indoor projects or anything that will contact food.
When sourcing pallets or timber from local businesses, how can you quickly tell if the wood has been pressure-treated or chemically treated, especially if the markings are worn off? I want to use reclaimed wood for indoor shelves but am worried about unknown treatments.
If pallet or timber markings are missing, a quick check is to look for a greenish or yellow hue—pressure-treated wood often has these colors. Chemically treated wood may also have an oily or chemical smell. You can also check for incisions or tiny slits along the surface, which are sometimes present in pressure-treated lumber. If in doubt, it’s safest to avoid using it indoors or ask the supplier directly about its history.
You mention that pressure-treated wood can contain toxins and shouldn’t be used for food surfaces or indoor projects. Is there a reliable way to identify if a salvaged piece has been pressure-treated if all the original markings or tags are missing?
If salvaged wood has no markings, you can look for signs of pressure treatment like a greenish tint, oily or chemical smell, or small incisions or perforations along the surface. If you’re still unsure, avoid using the wood for food surfaces or indoor projects, since chemical residues can persist even after weathering.
The article mentions avoiding pressure-treated wood for indoor or food-related projects due to possible toxins. Are there any safe ways to repurpose pressure-treated wood outdoors, and what precautions should be taken to ensure it remains safe over time?
Pressure-treated wood can be reused safely for outdoor projects like garden borders, fences, or decking, as long as it doesn’t come into direct contact with edible plants or drinking water. To ensure safety, always wear gloves and a dust mask when cutting or sanding it, and seal cut ends with a wood preservative. Regularly inspect and re-seal the wood to maintain its protective barrier and minimize leaching of chemicals over time.
I just picked up some weathered boards from an old barn and noticed a few spots with what looks like black mold. Aside from cleaning, is there a safe way to treat or seal this wood so it’s okay to use indoors, or should I just avoid those boards completely?
If the boards have only minor mold spots, you can scrub them with a solution of water and vinegar or a diluted bleach mix to clean and kill mold spores. Let the wood dry completely, then sand the surface. To seal and protect it for indoor use, apply a mold-resistant primer or wood sealer. However, if the mold has penetrated deeply or the wood is soft or crumbling, it’s safer to avoid using those boards indoors.
Could you explain how to safely handle salvaged wood that might have been treated with chemicals, especially if I want to use it for indoor furniture? I’m concerned about potential toxins but also want to make use of some old floor joists I recently found.
When using salvaged wood for indoor furniture, it’s important to identify any previous chemical treatments, like paints or preservatives, which may contain toxins. Wear gloves and a mask when handling or sanding the wood. Avoid using pieces with visible mold, rot, or heavy coatings. If you’re unsure about the wood’s history, have it professionally tested or use it for outdoor projects instead. Always seal finished pieces with a non-toxic finish to reduce potential exposure indoors.
You mention avoiding pressure-treated wood for indoor or food projects because of possible toxins. Is there a safe way to identify whether older salvaged wood was pressure treated if it’s not labeled, especially if it’s already weathered or painted?
Identifying old pressure-treated wood without labels can be tricky, especially if it’s weathered or painted. Some signs include a greenish or brown tint, tiny surface perforations from treatment injection, or a chemical smell. If you’re unsure, avoid using the wood for indoor or food-related projects, as chemical residues may still be present. When in doubt, it’s safest to use wood with a clear history or opt for new, untreated lumber for sensitive uses.
When assessing salvaged wood from old barns or demolition sites, do you have tips for differentiating between cosmetic surface mold and deeper fungal decay? Sometimes it’s hard to tell if a black patch is just on the finish or an indicator of rot all the way through.
To tell the difference, try gently scraping the black patch with a putty knife. If it comes off easily and the wood underneath is solid, it’s likely just surface mold. If the wood feels soft, crumbles, or the discoloration goes deeper than the surface, it may be fungal decay or rot. Also, poke with a screwdriver—sound wood resists pressure, while decayed wood often gives way.
When you mention avoiding pressure-treated wood for indoor or food-related projects, what are some effective ways to identify whether salvaged timber has been treated, especially if markings or tags are missing or faded?
To identify pressure-treated wood without tags or markings, closely examine the color and smell. Treated wood often has a greenish or brown tint and may have small surface incisions from processing. It can also emit a chemical or oily odor. If you’re unsure, avoid using that wood for indoor or food-related projects, as chemical treatments can pose health risks. When in doubt, it’s safer to choose wood with a known history.
When checking salvaged wood for things like lead paint or chemical treatments, what are the quickest ways for a small business owner to test for safety before bringing that wood into a workshop? I work with a lot of reclaimed boards and want to avoid exposure risks.
For lead paint, you can use over-the-counter lead test swabs, which give results within minutes. For chemical treatments, look for color stains, unusual smells, or stamps indicating pressure treatment; if unsure, consider portable wood preservatives test kits. Always wear gloves and a mask when handling unknown wood, and if you suspect contamination, consult a professional lab for detailed analysis before using the material in your workshop.
You mention that pressure-treated wood might contain toxins and shouldn’t be used for food surfaces or indoors. If I want to reuse old deck boards indoors, is there a reliable way to tell if they were pressure-treated or chemically treated, especially if any labels are gone?
Identifying pressure-treated wood without labels can be tricky. Look for a greenish or brown tint, incised surface markings, or an oily or chemical smell, which are common signs of chemical treatments. If you’re unsure, it’s safest to avoid using the boards indoors, especially for surfaces that come into contact with food. When in doubt, consult a professional or consider using wood confirmed to be untreated.
When inspecting reclaimed wood for signs of insect damage like fresh holes or powdery frass, what’s the best way to treat it if I find a mild infestation? Is it enough just to sand and seal, or do I need to use special products?
If you spot signs of a mild insect infestation in reclaimed wood, sanding and sealing alone usually isn’t enough. First, brush or vacuum away any loose frass. It’s best to treat the wood with a borate-based wood preservative, which targets wood-boring insects. After treatment and allowing it to dry thoroughly, proceed with sanding and sealing to finish the project and help prevent future infestations.
If I find salvaged wood with light mildew spots, should I always avoid it, or are there recommended treatments for cleaning and making it safe for use? I’d like to know which products or methods work best without harsh chemicals.
You don’t have to avoid salvaged wood with light mildew spots. You can clean it safely by scrubbing with a mixture of white vinegar and water or a paste of baking soda and water. Let the wood dry completely in the sun afterward, as sunlight helps kill remaining spores. These methods are effective and don’t involve harsh chemicals. Just make sure the mildew hasn’t penetrated deeply or caused rot before using the wood.
When checking salvaged wood for infestations, you mentioned looking for fresh holes and powdery frass. Is there a preferred way to treat wood that has evidence of old, inactive insect damage but no live pests, or is it safer to avoid using it altogether?
If the insect damage appears old and there are no signs of active pests—like fresh holes, new frass, or live insects—it’s generally safe to use the wood. To be extra cautious, you can brush or vacuum the wood, then treat it with a borate-based wood preservative to discourage any hidden eggs from hatching. Sealing the wood afterward adds further protection.
When inspecting salvaged wood for things like rot or insect damage, do you have any tricks for determining whether a piece is worth saving or if it’s too far gone? Sometimes it’s hard for me to know when to put in the extra effort versus just scrapping it.
Inspecting salvaged wood can be tricky, but here are some handy tips: Press a screwdriver or awl into the wood—if it sinks in easily or the wood crumbles, rot is likely severe. Look for powdery residues, tiny holes, or tunnels as signs of insect damage. Surface stains or minor wormholes can often be sanded out, but if the damage goes deep or the piece feels soft and lightweight, it’s usually best to scrap it.
I noticed you mention that pallets from local businesses can be a source of salvaged wood, but how can I tell if the pallets are safe for indoor use, especially if I’m making furniture for my kids’ rooms? Are there specific markings I should look for to avoid chemical treatments?
When choosing pallets for indoor projects, especially for children’s furniture, check for markings stamped on the pallet wood. Look for ‘HT’, which stands for heat treated—these are generally safe. Avoid pallets labeled ‘MB’, which means they were treated with methyl bromide, a harmful chemical. Also, steer clear of pallets with stains, strong odors, or no markings at all. Always clean and sand pallets thoroughly before use.
I’m interested in using old pallets for making shelves, but I often find ones with minor warping or cracks. How do you determine if those boards are still structurally sound enough for furniture, and are there specific repair techniques you recommend for reinforcing them?
Check each pallet board for deep cracks, rot, or signs of insect damage—these are usually deal-breakers. Minor warping and small surface cracks are common in pallets and can often be sanded smooth or filled with wood filler. To reinforce boards, you can glue and screw a straight support strip (cleat) along the length of the warped board or use wood glue and clamps to repair cracks. Always test the strength by applying pressure before building your shelves.
When checking salvaged wood for active infestations, how do you safely treat pieces if you spot signs like powdery frass or fresh beetle holes? Are there household treatments that work, or does it require special products to make the wood safe for indoor use?
If you notice powdery frass or fresh beetle holes in salvaged wood, you’ll want to act before bringing it indoors. Freezing small pieces for several days can kill most insects, and thoroughly heating the wood (at least 140°F for an hour) is another effective household method. For larger or valuable pieces, using a borate-based wood treatment is best—these are safe for indoor use and penetrate deeply to eliminate pests. Household sprays are usually insufficient for deep infestations.
Could you share more details on how to safely treat salvaged wood if there’s a chance it’s been exposed to mold or mildew? I’m interested in using old floor joists but want to make sure they’re safe and clean before starting a project.
To safely treat salvaged wood that might have mold or mildew, start by wearing gloves, a mask, and eye protection. Scrub the wood with a stiff brush to remove visible mold. Mix a solution of one part vinegar to one part water or use a commercial mold remover and wipe down the wood thoroughly. Allow it to dry completely in a well-ventilated space. Inspect for deep mold—if it’s penetrated deeply, consider discarding the wood. Once dry and clean, sanding and sealing can help prevent future growth.