
Introduction: Salvaged Bathtubs as Sustainable Garden Planters
Upcycling offers more than just a creative outlet—it’s a practical path toward sustainability and resourcefulness. Among the most striking, conversation-starting upcycling projects is transforming a salvaged bathtub into an outdoor planter. Bathtubs, with their generous size, durable construction, and vintage charm, are often discarded during renovations. Instead of sending them to landfill, you can resurrect these castoffs into stunning garden features. This project not only diverts bulky waste but also provides a unique focal point, combining function and artistry. Whether you’re a seasoned upcycler or just starting out, this detailed guide walks you through each step of converting an old bathtub into a thriving planter. You’ll learn how to source, restore, and design with salvaged tubs, address drainage and safety, and maintain your upcycled planter for years of sustainable beauty. Let’s dig in and turn yesterday’s bathroom staple into tomorrow’s garden showpiece.
Choosing the Right Salvaged Bathtub: Materials, Condition, and Sourcing
Common Bathtub Materials and Their Upcycling Suitability
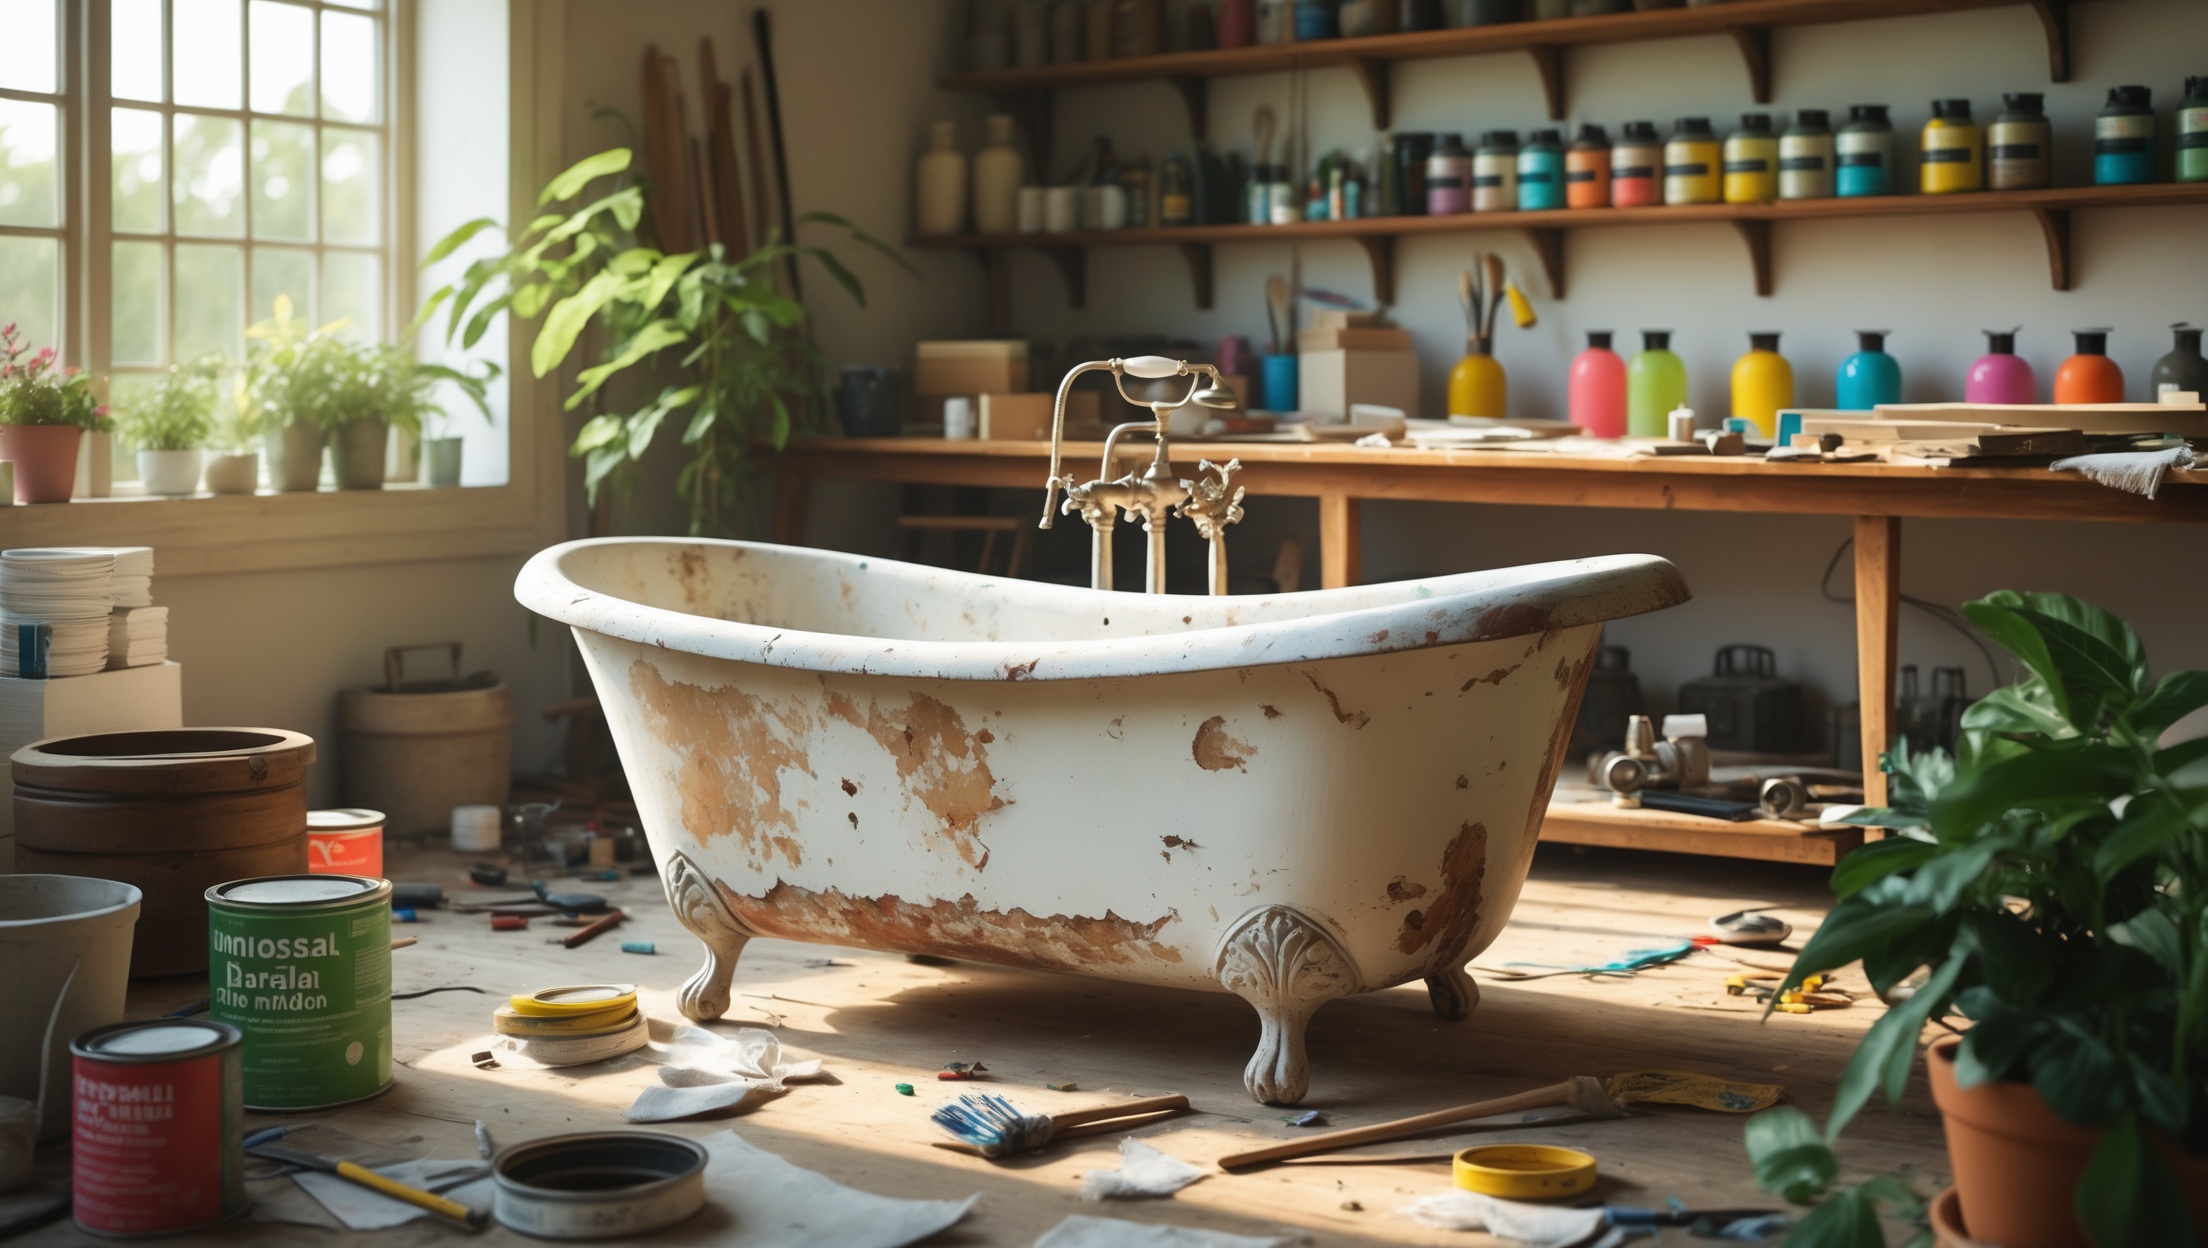
- Cast Iron with Porcelain Enamel: Heavy, extremely durable, and often found as vintage clawfoot tubs. Can be refinished and painted easily; ideal for outdoor use.
- Acrylic/Fiberglass: Lightweight and easier to move, but may fade or crack over time outdoors. Still usable if in decent condition.
- Steel: Lighter than cast iron but more prone to rust. Requires thorough rust treatment and sealing before upcycling.
Evaluating Condition: What to Look For
- Surface Damage: Chips, cracks, or flaking enamel are common. Minor flaws are fixable, but avoid tubs with major structural damage.
- Rust and Corrosion: Surface rust can be sanded and treated. Deep corrosion, especially around the base, may compromise safety and longevity.
- Previous Use: Avoid tubs that held hazardous materials or were used for purposes other than bathing.
Where to Source Salvaged Bathtubs
- Demolition sales and architectural salvage yards
- Online classifieds (Craigslist, Facebook Marketplace, Freecycle)
- Local renovation contractors (ask to be notified when bathtubs are removed)
- Municipal recycling centers or dumps (with permission)
Preparation and Restoration: Cleaning, Repair, and Surface Treatment
Safety First: Handling Heavy Materials
Use proper lifting technique and, for cast iron tubs, at least three people or a dolly for safe transportation. Wear heavy-duty gloves and steel-toed boots. Watch for sharp edges or chipped enamel.
Cleaning the Bathtub
- Remove any remaining hardware (drain, overflow covers, taps) using a wrench or screwdriver.
- Scrub thoroughly with a degreasing cleanser and a stiff brush to remove grime, soap scum, and mineral deposits.
- Rinse and allow to dry completely before proceeding.
Minor Repairs
- Chips and Scratches: Fill with epoxy filler or porcelain repair kit. Sand smooth after curing.
- Rust Spots: Remove with a wire brush or sandpaper. Apply rust converter and a rust-inhibiting primer.
- Cracks (Acrylic/Fiberglass): Patch with fiberglass repair tape and resin. Sand flush after curing, then paint with UV-resistant finish.
Surface Finishing (Optional)
- For a decorative touch, consider painting the exterior with weather-resistant enamel or outdoor spray paint. Use a primer suitable for the tub’s material.
- Leave the interior as-is, or line it with landscape fabric if the finish is badly damaged.
Planning Drainage and Placement for Healthy Plants
Creating Adequate Drainage
Proper drainage is crucial to prevent root rot and ensure plant health. Most bathtubs already have a drain hole, but you can optimize it for planter use:
- Ensure the drain is clear and unobstructed. Remove any old plumbing or hardware.
- If the tub will sit flat on the ground, elevate it slightly (using bricks or blocks) to allow water to escape.
- Cover the drain hole with landscape fabric or mesh to keep soil from washing out while letting water flow.
- Add a 2-4 inch layer of coarse gravel or broken pottery (known as “crocks”) at the bottom for extra drainage.
Best Locations for Bathtub Planters
- Choose a level, stable spot in full or partial sun, depending on your chosen plants.
- Avoid low-lying areas where water pools after rain.
- Position the tub so it’s easy to access for planting, watering, and maintenance.
Designing Your Bathtub Planter: Plant Selection and Arrangement
Choosing Plants for Bathtub Planters
- Herbs: Basil, mint, chives, thyme, oregano, and parsley thrive with good drainage.
- Flowers: Petunias, marigolds, nasturtiums, geraniums, and pansies create vibrant displays.
- Vegetables: Lettuce, radishes, spinach, and compact tomatoes work well in deep tubs.
- Succulents: Especially suited for shallow tubs or drier climates.
- Pollinator Plants: Lavender, echinacea, and bee balm attract bees and butterflies.
Arranging Plants
- Layer taller plants at the back (if placing against a wall) or in the center (if freestanding), with cascading or shorter plants along the edges.
- Mix colors and textures for maximum visual impact.
- Leave room for growth and airflow to prevent disease.
Soil Mix for Bathtub Planters
Fill with high-quality, well-draining potting mix. Combine compost, peat moss (or coconut coir), and perlite or coarse sand. Avoid garden soil, which can compact and impede drainage.
Step-by-Step Setup Tutorial
- Step 1: Prepare the bathtub by cleaning and making any necessary repairs as described above.
- Step 2: Move the tub into position, ensuring it is level and the drainage hole is unobstructed.
- Step 3: Place mesh or landscape fabric over the drain.
- Step 4: Add a drainage layer of gravel, stones, or pottery shards (2–4 inches deep).
- Step 5: Fill with custom potting mix, leaving at least 2 inches of space from the rim.
- Step 6: Arrange and plant your chosen greenery, starting with the largest or tallest plants.
- Step 7: Water thoroughly, letting excess drain out the bottom. Add mulch to retain moisture if desired.
- Step 8: Monitor the planter over the next week, watering as needed and adjusting the arrangement if settling occurs.
Creative Enhancements: Decoration and Functionality
- Paint the tub’s exterior with stencils, murals, or bold colors to match your garden theme.
- Attach vintage hardware (handles or feet) for extra charm.
- Install a trellis or arch at one end for climbing plants like sweet peas or beans.
- Add solar lights inside or around the tub for nighttime ambiance.
- Use the tub as a water feature by partially filling with water-loving plants like water lilies and irises (ensure drainage is blocked).
Maintenance Best Practices for Bathtub Planters
Watering and Drainage
Check soil moisture regularly; tubs without drainage can quickly become waterlogged. Adjust watering frequency based on rainfall and plant needs. In rainy climates, ensure the drainage hole remains clear of debris.
Seasonal Care
- In winter, empty and store lightweight tubs (fiberglass/acrylic) to prevent cracking from freeze-thaw cycles.
- For heavy tubs, insulate with straw or cover with a tarp to protect perennial plants.
- Refresh soil and compost annually to replenish nutrients.
Pest and Disease Control
- Inspect regularly for aphids, snails, or fungal issues. Use organic treatments where possible.
- Keep mulch away from tub edges to deter slugs.
Safety Checklist: Placement, Handling, and Environmental Considerations
- Ensure the tub is stable and will not tip over if leaned on or bumped.
- Check for sharp or jagged edges and sand them smooth or cover with trim.
- Never use a tub that previously contained chemicals; residue can be hazardous to plants and humans.
- Be mindful of lead-based paint on old tubs—avoid sanding or stripping paint without proper precautions.
- Position away from areas where children or pets play unsupervised.
Cost Breakdown and Budgeting Tips
- Salvaged Bathtub: Often free to $150 depending on condition and material.
- Transport: $0–$60 (borrow a truck or rent a trailer/dolly).
- Cleaning and Repair Supplies: $20–$50 (cleaner, brushes, rust converter, paint, patch kits).
- Drainage Material: $10–$20 (gravel, pottery shards, mesh).
- Potting Mix and Compost: $25–$50 (bulk is cheaper; mix your own for savings).
- Plants: $20–$50 (even less if you propagate your own or swap with neighbors).
- Decorative Paint/Hardware (optional): $10–$40.
Total Estimated Cost: $85–$370, depending on choices and available materials. Upcycling is most affordable when you source free materials and repurpose items you already own.
Conclusion: The Lasting Value of Bathtub Planter Upcycling
Upcycling a salvaged bathtub into a garden planter is more than a statement of creativity—it’s a testament to sustainable living. This project diverts waste from landfills, reduces demand for new resources, and fosters habitat for pollinators and beneficial insects. The process—from sourcing and restoring your tub to designing an eye-catching, eco-friendly planter—encourages hands-on learning and resourcefulness. With thoughtful maintenance and seasonal care, your bathtub planter can remain a vibrant part of your outdoor space for years to come. Plus, each tub tells a story: of renewal, ingenuity, and environmental stewardship. As you enjoy your lush, blooming creation, you’ll inspire others to reimagine the potential in everyday castoffs. Let this project be the start of many more upcycling adventures, each one contributing to a more sustainable, beautiful world—one rescued item at a time.


I’m curious about dealing with drainage when turning a cast iron or steel bathtub into an outdoor planter. If the original drain isn’t usable or is missing, what would be the best way to create new drainage holes without risking damage to the tub?
If the original drain can’t be used, you can drill new drainage holes in the bottom of the tub. For cast iron or steel, use a drill with a carbide-tipped or metal drill bit. Start with a small pilot hole, then gradually enlarge it to your desired size. Drilling a few evenly spaced holes will help with drainage. Just be sure to wear safety gear and go slowly to avoid chipping the enamel or damaging the metal.
You talk about making sure salvaged tubs weren’t used for hazardous materials before upcycling them. What’s the safest way to thoroughly clean and prep a tub whose history is unknown, so it’s safe for growing edible plants like herbs or veggies?
If you’re unsure about a salvaged tub’s history, start by scrubbing it thoroughly with a mix of hot water, dish soap, and a stiff brush. Rinse well, then disinfect using a mixture of one part white vinegar to one part water or a diluted bleach solution (1 part bleach to 10 parts water). Rinse again thoroughly and let it dry in the sun. If the tub is coated or painted, check for lead-based paint and remove or seal it if needed. Using a food-safe liner or planting in containers inside the tub can offer extra safety.
If I come across an acrylic or fiberglass tub that has some surface fading but is still structurally intact, is there a specific type of outdoor-safe paint or sealant you recommend to help it hold up against sun and rain?
For outdoor use, it’s best to use an exterior-grade acrylic latex paint or a spray paint specifically formulated for plastics. Before painting, lightly sand the tub and apply a primer designed for plastic surfaces. To protect the finish from sun and rain, add a clear UV-resistant sealant once the paint is dry. This combination helps the color last longer and resists weathering.
If I end up using a steel bathtub as a planter, what kind of sealing products or techniques do you recommend to prevent rust, especially in areas with a lot of rain? I want something that will really last but isn’t too complicated to maintain yearly.
For steel bathtubs, a high-quality exterior-grade rust-inhibiting primer followed by a couple of coats of outdoor enamel or marine paint works well to seal the surface and prevent rust. For extra protection, you can also use a clear waterproof sealer on top. This combination is durable and typically only needs a quick touch-up every year or two in wet climates.
I’m curious about what you recommend for treating rust on steel bathtubs before turning them into planters. Is there a specific type of sealant that holds up best outdoors, or should I be using multiple products to make sure the rust doesn’t come back?
To treat rust on steel bathtubs, start by thoroughly scrubbing off all loose rust with a wire brush or sandpaper. After cleaning, apply a rust converter to neutralize any remaining rust. Once dry, use a high-quality exterior-grade metal primer, and then finish with a durable outdoor enamel paint or a clear outdoor polyurethane sealant. Using both primer and sealant offers the best long-term protection against outdoor moisture and rust reformation.
If I go with an acrylic or fiberglass tub, what’s the best way to protect it from UV damage and cracking in harsh outdoor weather, especially since the article says they can fade over time? Any specific sealers or paints recommended for those materials?
For acrylic or fiberglass tubs, start by thoroughly cleaning and lightly sanding the surface. Choose a high-quality exterior acrylic or marine-grade paint designed for plastic or fiberglass, as these resist fading and weathering. After painting, apply a clear UV-resistant polyurethane or specialized outdoor sealer for extra protection. Reapply the sealer every couple of years to help prevent cracking and color loss in harsh weather.
I’m interested in trying this with an old cast iron bathtub I found, but I’m worried about how to move it safely since it’s so heavy. Do you have any tips or recommended tools for transporting and positioning a cast iron tub in the yard without it getting damaged?
Moving a cast iron bathtub can be challenging due to its weight, but using the right tools will help. A sturdy appliance dolly or hand truck is essential, along with moving straps to secure the tub. Place thick blankets or padding under the tub to prevent scratches or chips. If possible, enlist the help of a few friends to guide and lift it. Plan your route carefully and clear any obstacles ahead of time for a smoother move.
If I find an old acrylic tub at a local salvage yard, are there any special steps I should take to protect it from fading or cracking outside, especially in areas that get a lot of sun? I want to make sure my planter holds up through the seasons.
For an acrylic tub, start by thoroughly cleaning and drying it. To protect against fading and cracking from sun exposure, apply a high-quality, UV-resistant clear sealant designed for plastics. This coating helps block sunlight and weather damage. Place your planter in a spot where it gets some shade during the hottest part of the day, if possible. Regularly inspect the tub for any signs of wear so you can touch up the sealant as needed.
You mentioned that acrylic and fiberglass tubs can fade or crack outdoors. Do you have any suggestions for sealing or painting these materials to help them withstand weather, or is it better to stick with cast iron for longevity?
Acrylic and fiberglass tubs can be used outdoors if you prep them well. For added durability, use a high-quality exterior primer and paint made for plastics or fiberglass. You can also apply a clear outdoor sealant over the paint for extra protection. However, even with these steps, cast iron tubs still outlast acrylic or fiberglass outside, as they’re more resistant to weathering over time.
I usually see old acrylic tubs for sale in my area rather than cast iron. Given what you mentioned about fading and cracking, would applying a certain type of paint or sealant help them hold up longer outdoors, or should I just stick to metal tubs?
Acrylic tubs can work as planters, but to help them last outdoors, choose a high-quality exterior primer followed by UV-resistant outdoor paint made for plastics. Once dry, apply a clear polyurethane or marine sealant for extra protection. While this won’t make acrylic as durable as metal, it can extend its lifespan and slow down fading and cracking.
I noticed the guide compares cast iron, acrylic, and steel tubs for upcycling, but how do I decide which is best if I live somewhere with very cold winters? Do any particular materials hold up better to freezing temperatures when used as planters?
If you live in an area with cold winters, cast iron and steel tubs are your best options for upcycling into outdoor planters. Cast iron, in particular, is extremely durable and can handle freeze-thaw cycles without cracking, whereas acrylic is more likely to become brittle and could crack in freezing temperatures. Make sure to drill drainage holes to help prevent water from freezing and expanding inside the planter.
I’m interested in turning an old cast iron bathtub into a planter, but I’m worried about the weight when it’s filled with soil. Do you have tips for moving these heavy tubs into place safely, or is it better to position them before adding soil?
It’s definitely best to move your cast iron bathtub into its final spot before adding any soil, as it will become extremely heavy once filled. To move it safely, use a dolly or heavy-duty furniture sliders, and get some help from friends or family. Protect the surface beneath by laying down plywood if moving over grass or soft ground. Take your time and lift with care to avoid injuries.
When sourcing a salvaged bathtub for an outdoor planter, how do you deal with tubs that have surface rust or chipped enamel? Are there specific products or methods you recommend to safely treat and seal these issues for long-term outdoor use?
For tubs with surface rust, start by scrubbing the rusted areas with a wire brush or sandpaper to remove loose rust. Apply a rust converter or rust-inhibiting primer to prevent further corrosion. For chipped enamel, clean the area and use an epoxy-based enamel repair kit to fill and seal chips. Once repairs are dry, seal the entire interior with a weather-resistant exterior paint or clear sealant designed for metal. This will help protect the tub and ensure it lasts outdoors.
When sourcing a salvaged bathtub, how can I tell if surface damage or flaking enamel is still within a fixable range? Are there telltale signs that indicate the tub might not be safe or sustainable for upcycling as a garden planter?
When checking a salvaged bathtub, light scratches and minor enamel chips are usually fixable with enamel repair kits or by lining the tub. However, widespread rust, deep cracks, or flaking all over the surface can indicate structural weakness or potential for leaching unsafe materials. If the tub feels brittle, has sharp rusted edges, or shows signs of lead-based enamel (common in very old tubs), it’s best to avoid using it as a planter.
I’m interested in the creative side—do you have tips for painting or decorating a cast iron clawfoot tub to make it look really unique in the garden, and are there any specific types of paint or finishes that work best for outdoor conditions?
Painting a cast iron clawfoot tub for outdoor use is a fun way to make your planter stand out. For best results, use an exterior-grade metal primer first, then follow with oil-based or acrylic enamel paints designed for metal surfaces. Stencils, bold patterns, or even mosaic tiles can add unique flair. Finish with a clear, weather-resistant sealer to protect your design from the elements and keep it looking great season after season.
Does the guide include any advice on how to add adequate drainage to a bathtub made of acrylic or fiberglass? I’m concerned about cracking the material if I try drilling holes, so I’d love some tips on safe methods for lightweight tubs.
The guide does touch on drainage for various tub types, including acrylic and fiberglass. For lightweight tubs, it recommends using a drill with a fine masonry or step bit and starting with a small pilot hole to minimize the risk of cracking. Placing masking tape over the spot before drilling can also help prevent the material from splintering. If you’re nervous about drilling, you can elevate one end of the tub slightly and add a layer of coarse gravel at the bottom to help with drainage.
You mentioned avoiding tubs that were previously used to hold hazardous materials. Is there a safe way to check a tub’s history before purchasing it from a salvage yard, or specific questions I should ask the seller?
When buying a salvaged bathtub, ask the seller about its previous use and if they have records of where it came from. Look for discoloration, odd smells, or chemical stains, which might indicate past hazardous material storage. If possible, request information on the tub’s origin or past location. Any reputable salvage yard should be able to tell you whether the tub was used for chemicals or industrial purposes.
I’m interested in the idea of using a vintage cast iron tub as a planter, but how do you safely move something that heavy without special equipment? Are there any tips for DIYers trying this by themselves?
Moving a vintage cast iron tub is definitely a challenge due to its weight. If you’re tackling this solo, consider using a sturdy dolly or hand truck, and place thick blankets underneath to help slide the tub without scratching surfaces. Leverage boards or planks as ramps to avoid lifting the tub entirely. If possible, ask a friend to help—cast iron tubs can weigh 300-400 pounds, so safety is key. Take your time and wear gloves to protect your hands.
I’m curious—how much does it actually cost overall to upcycle a salvaged bathtub into a planter? Does the material (like cast iron versus fiberglass) significantly change your expenses for preparation and maintenance?
The total cost of upcycling a salvaged bathtub into a planter typically ranges from $50 to $200, depending on supplies and finishes. The material does make a difference: cast iron tubs are heavier, may need rust treatment or special paint, and can be pricier to move, while fiberglass is lighter but might require extra care to prevent cracking during preparation. Maintenance is usually lower for fiberglass, but cast iron is more durable long-term if properly sealed.
I want to upcycle an old cast iron tub I found at a salvage yard, but it has a few chips in the enamel and a spot with surface rust. How can I tell if the damage is too much to repair, or if it should still be safe for use as a planter?
Small chips in the enamel and minor surface rust are usually not a problem for an outdoor planter. To check if your tub is suitable, look for deep rust that has eaten through the metal or caused major structural weakening. If the tub is still sturdy with no holes or sharp broken edges, it should be fine. Clean off rust and seal chipped areas before planting to help preserve it.
If I go with an acrylic or fiberglass bathtub for my planter, how can I prevent fading and cracking from sun exposure, and is there a way to extend the lifespan compared to using a heavier cast iron tub?
To help an acrylic or fiberglass bathtub planter last longer outdoors, apply a high-quality UV-resistant clear sealant to protect against sun damage and fading. Place the planter in a spot that gets partial shade during the hottest part of the day if possible. Regularly check for cracks and reapply the sealant annually. These steps can greatly extend durability, but a cast iron tub will still generally outlast lighter materials.
I’m interested in turning a fiberglass bathtub into a planter, but I’m concerned about it potentially cracking or fading over time, especially since I live in an area with harsh sunlight. Are there specific sealants or protective coatings you suggest to help it last longer outside?
Fiberglass bathtubs can definitely be used as outdoor planters, but you’re right to consider protection from sun and weather. For durability, apply a marine-grade epoxy resin or a high-quality exterior polyurethane sealant to the outside and rim. For UV protection, look for a clear coat specifically labeled as UV-resistant. Regularly inspect for cracks, and reapply the coating every couple of years to keep your planter in good shape.
If the salvaged bathtub I find has some surface rust and a few minor chips in the enamel, what are the best repair techniques before turning it into a planter? I’d love some details on what products or methods work best for prepping the tub for outdoor use.
To repair surface rust, start by scrubbing the affected area with a wire brush or abrasive pad, then apply a rust converter to stop further corrosion. For enamel chips, use a two-part epoxy or porcelain repair kit to fill and seal the spots, following the manufacturer’s directions. Once repairs are dry, prime the tub with a rust-resistant exterior primer and finish with an outdoor-grade paint for long-lasting protection.
Could you clarify how to handle drainage for a cast iron bathtub planter? I’m worried about water building up and damaging either the soil or the tub over time, especially since ours has no existing drain holes.
For a cast iron bathtub with no drain holes, it’s important to create proper drainage to prevent water buildup. Drill several holes in the bottom of the tub using a metal drill bit—space them evenly to allow excess water to escape. Place a layer of gravel or broken pottery shards at the base before adding soil; this helps further with drainage. This approach protects both your soil and the tub from water damage over time.
You mentioned surface rust can be treated, but what kind of products or methods work best to seal a steel bathtub planter after treatment so it will survive being outside for multiple seasons?
After treating any rust, it’s best to use an exterior-grade metal primer followed by a weather-resistant enamel paint specifically designed for metal surfaces. Once painted, you can add a clear outdoor polyurethane or a rust-inhibiting sealant for extra protection. Make sure each layer is fully dry before applying the next. This combination will help your steel bathtub planter withstand the elements for many seasons.
I’m interested in using a vintage cast iron bathtub as a planter but am a bit worried about potential lead in old enamel coatings. Do you have any recommendations for testing or sealing the tub to make sure it’s safe for growing edibles?
Your concern about lead in vintage enamel is valid, especially if you plan to grow edibles. You can test the tub’s surface using a lead test kit, which is available at most hardware stores. If lead is present or you want extra peace of mind, seal the interior with a food-safe epoxy or pond liner. This creates a barrier between the soil and the potentially hazardous surface, making it safer for growing edible plants.
When upcycling a cast iron bathtub into a planter, what’s the best way to deal with deep surface rust, especially around the base? I’d like to make sure it lasts many seasons outdoors and won’t deteriorate quickly.
To tackle deep surface rust on a cast iron bathtub, especially at the base, start by scrubbing away loose rust with a wire brush or sandpaper. Then, apply a rust converter to neutralize any remaining rust. Once dry, use an outdoor-grade primer followed by several coats of weather-resistant paint or sealant. These steps help protect the metal and ensure your planter lasts for many seasons outdoors.
When evaluating an old steel bathtub for upcycling, how can I tell if the rust is just on the surface or if it’s deep enough to affect the tub’s stability? Are there any tricks for checking this before I commit to restoring it?
To check if the rust on a steel bathtub is only surface deep, gently tap the rusted area with a screwdriver or small hammer—solid metal gives a sharp sound, while deeper rust may sound dull or feel soft. You can also try scraping with a wire brush; if metal flakes off easily or you see holes, the rust is deep. Avoid tubs with extensive pitting or thin, brittle spots.
When prepping a cast iron bathtub for use as a planter, what type of paint or sealant would you recommend to withstand outdoor conditions and prevent potential leaching into the soil?
For a cast iron bathtub planter, it’s best to use an exterior-grade epoxy or acrylic enamel paint designed for metal surfaces. Before painting, apply a rust-inhibiting metal primer. To further prevent leaching, line the inside with a heavy-duty pond liner or food-safe sealant, which acts as a barrier between the paint and the soil. This approach ensures durability and protects your plants from harmful chemicals.
I noticed you mentioned that cast iron tubs are ideal for outdoor planters, but they are also extremely heavy. Do you have any tips for safely moving and positioning a cast iron bathtub in the yard, especially if you don’t have access to heavy machinery?
Moving a cast iron bathtub without machinery can be challenging, but it’s possible with some planning. Try using a sturdy dolly or hand truck with straps to help secure and roll the tub. Gather a few strong helpers for lifting and maneuvering, and place plywood sheets or boards on the ground to create a smooth path and protect your lawn. Take your time, communicate clearly with your helpers, and always lift with your legs to avoid injury.
Can you share some tips for moving and positioning a really heavy vintage cast iron bathtub in the yard, especially if I don’t have access to special moving equipment? I’d love to avoid injuries or property damage during this step.
Moving a heavy cast iron bathtub safely takes some planning. Gather a few strong helpers to share the load and always lift with your legs rather than your back. Lay plywood sheets or boards along your path to protect the ground and make dragging easier. Old blankets or towels under the tub can help it slide without scratching surfaces. Be sure to clear your route of obstacles, and take breaks if needed to prevent strain.
I’m wondering about how to safely address drainage when turning a cast iron bathtub into a planter. Does the guide recommend drilling new holes, or is it usually enough to work with the existing drain for most plant types?
The guide suggests that the existing drain in a cast iron bathtub is usually sufficient for most plant types, as long as it remains unblocked. However, if you plan to grow plants that require excellent drainage or the tub will be outdoors where heavy rain might collect, you can add a few extra holes for better water flow. When drilling new holes, use a masonry bit and take safety precautions.
You mentioned that acrylic and fiberglass tubs can crack or fade outdoors. Is there a way to make these types last longer as planters, or are they better suited for just one or two seasons before needing replacement?
To help acrylic and fiberglass tubs last longer outdoors, you can apply a UV-resistant outdoor paint or sealant to protect against fading and cracking. Placing the tub in partial shade and avoiding harsh impacts will also extend its life. With these steps, you can expect them to last several seasons, but they generally won’t be as durable as cast iron or metal tubs in outdoor conditions.