
Introduction: Reviving Vintage Lighting for Sustainable Living
In the world of creative salvage and sustainable design, lighting fixtures offer a unique opportunity to blend history, craftsmanship, and green living. Vintage lamps, pendants, and chandeliers—often overlooked at thrift stores, architectural salvage yards, or estate sales—are prime candidates for upcycling. Restoring these pieces not only diverts waste from landfills but also preserves the artistry of bygone eras, infusing modern homes with character and eco-conscious charm.
Yet, working with salvaged lighting comes with its own set of challenges and rewards. Fixtures may harbor outdated wiring, corroded metal, or missing components. Safety is paramount, as poorly restored electrical items can pose significant hazards. However, with careful sourcing, thoughtful assessment, and the right restoration techniques, even the most neglected fixture can be transformed into a statement piece—illuminating your space while honoring the planet.
This comprehensive guide will walk you through every stage of restoring salvaged lighting. From spotting the best finds and evaluating their potential, to rewiring, refinishing, and styling the finished piece, you’ll gain the expertise needed to bring vintage illumination into your sustainable home safely and beautifully.
Sourcing Salvaged Lighting Fixtures: Where and What to Look For
Best Places to Find Vintage Fixtures
- Architectural Salvage Yards: These treasure troves often stock lighting removed from historic homes and commercial buildings. Ask staff about recent arrivals or items in storage.
- Thrift Stores and Charity Shops: Small table lamps and wall sconces frequently appear here, sometimes overlooked due to age or grime.
- Flea Markets and Estate Sales: Look for whole fixtures or even parts boxes—perfect for custom builds or repairs.
- Online Marketplaces: Sites like eBay, Craigslist, and Facebook Marketplace can yield unique finds, but always request detailed photos and confirm dimensions before purchasing.
- Curbside and Demolition Sites: With permission, you may find discarded fixtures during neighborhood cleanouts or renovation projects.
What Makes a Fixture Worth Restoring?
- Quality Materials: Solid brass, copper, cast iron, hand-blown glass, or porcelain parts are durable and restore well.
- Structurally Sound: Check for cracks in glass, severe rust, or broken arms that may be difficult or costly to repair.
- Distinctive Design: Fixtures with unique shapes, ornate details, or period features (Art Deco, Mid-Century, etc.) add personality to modern spaces.
- Replaceable Parts: Missing sockets, chains, or canopies are usually easy and affordable to replace; avoid fixtures with custom or obsolete fittings unless you’re up for a challenge.
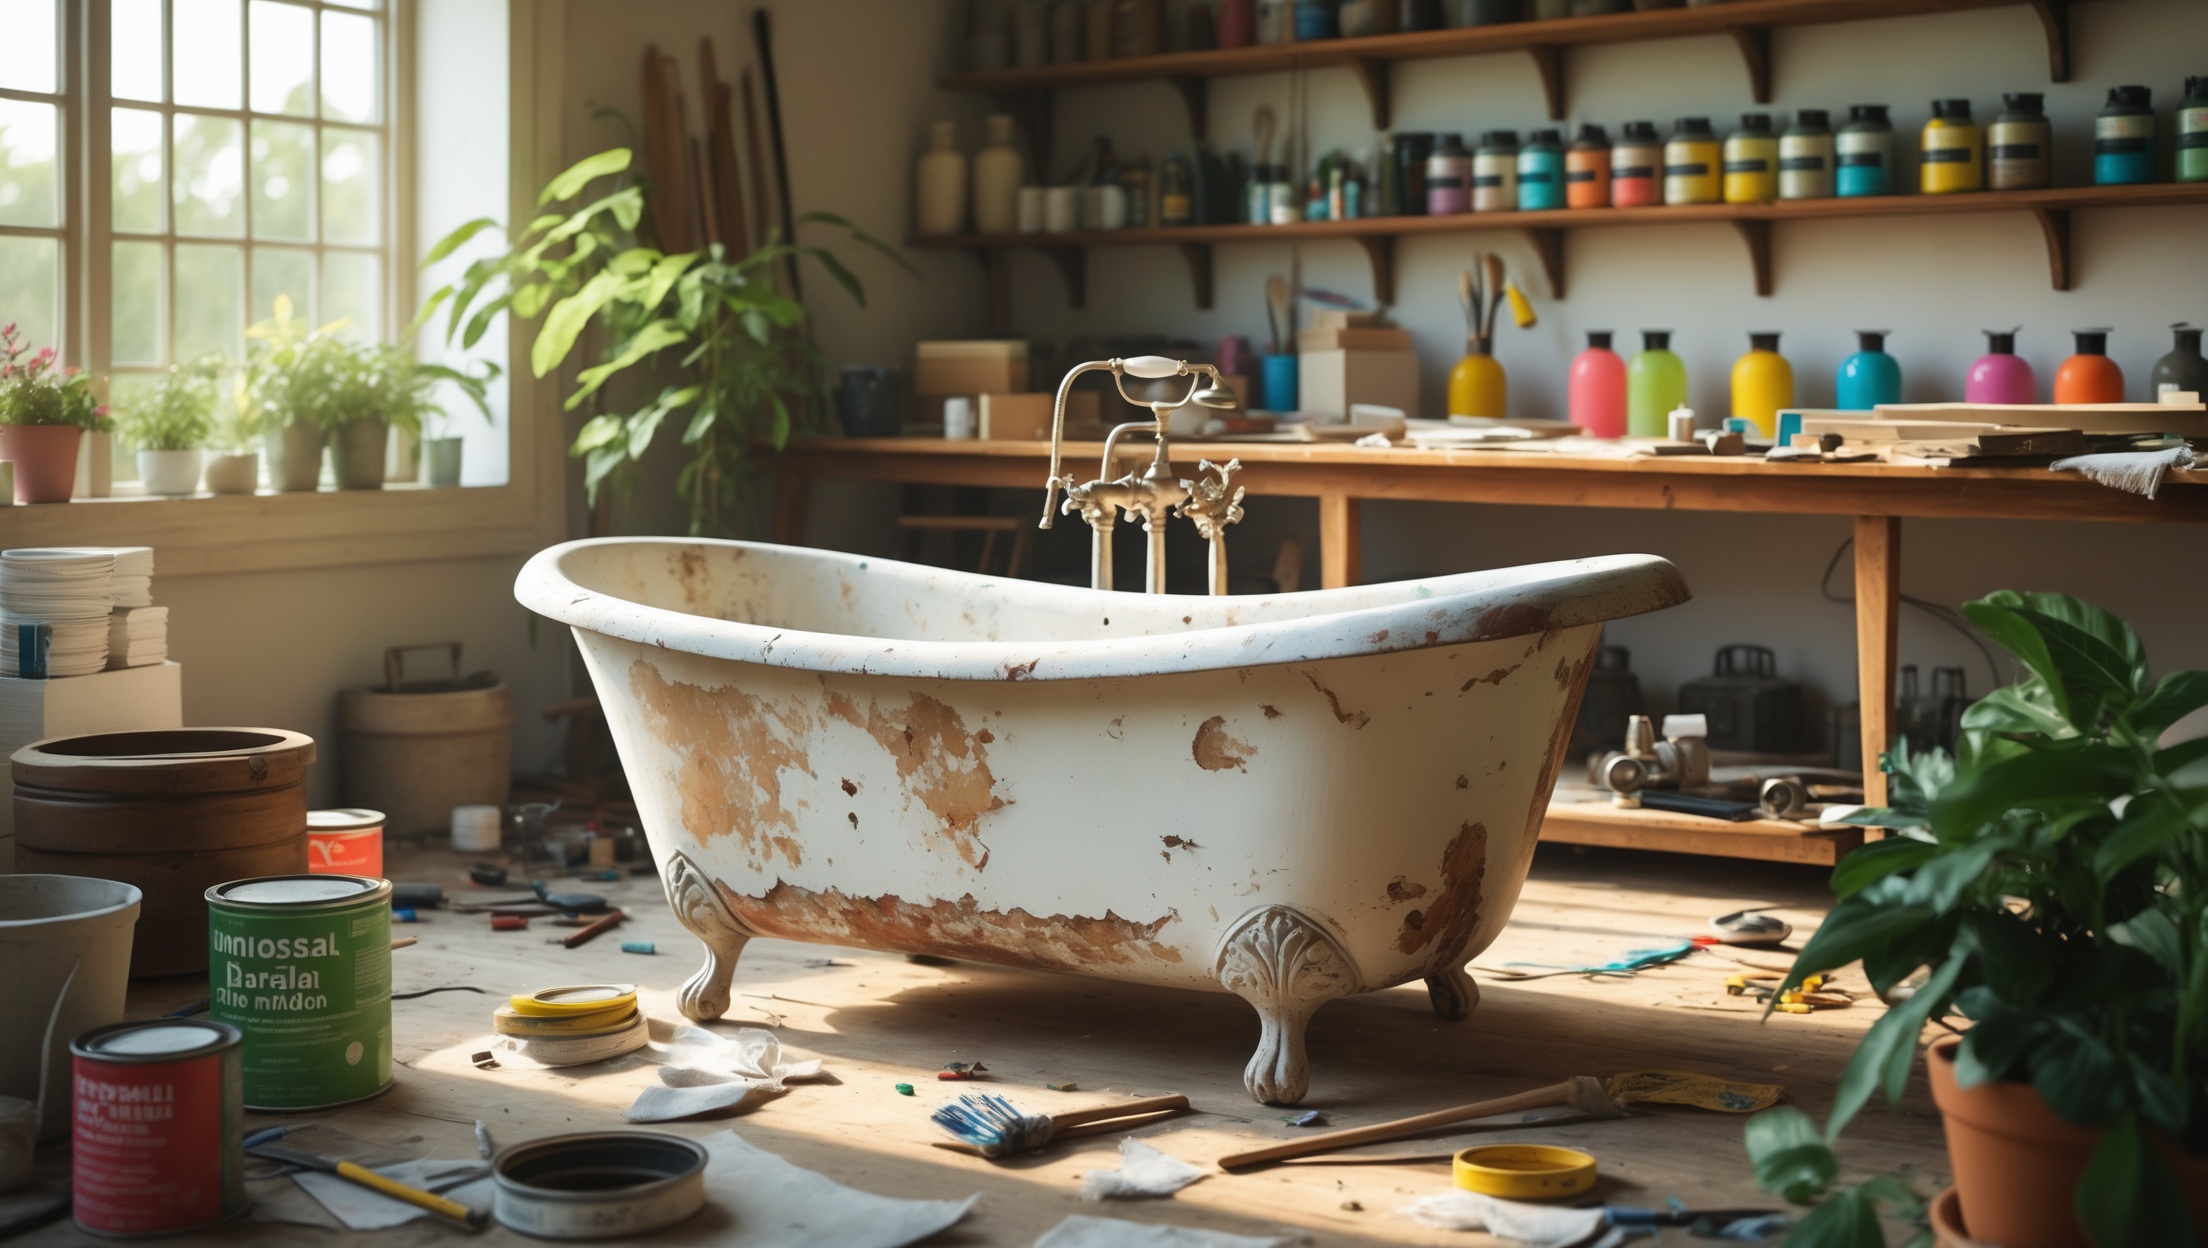
Initial Assessment: Safety and Feasibility
Inspecting for Hazards
Before you begin, inspect your find in a well-lit area. Look for:
- Frayed Wiring or Cloth Insulation: Never use original wiring from fixtures older than the 1980s. Plan to replace all wiring and sockets.
- Lead Paint: Test with an at-home kit if you suspect the fixture is pre-1978. If positive, strip paint using safe, approved methods (never sand or heat, which can release lead dust).
- Asbestos: Some mid-century fixtures used asbestos pads or insulation. If you see a fibrous, grayish material, consult a professional before proceeding.
- Broken Glass or Sharp Edges: Wear gloves and eye protection during handling and disassembly.
Can You Restore It?
- Missing Parts: Research the fixture’s style and era. Many replacement parts (sockets, chains, canopies, screws) are available from specialty suppliers.
- Surface Condition: Minor tarnish, paint splatter, or light rust are usually fixable. Severe corrosion or structural damage may not be worth the effort unless the fixture is rare or sentimental.
Disassembly and Cleaning
Tools and Supplies Needed
- Screwdrivers (flat and Phillips)
- Pliers and adjustable wrench
- Wire cutters/strippers
- Soft-bristle brushes
- Mild dish soap and distilled water
- Microfiber cloths
- Brass polish (if applicable)
- Masking tape for labeling
Step-by-Step Disassembly
Take photos before and during disassembly, so you can reference them later. Remove bulbs, shades, and any detachable parts. Unscrew sockets and gently pull out old wiring. Label screws and small pieces with masking tape as you go. If you encounter rusted hardware, apply penetrating oil and wait several hours before proceeding.
Cleaning Techniques by Material
- Metal: Use mild soap, warm water, and a soft brush for general cleaning. For tarnished brass, a paste of baking soda and lemon juice can be effective, followed by a non-toxic brass polish if desired.
- Glass: Soak glass shades in warm, soapy water. For stubborn grime, use a 1:1 mixture of white vinegar and water.
- Painted or Enameled Surfaces: Wipe gently with a damp microfiber cloth. Avoid abrasive pads that can scratch or remove original finishes.
Repairing and Refinishing
Addressing Metal Corrosion and Tarnish
Light surface rust on steel or iron can be scrubbed away with fine steel wool (0000 grade) and finished with a rust converter or clear coat to prevent recurrence. For brass or copper, avoid harsh chemicals; a gentle polish will bring back luster without erasing patina.
Filling Holes and Smoothing Surfaces
Tiny pits or missing metal can be repaired with metal epoxy, sanded smooth once cured. For decorative details, use epoxy putty and sculpt as needed before painting or finishing.
Painting and Sealing
- Eco-Friendly Paints: Choose low-VOC spray paints or metal enamels for a sustainable finish.
- Clear Coats: For raw metal, a water-based polyurethane or furniture wax protects against future tarnish without yellowing.
Rewiring for Safety and Efficiency
Gathering Modern Electrical Components
- UL-listed lamp wire (in a color similar to original, if aesthetics matter)
- New sockets (ceramic preferred for heat resistance)
- Wire nuts and heat-shrink tubing
- Grounding wire (for metal-bodied fixtures)
- Plug, switch, or ceiling canopy kit as needed
Step-by-Step Rewiring Process
- Plan Your Path: Thread new wire through the fixture body, using a fish tape or stiff wire if necessary. Ensure no sharp edges contact the wire—add rubber grommets where needed.
- Connect Sockets: Strip about 1/2 inch of insulation and wrap wires tightly around socket terminals. Secure with screws.
- Establish Ground: For metal fixtures, connect a green or bare copper wire from the fixture body to the ground screw inside the canopy or plug.
- Secure Connections: Use wire nuts and heat-shrink tubing to insulate all joins. Double-check for frayed wires or loose connections.
- Test: Before installing, use a continuity tester or multimeter to ensure proper wiring. Plug in or mount the fixture in a safe area and observe for any flickering, buzzing, or heat build-up.
When to Consult an Electrician
If your fixture requires significant rewiring (such as multi-arm chandeliers), or if you’re unsure about code compliance for hardwired installations, hire a licensed electrician. This is especially important in older homes with outdated wiring or grounding.
Replacing or Restoring Glass and Shades
Finding Replacements
- Measure openings carefully (diameter, fitting type) to source compatible vintage or reproduction shades.
- Try salvage yards, online sellers, or specialty lighting shops. Many carry new glass shades in period styles.
- If glass is missing but the frame is intact, consider commissioning a local glassblower to replicate the piece.
Repairing Minor Chips and Cracks
Small chips can be smoothed with a diamond file. For hairline cracks, clear epoxy can stabilize the glass, though it may remain visible. Sand edges smooth to prevent injury.
Styling and Installing Your Restored Fixture
Choosing the Right Bulbs
- LED Filament Bulbs: Offer vintage looks with modern efficiency and minimal heat.
- Color Temperature: Warm white (2700K-3000K) best mimics traditional incandescent glow.
- Dimmable Options: For maximum flexibility and ambience.
Placement and Mounting Safety
- Always switch off power at the breaker before installing hardwired fixtures.
- Use appropriate anchors and mounting hardware for fixture weight.
- Ensure ceiling or wall boxes are rated for the fixture’s mass, especially with heavy or multi-arm chandeliers.
Styling Tips for Modern Spaces
- Pair ornate fixtures with minimalist décor for striking contrast.
- Group smaller pendants above kitchen islands or dining tables for a contemporary cluster effect.
- Use salvaged sconces as bedside lighting for a boutique hotel vibe.
Environmental Impact and Sustainable Practices
Benefits of Upcycling Lighting
- Reduces landfill waste and demand for new raw materials.
- Preserves historical design and craftsmanship.
- Supports local economies when sourcing from small businesses or artisans.
Eco-Friendly Restoration Choices
- Select non-toxic cleaners and low-VOC paints or finishes.
- Opt for LED bulbs and dimmers to lower energy consumption.
- Donate or recycle any unusable fixture parts responsibly.
Troubleshooting Common Restoration Issues
Fixture Won’t Light Up?
- Check all wiring connections for tightness and proper insulation.
- Test the socket with a multimeter to confirm continuity.
- Ensure bulbs are compatible and functional.
- Double-check that the power is on and the fixture is correctly mounted.
Persistent Tarnish or Rust?
Try repeated gentle cleaning. For stubborn rust, use a rust remover gel (follow all safety instructions) and seal with clear coat. In humid environments, occasional waxing helps prevent tarnish.
Loose Arms or Fixtures?
Tighten all screws and bolts. If threads are stripped, use threadlocker or replace with slightly larger hardware. For wobbly ceiling mounts, verify that the electrical box is securely fastened to a ceiling joist.
Conclusion: Illuminating Your Sustainable Home with Restored Salvage
Restoring salvaged lighting fixtures is more than an exercise in sustainability—it’s a journey into history, craftsmanship, and personal expression. Each restored piece tells a story, from the hands that originally crafted it to your own careful work bringing it back to life. By choosing to upcycle rather than buy new, you’re not only reducing environmental impact but also creating a unique, meaningful home environment that reflects your values and style.
The process may seem daunting at first, but with patience, research, and the right tools, even beginners can transform discarded fixtures into safe, beautiful, and efficient sources of light. Always prioritize safety by replacing old wiring and consulting professionals when necessary. Embrace imperfections and patina—they’re part of the charm and authenticity of vintage pieces.
As you continue your sustainable living journey, remember that every salvaged fixture you restore is a small act of preservation and creativity. Let your lighting choices illuminate not just your rooms, but your commitment to a greener, more thoughtful world. Happy upcycling!


I’m interested in repurposing several salvaged lamps for my home, but I wonder if there are certain types of fixtures or materials that are more challenging or expensive to restore than others. Any guidance on what to prioritize if I’m working with a limited budget?
When restoring salvaged lamps on a budget, it’s usually easier and more affordable to work with metal or simple ceramic fixtures, as these materials clean up well and replacement parts are widely available. Intricate crystal chandeliers, fixtures with damaged wiring, or lamps made of delicate glass can be pricier and more labor-intensive to restore. Prioritize sturdy fixtures with minimal missing pieces and avoid those that show signs of internal rust, severe corrosion, or complicated rewiring needs.
When looking for vintage fixtures at thrift stores or flea markets, how do you recommend evaluating if a light is worth restoring versus one that might be too damaged or missing too many components? Is there a quick way to assess potential before buying?
When checking vintage lighting at thrift stores or flea markets, look for sturdy frames without severe rust or cracks. Make sure the main structure is solid, even if sockets or wiring are missing—they can usually be replaced. Avoid fixtures with broken glass that’s hard to match or parts that appear custom and impossible to source. Bring a small flashlight to check inside for corrosion. If most parts are present and damage is mostly cosmetic, it’s likely a good restoration candidate.
When restoring a salvaged vintage fixture with outdated or unsafe wiring, do you have any recommendations for sourcing modern replacement parts that still preserve the period look? I want to make sure my rewiring both meets safety standards and maintains the aesthetic of the original piece.
To update vintage fixtures safely while preserving their original charm, look for specialized suppliers of period-appropriate lighting parts. Several companies offer cloth-covered wire, reproduction sockets, and mounting hardware designed for modern electrical standards but styled to match vintage aesthetics. Be sure to choose UL-listed components for safety. Antique lighting shops and online stores focused on restoration supplies are good places to start your search.
When sourcing vintage lighting fixtures from places like thrift stores or salvage yards, what are the main red flags to watch out for in terms of safety or repair difficulty before deciding to take a piece home?
When checking vintage lighting fixtures, look for frayed or brittle wiring, missing or corroded sockets, and broken or cracked glass. Rust can indicate deeper structural issues. If parts are missing or the fixture seems modified in a risky way, repair could be challenging or unsafe. Also, check if replacement parts like shades or bulbs are easily available for the style you’re considering.
When you find a vintage fixture that has old or possibly damaged wiring, how can you tell if it’s worth rewiring yourself versus taking it to a professional? Are there certain signs that make a DIY restoration risky?
If a vintage fixture has visibly frayed, cracked, or cloth-covered wiring, it can be risky to rewire it yourself unless you have solid electrical experience. Look out for brittle insulation, corroded metal parts, or complex multi-bulb wiring—these are signs to consider professional help. DIY is usually safe for simple fixtures in stable condition, but if you’re unsure or the wiring looks hazardous, it’s best to consult a licensed electrician.
I noticed the article highlights the importance of safety with restored fixtures. Is there a recommended process or specific guidelines for having rewired vintage lighting inspected before installing it in a home, especially for those new to electrical DIY work?
It’s wise to have rewired vintage fixtures inspected before use. The safest approach is to take your fixture to a licensed electrician or a certified lighting repair shop. They can test the wiring, check for proper grounding, and ensure everything meets current electrical codes. This is especially recommended if you’re new to electrical work, as safety standards may have changed since the fixture was made.
When you mention safety concerns with outdated wiring in old fixtures, what is the best way for a small business owner to ensure rewiring is up to code? Do you recommend hiring a licensed electrician every time, or are there reliable DIY resources for basic projects?
For a small business owner, the safest approach is to hire a licensed electrician, especially if you’re not experienced with electrical work. This guarantees the rewiring meets current codes and insurance requirements. For minor projects, there are reputable DIY guides and kits, but always check local regulations—some areas require professional installation for commercial properties. Safety and compliance should be top priorities.
I run a local home decor shop and have considered adding restored vintage lighting to my offerings. Could you share some practical tips on identifying whether a salvaged fixture just needs simple rewiring or if it’s structurally too risky to refurbish? It can be tough to tell the difference when sourcing from estate sales.
When sourcing vintage lighting, check for rusted or brittle metal parts, cracked sockets, or damaged arms—these can signal structural concerns that go beyond a simple fix. If the frame feels sturdy and there’s no major corrosion, most issues can be addressed by rewiring and replacing sockets. Always avoid fixtures with frayed wiring embedded within fixed parts, as hidden damage can be unsafe and hard to repair.
I noticed you suggest rewiring as part of the restoration process. If I find a unique chandelier at a flea market, how much time should I realistically expect a full restoration to take for a beginner, from cleaning and assessment to safe rewiring and refinishing?
For a beginner, restoring a chandelier from cleaning and assessment to rewiring and refinishing could take anywhere from 8 to 20 hours, depending on the fixture’s size, condition, and your comfort with tools. The rewiring step alone might take a few hours if you’re careful and follow safety guidelines. Take your time and consider seeking professional help if any wiring seems confusing or damaged.
I noticed you mention refinishing and rewiring vintage lamps to make them safe and stylish. If I find a fixture with missing parts or a damaged shade, are there affordable sources for replacements, or is it better to look for something more complete?
If you find a fixture with missing parts or a damaged shade, there are affordable ways to source replacements. Check local hardware stores, thrift shops, or online marketplaces for compatible parts and shades. Some specialty lighting stores also carry reproduction pieces for vintage fixtures. Restoring with replacement parts can be cost-effective and gives you more creative flexibility, so you don’t necessarily need to find a completely intact fixture.
When rescuing lighting fixtures from estate sales or salvage yards, how do you decide if a piece is worth the effort to restore versus too far gone? Are missing parts like sockets or shades generally easy to replace, or does that make restoration more complicated and expensive?
When considering a fixture for restoration, check its overall structure—look for solid metal or glass with minimal rust, cracks, or dents. Missing sockets or wiring are usually easy to replace and don’t add much cost. However, hard-to-find shades or unique decorative parts can be expensive or difficult to source, so factor that in. If the fixture is severely damaged or missing key elements, restoring it may not be practical.
You mention that restoring vintage lighting can require rewiring and refinishing. For someone who wants to upcycle a thrifted lamp but has no prior experience with electrical work, are there beginner-friendly resources or safety steps you recommend before attempting rewiring at home?
If you’re new to rewiring lamps, it’s smart to start by learning about electrical safety basics. Look for beginner kits or tutorials specifically for lamp rewiring, often available at hardware stores or online. Always unplug the lamp before starting, use insulated tools, and consider having your work checked by a professional. If you feel unsure, many local hardware stores or community classes offer hands-on workshops for beginners.
When restoring a vintage chandelier I found at an estate sale, how do I safely check if the old wiring is still usable, or if it absolutely needs to be replaced? I want to make sure it isn’t a fire hazard before using it in my home.
To check if the old wiring on your vintage chandelier is safe, examine the insulation for cracks, brittleness, or exposed wires. If the wiring feels stiff or you see fraying, it’s best to replace it. Even if wiring looks okay, vintage fixtures often lack grounding and may not meet modern safety standards. For peace of mind and to avoid fire hazards, consulting a licensed electrician is strongly recommended before installing or using the chandelier.
I’m interested in adding a vintage pendant lamp to my home, but I’m worried about dealing with outdated wiring. Is rewiring a salvaged fixture something a cautious DIYer can handle, or should I budget for a professional to do this part?
Rewiring a salvaged vintage pendant lamp is possible for a cautious DIYer, especially if you have some basic electrical knowledge and the right tools. However, safety is key—older wiring may not meet modern standards and could be hazardous. If you’re unsure or uncomfortable with electrical work, it’s wise to budget for a professional. This ensures your fixture is both beautiful and safe to use in your home.
If I find a vintage chandelier at an estate sale that’s missing a few pieces, do you recommend trying to find exact original parts, or is it okay to use modern hardware or parts from other fixtures when restoring it? Which option usually looks better in a finished sustainable home?
You absolutely can use modern hardware or parts from other fixtures when restoring a vintage chandelier, especially if finding exact originals proves difficult or costly. Mixing old and new can look striking and adds a unique character, which often fits well with the aesthetic of a sustainable home. Just aim to match the style and finish so everything feels cohesive and intentional.
When picking out a vintage fixture at a salvage yard or thrift store, how do you tell if the wiring is too outdated or unsafe to even bother restoring? Are there certain warning signs to watch for before buying?
When inspecting vintage fixtures, check for brittle, frayed, or cracked wires—these are clear signs the wiring is unsafe. Look out for cloth-covered or rubber wires, as these often indicate outdated insulation. If the socket is loose or corroded, or if there’s a strong burnt odor, it’s best to pass on that fixture. Even if the fixture looks good, remember that rewiring is usually needed for safety, so factor that into your plans.
Could you elaborate on what tools and materials are typically needed for safely rewiring old lamps or chandeliers found at thrift stores? I am trying to estimate a starter budget for restoring salvaged fixtures for my shop.
To safely rewire vintage lamps or chandeliers, you’ll typically need wire cutters, wire strippers, a screwdriver set, needle-nose pliers, a voltage tester, replacement lamp wire (UL-listed), new sockets if necessary, wire nuts, and possibly a replacement plug. For materials, budget for these tools plus lamp parts, which can add up depending on the fixture’s complexity. A basic starter budget might range from $50 to $150, depending on the quality and quantity of tools and supplies you choose.
If I find a vintage chandelier at an estate sale that has really outdated wiring, is it safer and more cost-effective to try rewiring it myself, or should I always have an electrician handle that? Are there any telltale signs that the fixture is just too far gone to restore safely?
Rewiring vintage chandeliers can be risky if you’re not familiar with electrical work, as old fixtures may have brittle insulation or outdated components. While some DIYers with experience tackle rewiring, having a licensed electrician ensures safety and code compliance. Signs a fixture may be beyond safe restoration include severe rust, cracking or crumbling insulation, and damaged structural parts. If any of these are present, it’s best to consult an expert before investing time or money in restoration.
You mentioned finding fixtures at estate sales and flea markets. If I spot a vintage pendant with missing components, are there resources or suppliers you recommend for sourcing compatible replacement parts, especially for unique or older designs?
For vintage pendant fixtures missing parts, you can check specialty lighting restoration shops or online suppliers that focus on antique lighting, such as companies offering reproduction lamp parts. Many carry a wide range of sockets, canopies, chains, and decorative elements designed to match older styles. It can also help to bring photos and measurements to local restoration stores, as they often have catalogs or can suggest creative solutions for hard-to-find components.
When evaluating fixtures at places like salvage yards or thrift stores, are there any specific signs of wiring damage or corrosion that a beginner should watch out for before purchasing? I want to try restoring a piece but don’t want to end up with something unsafe or beyond repair.
When checking vintage lighting fixtures, look for frayed or brittle wires, exposed copper, or insulation that’s cracked or discolored. Greenish or white powdery buildup on metal parts suggests corrosion. Also, avoid fixtures with melted spots or a burnt smell. If you see these signs, repairs may be difficult or unsafe, especially for beginners. Fixtures with intact wiring and clean connections are better choices for restoration.
When sourcing old lighting at flea markets or salvage yards, what is typically the most expensive part to replace—wiring, missing glass, or decorative metalwork? I’m trying to estimate the budget for restoring a few fixtures and want to avoid surprises.
Among the parts you mentioned, replacing missing glass—especially if it’s curved, colored, or uniquely patterned—is typically the most expensive. Custom glass reproductions or rare vintage pieces can add significantly to your budget. Wiring is usually inexpensive and straightforward, while decorative metalwork costs can vary but are often less than specialty glass unless extensive repairs are needed. Factoring in the cost and availability of glass will help you avoid unexpected expenses.
When you mention that safety is a big concern with old fixtures, especially regarding outdated wiring, do you have recommendations for someone with limited electrical experience on how to get those rewired properly? Should I always hire an electrician or are there beginner-safe steps I can take myself?
If you’re new to electrical work, it’s safest to have a licensed electrician rewire vintage lighting fixtures, especially since old wiring can pose fire risks. However, you can still do some beginner-safe steps like cleaning the fixture, removing old paint, or sourcing new bulbs and appropriate hardware. For anything involving wiring or electrical connections, professional help ensures the fixture is both beautiful and safe to use.
The guide mentions sourcing from flea markets and estate sales, but I’ve noticed a lot of fixtures have missing or mismatched components. Do you have advice on where to find compatible replacement parts, or is it better to mix and match pieces for a unique look?
You can find compatible replacement parts for vintage fixtures at specialty lighting supply stores, online marketplaces dedicated to antiques, or even some larger hardware stores. If authenticity is important, look for shops that specialize in restoration. Mixing and matching pieces is also a popular approach—many people enjoy creating a unique look by combining different styles and finishes. Ultimately, it depends on whether you prefer historical accuracy or a more creative, eclectic result.
You mention finding parts boxes at flea markets for repairs or custom builds. For someone new to this, is it usually more affordable to restore a whole vintage fixture or piece one together from assorted parts, especially considering potential missing components and wiring upgrades?
If you’re new to lighting restoration, it’s typically more affordable and less complicated to restore a complete vintage fixture rather than building one from assorted parts. Restoring a whole fixture ensures you have all the necessary pieces and can focus on cleaning, rewiring, and minor repairs. Piecing one together from parts can be fun but often ends up costing more due to missing components and the extra time spent sourcing compatible pieces.
As someone running a shop on a tight budget, do you have tips for sourcing replacement parts cheaply when restoring salvaged chandeliers or lamps, especially if they’re missing key components like sockets or specialty bulbs?
For budget-friendly replacement parts, try checking local thrift stores, flea markets, and architectural salvage yards—these often have bins of old lighting parts at low prices. Online marketplaces, especially auction sites, can be great for bulk lots of sockets, wiring, and bulbs. Sometimes, hardware stores carry generic replacements that fit vintage pieces. If you need specialty bulbs or fittings, consider joining online forums or social media groups focused on lighting restoration, where members often trade or sell parts affordably.
When shopping at architectural salvage yards for vintage lighting, what are some telltale signs that a fixture is worth restoring versus being too far gone, especially if the wiring is missing or the metal shows significant corrosion?
When evaluating vintage fixtures, check if the overall structure is solid and free from major cracks or breaks, as these are difficult to repair. Surface corrosion on metal is often fixable, but deep rust or metal fatigue can signal serious damage. If the wiring is missing, that’s not a dealbreaker since rewiring is commonly needed for safety. However, avoid fixtures with missing or severely damaged essential parts, such as sockets or intricate metalwork, as replacements can be hard to find. Look for pieces with intact frames and shades, since those are the best candidates for restoration.
I’m curious about sourcing specific replacement parts for older fixtures, especially when pieces are missing or too corroded to reuse. Do you recommend online marketplaces over local salvage yards for finding rare components, and are there trusted sources you prefer?
Both online marketplaces and local salvage yards have their advantages. Online sites like eBay or Etsy offer a vast selection and let you search for specific parts quickly, which is helpful for rare items. However, local salvage yards allow you to inspect pieces in person for compatibility and quality. For especially hard-to-find parts, checking with specialty lighting restoration shops or antique hardware stores can be worthwhile, as they sometimes carry rare inventory or offer advice on substitutes.
I’m interested in refinishing metal on salvaged chandeliers but am worried about dealing with corrosion. Could you elaborate on safe methods or products that work best for cleaning and restoring old metal without damaging the original details?
To safely clean and restore corroded metal on vintage chandeliers, start by gently brushing away loose rust using a soft brass brush or fine steel wool. For more stubborn corrosion, use a mild solution of white vinegar and water, applied with a soft cloth. Avoid harsh abrasives and strong chemicals, as they can damage original finishes and details. Always test any cleaning product on a small, inconspicuous area first. After cleaning, consider applying a clear wax or lacquer to help protect the metal from future corrosion.
If I find a vintage chandelier at an estate sale that has obvious signs of outdated wiring, how can I tell if it’s safe to rewire myself or if I need to bring in a professional? Are there certain red flags I should look for before even attempting a restoration?
If the chandelier’s wiring is frayed, brittle, or has cloth insulation, it’s best to have a professional handle the rewiring. Also watch out for damaged sockets, rusted metal, or any unusual smells—these are signs of deeper issues. Unless you have experience with electrical work and proper tools, vintage fixtures can pose safety risks, so consulting an expert is usually safest.
I noticed the article mentions architectural salvage yards and online marketplaces as good sources. For a beginner, do you recommend starting with items from one place over the other, or are there specific advantages to either in terms of safety or ease of restoration?
If you’re just starting out, visiting architectural salvage yards can be especially helpful. You’ll get to inspect fixtures in person, ask staff about their history, and check for missing parts or damage. This can make safety checks and restoration easier. Online marketplaces often have a wider selection, but you may not know the fixture’s exact condition until it arrives. For beginners, starting locally is usually less risky and more informative.
For someone new to working with salvage yard lighting, what basic tools and supplies would you recommend having on hand for a safe and successful restoration? Is there a cost-effective way to source replacement parts, especially for odd-sized or non-standard components?
For beginners, it’s helpful to have screwdrivers, pliers, wire cutters, a voltage tester, electrical tape, and replacement wiring on hand. Safety glasses and gloves are also essential. For odd-sized parts, try local hardware stores, online marketplaces, or specialty retailers that focus on vintage lighting. Sometimes salvage yards themselves have spare components, so it’s worth asking when you visit.
When looking for vintage lighting at thrift stores or flea markets, how do you know if a fixture is worth restoring, especially if it’s covered in grime or missing parts? Are there any signs that indicate a find is beyond salvage or would be too expensive to fix up?
When checking vintage lighting at thrift stores or flea markets, focus on the fixture’s structure. Look for solid metal or glass components and minimal rust or cracks. If wiring is shot, that’s often fixable, but broken sockets or missing specialty parts might be expensive to replace. Avoid fixtures with badly corroded metal, warped frames, or unrepairable glass. Sometimes, a little grime cleans up surprisingly well, so don’t be discouraged by surface dirt.
When sourcing fixtures from architectural salvage yards or estate sales, how do you judge whether corroded metal can actually be restored, or if it’s too far gone to be safely rewired and reused in a modern home?
When assessing corroded metal fixtures, look for deep pitting, missing structural parts, or extensive rust that flakes off easily—these often mean the metal is too compromised. Surface corrosion can usually be cleaned, but if the fixture feels weak or brittle, it may not be safe to rewire. Also, check if original mounting points or threads are intact, as these are crucial for modern use.
If I find an old chandelier at a thrift store that has missing parts and questionable wiring, how can I tell if it’s worth the time and money to restore compared to just buying a new fixture with a vintage look?
To decide if that old chandelier is worth restoring, first check if the frame is solid and free of major rust or damage. Consider the cost and availability of replacement parts, like glass pieces or crystals. Wiring can usually be replaced, but if the fixture is extremely damaged or missing too many unique parts, restoration costs may outweigh buying a new vintage-style piece. If you love the design and it’s structurally sound, restoration can be rewarding and eco-friendly.
When restoring vintage lighting fixtures that have outdated wiring, are there specific modern wiring materials or safety standards you recommend to ensure the fixture is both functional and up to code for use in a US home?
When restoring vintage lighting, it’s important to use UL-listed or ETL-listed wire rated for at least 300V and high temperatures (typically 105°C). Choose modern cloth-covered wiring if you want to maintain a vintage look. For sockets, replace old ones with new UL-approved porcelain or phenolic types. Ensure all work complies with the latest National Electrical Code (NEC), and consider having a licensed electrician inspect your finished fixture for safety.
When it comes to rewiring old lamps or chandeliers you find at flea markets, how can you tell if it’s a project a beginner can safely tackle at home, or if it’s better to leave it to a professional?
If a lamp or chandelier has a simple wiring setup and you’re comfortable identifying the wires and replacing a socket or cord, it can be a good beginner project. However, if the fixture has complex wiring, damaged insulation, or parts that look corroded or unsafe, it’s best to consult a professional. Safety always comes first, so if in doubt, let an expert handle it.
If I find a unique fixture online but it is missing parts or shows signs of corrosion, is it usually possible to source replacement components easily, or should I expect to invest a significant amount of time and money searching for compatible pieces?
Sourcing replacement parts for vintage lighting fixtures can vary in difficulty. Common components like sockets, wiring, and standard shades are often easy to find at hardware stores or specialty lighting suppliers. However, unique or ornate pieces may require more effort and possibly higher costs, especially if they’re rare. It’s wise to factor in extra time and some additional expense when planning your restoration project.
You mentioned that fixtures can sometimes have missing components or corroded metal. For someone running a small home decor shop, what are the best strategies or suppliers for sourcing authentic replacement parts without breaking the bank?
When sourcing authentic replacement parts for vintage lighting, consider checking architectural salvage yards, estate sales, and local flea markets—they often have affordable, original components. Online marketplaces like eBay or specialty groups on social media can also be useful for hard-to-find parts. For bulk or common hardware, wholesale suppliers for antique lighting restoration may offer better prices. Building relationships with these sources can help you access affordable, genuine parts regularly.
You mention that fixtures from thrift stores or salvage yards might have missing parts or corrosion. For someone new to lighting restoration, how do you figure out if a piece is actually worth the time and cost to revive, versus being better off finding a different fixture?
When evaluating a salvaged fixture, check if its main structure is solid and free of severe rust or cracks. Minor surface corrosion or missing screws are usually fixable, but extensive damage or missing unique parts can mean expensive repairs. If you’re new, start with simpler pieces that just need cleaning or paint, and avoid anything with complicated wiring or unique glass that would be hard to replace.
The article mentions rewiring as a key step for safety, but I’ve never done electrical work before. Are there particular tools or supplies you recommend for beginners, and is it realistic for a first-timer to rewire a vintage lamp themselves, or should I leave that part to a professional?
Rewiring a vintage lamp can be a rewarding DIY project, but safety is crucial. Beginners will need basic tools like a screwdriver, wire strippers, and a voltage tester, plus a replacement lamp cord set and wire nuts. If you’re comfortable following step-by-step instructions and take precautions (like unplugging everything before working), it’s doable. However, if you feel unsure or the fixture is complex, it’s safer to consult a professional electrician.
When restoring vintage lighting with outdated wiring, do you recommend fully replacing all the internal wires or is it sometimes safe to simply repair sections? I want to make sure I’m not overlooking any hidden electrical risks, especially for fixtures from the 1940s or earlier.
For lighting fixtures from the 1940s or earlier, it’s safest to fully replace all the internal wiring rather than just repairing sections. Old insulation can be brittle and may hide damage that’s not visible. Modern wiring ensures your fixture meets current safety standards and reduces the risk of electrical hazards. If you’re not experienced with wiring, consider having a professional handle the rewiring process.
You mentioned refurbishing fixtures from architectural salvage yards and thrift stores. In your experience, is it usually more cost-effective to restore a fixture with missing parts, or should you prioritize ones that are more complete even if they need a good cleaning or rewiring?
Choosing more complete fixtures is generally more cost-effective, even if they need cleaning or rewiring. Missing parts can be hard to source and often add unexpected costs and delays. Fixtures with all their original components typically require less time and money to restore, making the process smoother. Prioritizing completeness usually leads to better results and a more reliable finished product.
When you find a vintage fixture with outdated or damaged wiring, do you usually recommend rewiring it yourself, or is it better to take it to a professional for safety reasons? Are there specific codes or precautions in the US that DIYers should watch out for during restoration?
If you aren’t experienced with electrical work, it’s safest to have a professional rewire vintage fixtures. Old fixtures may have insulation that is brittle or missing, posing a risk of shorts or fire. In the US, rewiring should comply with the National Electrical Code (NEC), which covers grounding, wire gauge, and insulation standards. Always disconnect power, use UL-listed parts, and avoid bypassing safety features. If in doubt, consulting a licensed electrician is the best way to ensure both safety and code compliance.
You mention that architectural salvage yards often have historic lighting, but how do the prices there typically compare to what I’d see at flea markets or thrift shops? I’m trying to figure out which sources are best for a tight budget.
Architectural salvage yards usually have higher prices than flea markets or thrift shops, mainly because their fixtures are often curated, cleaned, and sometimes partially restored. Flea markets and thrift stores can be more affordable, but the selection is less predictable and items may need more work. If you’re on a tight budget, start with flea markets and thrift shops, and check salvage yards for special pieces or when you need something specific.
When sourcing vintage lighting from places like thrift stores or flea markets, how can I tell if a fixture just needs cosmetic cleaning versus requiring a full rewiring for safety? Are there specific warning signs beyond just old wiring I should watch out for?
When inspecting vintage lighting, look for more than just the appearance of old wiring. Signs that a fixture may need full rewiring include frayed or cracked insulation, heat-damaged wires, loose sockets, missing or mismatched parts, or evidence of past electrical repairs. If the plug is unpolarized or the cord feels brittle, that’s another red flag. Even if wiring looks intact, testing with a voltage meter or having an electrician inspect it is the safest approach.
When evaluating a salvaged lighting fixture from a thrift store or estate sale, what are the key signs that indicate the wiring is too outdated or dangerous for DIY restoration? Should I always plan to fully rewire older pieces, or are there cases where that’s not necessary?
When examining salvaged lighting, watch for frayed cloth-covered wires, crumbling insulation, or non-polarized plugs—these are signs the wiring may be unsafe. If the fixture uses knob-and-tube wiring or visibly brittle components, it’s best to rewire. In most cases, full rewiring is safest, even if the original wiring appears intact, since old materials may deteriorate unseen. This ensures your vintage fixture meets modern safety standards.
You mention that outdated wiring and corroded metal are common issues with salvaged lighting fixtures. For someone new to restoration, how can you tell if a fixture is too far gone to be safely restored, especially in terms of hidden wiring problems?
When assessing a salvaged fixture, check for frayed or brittle wires, missing or melted insulation, and rusted or loose connections. If wiring is hard to access or the metal frame is severely corroded—especially near electrical parts—it may be unsafe to restore without professional help. If you’re unsure about hidden wiring issues, it’s best to have an electrician inspect the fixture before starting any restoration work.
When you find a vintage chandelier with damaged or missing parts at an architectural salvage yard, do you have any tips for tracking down compatible replacement components, especially for older fixtures that might not have standard sizes?
For vintage chandeliers, start by bringing measurements and photos of your fixture and its missing parts. Antique lighting shops, online specialty retailers, and even forums dedicated to restoration often stock or can source unusual or discontinued pieces. If you can’t find exact matches, consider having compatible parts custom-made by a local metalworker. Salvage yards themselves sometimes keep bins of loose parts, so ask to look through those as well.
I am curious about how you recommend dealing with missing components when restoring salvaged fixtures found at thrift stores or estate sales. Are there reliable sources for replacement parts, or is it better to mix and match with pieces from other salvaged finds?
When you come across salvaged fixtures with missing components, you have a couple of good options. Mixing and matching with compatible parts from other salvaged finds often yields unique and characterful results, while also being sustainable. However, if you need specific replacement parts, many specialty lighting shops, architectural salvage stores, and online retailers offer vintage-style sockets, chains, or mounting hardware. Choosing between the two approaches depends on your desired look and how authentic you want your restoration to be.
When restoring a salvaged chandelier with outdated wiring, do you recommend keeping any original components for authenticity, or is it safer to replace everything electrical regardless of condition? I want to balance safety with preserving the fixture’s historic value.
For safety, it’s best to replace all original wiring, sockets, and electrical components with modern, code-compliant parts, even if the originals look intact. However, you can usually preserve non-electrical elements like the frame, crystals, and decorative pieces to maintain the chandelier’s historic character. This approach keeps your home safe while still honoring the fixture’s authentic design.
When sourcing vintage lighting from places like architectural salvage yards or estate sales, how can I tell if an old fixture is worth the effort to restore, especially if the wiring or main components are missing? Are there telltale signs that help you estimate restoration difficulty or cost upfront?
When evaluating a vintage fixture, look at its physical condition first—check for cracks, heavy rust, or missing parts, as these can make restoration much harder and costlier. If the main structure (like the frame or shade) is solid and unique, it’s usually worth restoring, even if wiring is missing, since rewiring is common and not too expensive. If rare parts or intricate glass are missing or broken, restoration costs can rise quickly. Try to estimate how much needs to be replaced versus restored, and factor in the availability of compatible parts.
When picking out vintage lighting at thrift stores or flea markets, what are some specific signs that the wiring might be too outdated or dangerous to restore safely? Are there tests you can do on the spot before making a purchase?
When examining vintage lighting, look for frayed or brittle wires, cloth-covered cords, signs of cracking insulation, or exposed copper. If the plug has only two prongs or feels loose, that’s another warning sign. While you can’t run electrical tests on the spot, you can gently flex the cord—if it feels stiff or cracks, it likely needs rewiring. Also, sniff for a burnt smell near the socket or wiring, which can signal internal damage.
I am curious about sourcing parts for fixtures that are missing components, especially if they have uncommon designs. Do you have recommendations for finding matching pieces or reliable modern substitutions when shopping at salvage yards or online?
For uncommon lighting fixtures, start by taking detailed photos and measurements of the missing parts. At salvage yards, bring these with you—staff may recognize compatible items, or you might spot similar pieces among their inventory. Online, specialized vintage lighting retailers or auction sites often carry individual components. If you can’t locate an exact match, look for modern reproduction parts with a similar finish or silhouette. Many lighting stores also offer universal kits that can be adapted to fit older fixtures with a bit of creativity.
I’m new to DIY lighting projects and wondered, after finding a dusty old lamp at a flea market, what are the safest first steps to take before testing or cleaning it? Do you recommend rewiring every vintage fixture, or are there situations where the original wiring can be safely kept?
Before testing or cleaning a flea market lamp, always unplug it and inspect the wiring for cracks, frays, or brittle insulation. If you’re unsure about the lamp’s electrical safety or if the wiring looks old, it’s best to rewire it—vintage insulation often isn’t up to modern safety standards. Even if the wires appear intact, replacing them ensures safety and reliability for years to come.
When hunting for vintage lighting at thrift stores or online, how can you tell if missing components can be easily sourced or if a fixture will end up being more trouble and expense to restore than it’s worth?
When evaluating a vintage fixture, check whether missing parts are common items like bulbs, sockets, or standard mounting hardware—these are usually easy to replace. If the fixture has unique glass shades, custom-fit parts, or decorative elements that are missing, replacements may be hard or costly to find. Research the brand or style online to see if spare parts are available before committing to buy.
I’m curious about finding salvaged lighting at online marketplaces like eBay or Facebook Marketplace. Are there any specific signs or questions you recommend looking for in listings to avoid buying fixtures that are beyond repair or unsafe to restore?
When browsing online marketplaces, look for clear photos showing all angles, including wiring and sockets. Ask sellers if the fixture has any rust, missing parts, or damaged wiring. Inquire about previous repairs and whether the fixture still has original components. Avoid listings where important parts are heavily corroded or missing, as these can be difficult to restore safely. It’s also wise to check if the fixture is compatible with modern wiring standards before purchasing.
When you mention finding pieces at estate sales or salvage yards, how do you recommend handling missing components or matching replacements? Is it usually better to look for similar old parts, or are there good modern alternatives that preserve the vintage look?
When restoring vintage lighting, you can often find compatible parts from other old fixtures at salvage yards or online sellers that specialize in vintage hardware. If original pieces are missing or can’t be sourced, many manufacturers offer reproduction components designed to match vintage styles, such as sockets, wiring, or shades. Mixing authentic old parts with high-quality replicas is a great way to preserve the fixture’s character while ensuring safety and functionality.
I’m curious about sourcing parts for incomplete vintage lamps I find at thrift stores. Are there reliable strategies for tracking down missing components, or is it usually more cost-effective to repurpose parts from other salvaged fixtures?
Sourcing parts for vintage lamps can be tricky, especially if original components are rare or specific. Many enthusiasts find it both practical and cost-effective to repurpose parts from other salvaged fixtures, especially for things like sockets or wiring. However, for unique pieces, online marketplaces or specialty lighting stores sometimes carry reproduction or compatible parts. Combining both approaches often yields the best results—reuse what you can and supplement with new or reproduction parts as needed.
When dealing with salvaged fixtures that have corroded metal or missing parts, what are your go-to sources for finding compatible replacement parts in the US, especially for less common or older pieces?
For salvaged fixtures with corrosion or missing parts, I often look to architectural salvage yards, specialized lighting restoration shops, and online marketplaces like eBay and Etsy for compatible pieces, especially for rare or vintage items. Rejuvenation and Antique Lamp Supply are also good sources for high-quality reproduction parts. For truly unique or hard-to-find parts, local metalworkers or machinists can sometimes fabricate custom replacements to match original designs.
Could you explain a bit more about sourcing missing parts for old fixtures, especially if you find something unique at a flea market but it needs a replacement socket or decorative element? Are there strategies for matching styles or ensuring compatibility with modern bulbs?
When restoring unique vintage fixtures, you can often find replacement parts like sockets, chains, or decorative elements at specialty lighting stores, architectural salvage shops, or online marketplaces. Bring the fixture or measurements with you to ensure a good fit. For matching styles, look for finishes and shapes that echo the original design. To use modern bulbs, select sockets rated for today’s wiring and bulb sizes, but check that they fit the fixture’s space and aesthetics.
You mentioned finding fixtures with missing components—how do you usually go about sourcing compatible replacement parts, especially for unusual or very old lamps and chandeliers? Is it best to look for donor pieces, or are there reliable retailers for vintage-compatible hardware?
When working with unusual or very old fixtures, sourcing replacement parts can be a mix of strategies. Donor pieces from other salvaged lamps are often useful for unique or hard-to-find components. For more common parts like sockets, chains, or canopy covers, there are specialty retailers and online shops that focus on vintage-compatible hardware. If authenticity is essential, donor pieces are a great option, but for safety, sometimes new parts are the best choice.
You mention that fixtures from thrift stores or salvage yards can have missing components. Are there certain replacement parts that are easier to find or substitute than others, especially for someone on a budget trying to keep the project affordable?
Yes, some replacement parts are much easier and cheaper to find. Standard items like light sockets, wiring, and mounting hardware are widely available at hardware stores and online. Shades and glass covers can be trickier, but you can often find affordable substitutes or mix and match styles. Decorative knobs or finials are best replaced with simple, off-the-shelf options to keep costs down.
When restoring older lighting fixtures from places like estate sales or salvage yards, do you recommend replacing all the original wiring as a precaution, or are there cases where the existing wires can be safely reused if they appear in good condition?
When restoring vintage lighting fixtures, it’s generally best to replace all original wiring, even if it looks fine. Older wires may have brittle insulation or outdated materials that aren’t up to modern safety standards. This precaution helps prevent electrical hazards. If you’re unsure, consult a licensed electrician, but in most cases, rewiring is the safest approach for both performance and peace of mind.
When restoring a vintage chandelier I found at an estate sale, how can I tell if the old wiring is too risky to keep versus just needing a minor repair? I want to make sure it’s safe before bringing it into my home.
Inspect the wiring for any signs of fraying, cracking, brittle insulation, or exposed wires—these are clear indicators that the wiring is unsafe and should be replaced. If the wire feels stiff or the fabric covering looks worn, it’s best not to risk it. Even if it looks intact, many experts recommend rewiring old fixtures for modern safety standards. For peace of mind, consider having a qualified electrician check it before installation.
If I find a unique lamp at an estate sale but the wiring looks really old and worn, what are the basic safety steps I should take before trying to plug it in, especially if I don’t have much experience with electrical repairs?
If you find a lamp with old or worn wiring, it’s safest not to plug it in until it’s been checked or rewired. First, inspect the cord and plug for cracks or fraying, and look for loose parts. If you’re not experienced with electrical work, consider taking the lamp to a professional for rewiring. This ensures it meets modern safety standards and reduces the risk of electrical hazards.
When restoring vintage lighting you mention outdated wiring and safety hazards. For someone with zero electrical experience, which steps are truly DIY-safe, and at what point would you recommend calling in a professional?
If you have no electrical experience, it’s DIY-safe to focus on cleaning, polishing, and repainting vintage lighting fixtures. You can carefully disassemble and reassemble non-electrical parts. However, as soon as any wiring, socket replacement, or internal electrical work is needed, it’s best to call a licensed electrician. This ensures your fixture meets safety standards and reduces fire risk.
You mentioned preserving the artistry of old lighting fixtures for modern sustainable homes. Once I find a piece at an architectural salvage yard, is it usually safer to try rewiring it myself, or should I budget for a professional electrician? I have some DIY experience but not with electrical work.
For old lighting fixtures, especially from salvage yards, it’s generally safer to hire a professional electrician for rewiring. Vintage wiring can be hazardous or not up to code, and working with electricity carries risks if you’re not experienced. While your DIY skills are valuable, budgeting for a licensed electrician ensures the fixture is safe to use in your home and meets modern electrical standards.
When buying vintage lighting online, what are some red flags to watch for in photos or descriptions to avoid rewiring nightmares or missing components? I’d love any tips for evaluating those finds before making a purchase.
When browsing vintage lighting online, look closely for signs of frayed or brittle wires in photos—these may mean extensive rewiring is needed. Check that all key parts are shown and mentioned: sockets, switches, mounting brackets, shades, and finials. If parts aren’t pictured or described, they may be missing. Also, be cautious of vague wording like ‘as is’ or ‘untested,’ which could signal hidden problems.
You mention that online marketplaces can be good sources for fixtures, but I worry about hidden damage or missing parts when I can’t see something in person first. Are there any specific questions you recommend asking a seller before buying vintage lighting online?
When buying vintage lighting online, it’s wise to ask for detailed photos from multiple angles and close-ups of wiring or moving parts. Request a list of any missing or non-original components, and ask if the fixture has been tested for electrical safety. Also inquire about the fixture’s dimensions, weight, and whether mounting hardware is included. This can help you avoid surprises and ensure you get exactly what you expect.
You mention that restoring salvaged lighting can involve dealing with corroded metal and missing components. Do you have recommendations for reliable places or methods to find compatible replacement parts for older fixtures, particularly if the original manufacturer is unknown?
For older fixtures with unknown origins, vintage lighting stores and architectural salvage shops are great sources for replacement parts. Online marketplaces specializing in antique or restoration hardware also offer a wide selection of compatible components. If you need something specific like sockets or mounting hardware, try contacting lighting restoration professionals who often have access to a broader inventory or can custom-fabricate parts to match your fixture.